Divinity Original Sin detailed walkthrough with pictures. Divinity: Original Sin. Tips for beginners on the passage Where is Reginald's cellar
Fresh Divinity: Original Sin is full of surprises and may seem too difficult for a beginner. If as a child you didn’t sit all night long playing Fallout or Arcanum, and the best RPGs in your life are Dragon Age and, then you will have to get used to some of the features of Original Sin. This humble guide will help you not get confused at the beginning of the game and quickly reach the desired form for passing it.
Play the way you like
Like most other RPGs, Original Sin starts with a character creation process. In this game, there are two of them by default - out of habit, you can stall at this stage for a good hour.
- Make sure that the physical indicators of the hero correspond to the set of abilities you have chosen.
- We advise you to take a warrior and a magician into the group, which can be found in the first city. The lady owns a two-handed weapon and a rich set of related skills. The mage wields the elements of water and air. To increase the effectiveness of the party, create characters that will not duplicate the abilities of colleagues.
For the rest, do not constrain yourself, play the character you like, or use one of the ready-made templates. There are no strong and weak here - there are just different ones. It's a win-win lottery: no matter what decision you make when creating your character, Original Sin will find common ground with you.
Focus on specific skills and don't get distracted
Formally, Original Sin does not tie your heroes to specific classes. Once you start playing as a mage, you can turn him into a warrior as the game progresses. But it is better to refuse this idea. It would be better not to spend the points received by increasing the level of the hero on all sorts of experiments, but to focus on one thing. The battles in Divinity are quite complex, and the more clearly the roles and functions of the adventurers are distributed, the better.
The same rule applies to social, technical and combat skills. If one of the heroes can talk to animals and pick locks, and the other can repair equipment and trade, then you did everything right. If you are dealing with two battle mages who cannot even heal each other, then something needs to be changed.
In addition to physical characteristics and skills, Divinity heroes have perks. These are character traits, biography details or some other nuances, the right choice and combinations of which can direct the game in an unexpected direction.
For example, the list has the "Zombie" perk, which allows the character to heal with poison, but makes standard healing potions and spells inapplicable. At the very beginning of the game, you will often oppose the undead, which splashes buckets of poison around them. The “Zombie” perk given to one of the heroes will help to quickly seize the strategic initiative.
Choose your perks wisely and try not to waste your perks on ones that simply increase stats or give extra skill points. You can develop both of these each time a character gains a new level. The opportunity to assign a new perk is too rare to just flush it down the toilet.
Save often
Losing one of the heroes in battle, or the entire party in general, is a normal practice even at the beginning of the game. Therefore, try to save often, and most importantly - on time. Any battle at a random moment in time can turn out in an unpredictable way, so saving the game during the battle is also useful.
Don't fool around
Original Sin is able to forgive rash acts, but only at the beginning of the game. If you decide to rob a merchant in the market, he will reprimand you and ask you to put the stolen goods back. If you answer with rudeness, then he will call the guards, and a massacre will begin, which will definitely end not in your favor.
In addition, every misdeed you see lowers your reputation, and it becomes more difficult to play. All inhabitants of the world of Divinity have an attitude parameter towards your adventurers. If this indicator is too low, then the prices of goods will be too high, and the strength of your social skills and the chance to persuade a character in an argument will be too low.
If you decide to test the Original Sin system for strength, then it is better to save first.
Make the most of the elements
Combat in Divinity: Original Sin is designed in such a way that most of the abilities can be used at every turn, and only a few spells need some time to recharge after being cast. The mage Jahan, who can join the party in the first city, is proficient in water and air magic - he has the ability to make rain and spew lightning from his staff at the very beginning of the game. Use it as often as possible!
Rain has a lingering effect, and makes all enemies more susceptible to frost and electricity. Remember that a charge of electricity released in time into a puddle in which a group of enemies stands knee-deep can save your life. Enemies slip on frozen puddles. Surfaces drenched in acid ignite.
But keep in mind that you can easily fall prey to your own traps.
Open every door, go to every forest and go down to every cellar
In Original Sin, it's hard to resist the urge to peek into every dark corner: even if you're strictly focused on the task at hand, you're bound to be thrown into random bindings. Don't worry about the integrity of the story. Divinity knows how to distract in small ways, but you will never find yourself collecting rare mushrooms on the opposite edge of the map from the main action.
Buy lock picks and invest development points of one of the characters in the ability to use them. Carry a sword that you don't need in combat to break chests and doors that can't be opened.
The geography of quests in Divinity is such that the solution to a task issued a few hours (or days) ago can sometimes be found in a completely unexpected place. Original Sin constantly leads the player by the nose and works according to its own logic.
Quests in Divinity: Original Sin are packed very tightly into the game, and their solutions are often located close to each other. Therefore, if you don’t see point-blank where this damned amulet for a talking cat is, then most likely you simply haven’t studied the area and what the characters are telling you carefully enough.
Improvise in crafts and read books
An endless number of books with spells, new skills and potion recipes are scattered around the game world. Feel free to read everything you can find. After a couple of hours of playing, a huge amount of junk will accumulate in your inventory, from which you can collect disposable items on your own, and not spend money on them in cities. Look for instruction books and don't be afraid to make mistakes. Even if the experiment does not end with anything good, in a minute you will find another mountain of ingredients for the product you are looking for.
Remember that books are the only source of new skills for all classes.
Focus on the area
After you fully explore the first city of Cysil, a sufficient number of tasks for exploring the area outside the walls will accumulate. Be careful: several gates lead outside the city, you need to exit through the western one. The sign will say: "West Gate".
In general, there is a little problem with orientation in the opening of Original Sin, so the easiest way to do this is to hover over the enemy and look at the number of his level. If it is equivalent or a couple of figures higher than the level of your heroes, then you are going in the right direction. If the level of the enemy is three to five numbers higher than yours, then you need to go the other way.
We hope that these tips will help you overcome the difficulties that an unprepared player can face in the debut of games of this scope and depth. The main thing in Divinity: Original Sin is not to rush and study the game measuredly. Otherwise, you can do everything here that is provided by the mechanics. Just remember to save ahead of time.
 "Divinity - Original Sin" is a turn-based isometric role-playing game with the possibility of cooperative passage of the main storyline, a prequel to "Divine Divinity. The Birth of a Legend". The developer and publisher is the Belgian company Larian Studios, the fundraising for the project took place through the Kickstarter website. The release took place on June 30, 2014 for Microsoft Windows. Once upon a time, the Guardians healed the sick and wounded with the help of a power that was called the "Source". Over time, the source was corrupted, and the guardians were consumed by madness, and now they use the power to plunge Rivellon into chaos. Several Seekers set off in search of the Source in order to protect the world from the impending darkness at all costs.
 City of Saisil
After talking with Master Arhu, you can immediately go to investigate Councilor Jake murders, however, there are many NPCs in town who can give you quests.
city plan
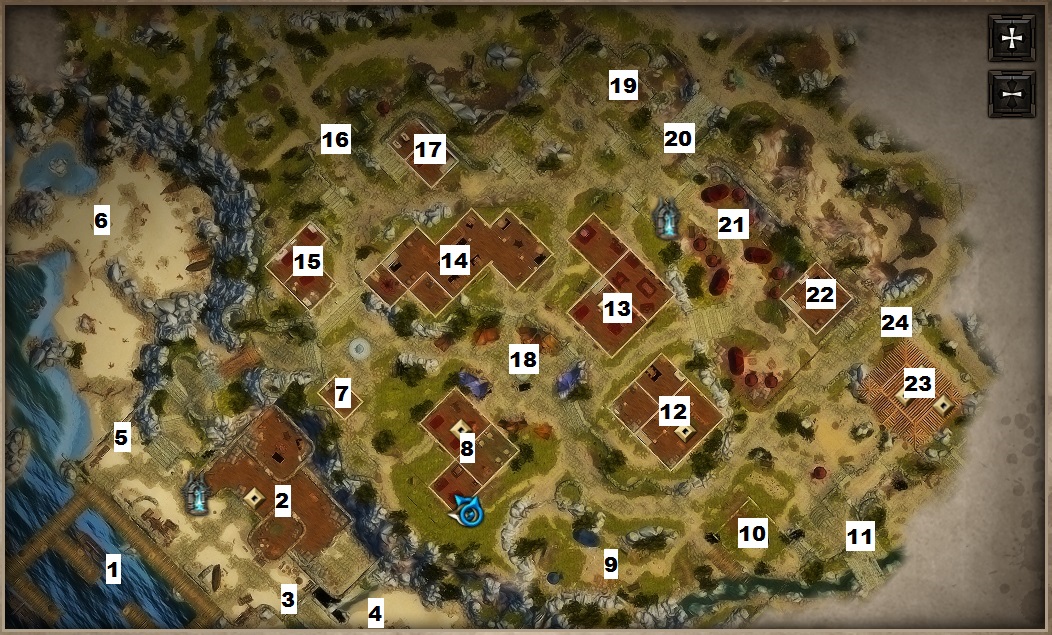
1 - Port Saisila; 2 - Port warehouse; 3 - Harbor gate; 4 - South Beach;
5 - Southwest gate; 6 - West Beach; 7 - Evelyn's House; 8 - Theliron Sanctuary;
9 - Area; 10 - Abandoned house; 11 - Southeast gate;
12 - Esmeralda's Shop (2nd floor of the building - Esmeralda's House); 13 - City Hall (Library);
14 - King crab; 15 - General Store; 16 - North Gate
17 - Funeral home; 18 - Central market; 19 - Cemetery; 20 - East Gate
21 - Legion Camp; 22 - House of cooks; 23 - Headquarters of the Legion; 24 - East Gate
Sysil is a safe place, which can not be said about the surrounding area. Therefore, you should not leave the city until you complete all the tasks in order to get the highest possible level at this stage. In addition, you can get new members of the squad. On the second floor of the library building near the entrance you can meet Jaana, he wants to join your squad (a waterbender who hunts demons, so he will become a member of the squad only on the condition that deals with demons will not be made). Another possible candidate for your squad is Madora, located on the first floor of the King Crab.

Fire! Fire! Fire!
Upon entering the city, we immediately turn left and move to the pier, you can see how several sailors are trying to put out the ship. We use the spell "Call Rain" and save the ship (the scroll can be purchased at the store, in case of absence). Gain experience and +1 reputation. 

Sailors without a ship
On the pier near the sunken sea vessel are Louis, Max and Philip, who, along with the ship, have lost the opportunity to earn money, it is necessary to help honest sailors in search of work. We are moving to the central market of the city, near the fountain Captain Jack will walk in a circle, who will be able to offer work to sailors. Next, you need to return to the pier and turn in the task. 

fish thief
 In the market near the fish shop we meet Robin, who is trying to steal the fish. You can dissuade him from committing this crime, or turn a blind eye to the theft (in this case, legionnaires will immediately come running and you will have to lie).
 Elf Orc: Blood Feud
In the southern part of the city (see the map), you can meet an old elf named Eglander, who asks for a meeting in a room in the King Crab tavern. 

We go to the tavern and go up to the second floor of the building, Eglander's room is in the center. 

Eglander tells the sad story of his elven home. One night, orcs of the Kazuldagar tribe attacked the NPC's hometown and killed all the inhabitants. The last elf of the Gandavum house was able to destroy everyone from the hated tribe, except for the last child, who became an exemplary resident of the city of Saisil. The name of the last representative of the Kazuldagar tribe - Victoria, librarian.
 The player is faced with a choice - to make Victoria pay for the crimes of her tribe, or to solve the problem differently (Eglander shows clear signs of schizophrenia and has long lost touch with reality). We leave the tavern and head to the library (the library is located on the second floor of the City Hall). We talk with the librarian Victoria, there are several options for solving the indicated problem: 1) Kill Victoria and take the amulet
The assistant librarian will also participate in the battle. After completing the quest, in addition to the amulet (which you will need to give), you will receive several scrolls, several books, +300 experience for winning the battle, +1800 experience for completing the quest and + 1 Heartless. 2) Stop Eglander
Talking to the Mayor Cecil, which allows you to use any means to fix the problem (the Mayor raised Victoria as his own daughter). Next, we return to the tavern and attack the elf. After the victory, we get +750 experience, +1800 experience for completing the task, + 1 Heartless (we also get Eglander's inventory). 3) Take the amulet from Victoria and trick Eglander With help impact get an amulet, you need to win four times in the game "Rock-Paper-Scissors", which method is right for you ("Intimidate", "Convince", "Charm") depends on the skills of the character. Next, we return to the tavern and complete the task (we get +1800 experience for completing the task, +300 for warning NPCs about danger and +1 Condescending). 4) Report Eglander to the legion to have the elf arrested
We move to the headquarters of the legion and speak with Aureus, who will arrest the old man only if you provide strong evidence of his guilt (we get +1 Righteous).
Charmed I'm sure
Behind the warehouse will be two legionnaires and an orc, who was mistakenly enchanted with the potion, and as a result, she fell in love with one of the legionnaires. The main characters must decide what to do with this trio. Marius - claims that the dangerous "pet" must be killed and Ninnius asks to leave the orc alive. Solution options:1) Kill a besotted orc.
Reward - +225 experience. Consequences - Ninnius will begin to take revenge on Marius.
2) Leave the orc alive.
Reward: +1 Romantic, +225 experience. Consequences - the orc will later come to her senses and kill both legionnaires.
Warming up the crowd
On the city square you can watch how Reginald shows a performance with a talking head, while Cedric(another artist, standing at the east end of the square) has no audience at all. Your task is to find out the reason for Reginald's popularity. Move to the show and talk to Gallagher, who works as a local barker and draws a crowd for a small fee. We return to Cedric and tell him about the barker, as a result, the artist asks to recruit Gallagher (for example, he can be intimidated or charmed). Next, we tell Reginald about the ringleader and complete the task (Reward: + 130 experience).Murder Mystery
We return to the main task, we head to the headquarters of the legion, we need to talk with Aureus. The commander of the local branch of the legion asks to report any oddities, and we are also allowed to the crime scene in the tavern. We head to the "King Crab" and get into the room in which the murder took place. As soon as the main characters go inside, they are transferred to another dimension by the star stone in the room. 

 The heroes come to their senses on a small island in space ( End Times), we speak with the imp by name Zixzags, which suggests looking through a telescope (he explains that the starstone has transported the source seekers to another dimension). We open a portal through which we get to a new location. We follow the imp and meet Weaver of time. After talking with the mysterious girl, we talk with the imp, get a personal teleporter and return to the city.

We move to the crime scene, break open the chest in the room and get letter for Councilor Jake's wife from Duke Ferol (Quest Counselor's wife). The main characters examined the crime scene, now it is necessary to examine the body of the victim.
Counselor's wife
A love letter can be regarded as a motive for committing a crime. We head to Esmeralda's Shop and speak with the wife of adviser Jake, Esmeralda denies her guilt (she rejects the letter as evidence, and characterizes the duke as a spoiled person). We rise to the second floor (2nd floor of the building - Esmeralda's House) and select key from another part of the house. 

We enter the house with back door(you should not do this in front of the patrol) and examine the room for evidence. There is a book on the table "Perfect Murder", the content has an unambiguous description of the preparation and commission of a crime. We go down to the basement and remove the hanging hams near the stairs, activate the found button(the mouse can tell about its presence) and get into Esmeralda's secret button. 

We raise indoors bloody knife and we go up. We head to the shop and present the found evidence to Jake's wife, to which the suspect finds an explanation and offers to pay attention to Evelyn, an apprentice of the healer Thelyron. After the hunt, Jake received a mortal wound, but Evelyn saved him from death, it was after these events that the adviser became detached and gloomy.
Murder Mystery (continued)
We move to the hospital and speak with Teliron, he reports that his student has disappeared. Go to the next room and pick up backpack suspect, inside which will be house key.


We go outside and move to Evelyn's house, open the door and select a diary, which contains information about secret lair(mark on the map), access can only be accessed using spells(scroll in the chest). We return to the study of the body of the victim, head to the funeral home and talk with Undertaker Roberts, he claims that the body of the deceased is in the cemetery. 

 We head to the north of the city and dig up Jake's grave, inside there will be sheep corpse, the adviser's body is gone. We talk with Murphy (the dog of the deceased), he can help in identification, you just need to bring the things of the suspects. We return to the undertaker and present evidence, influence the undertaker and get information: the undertaker really buried the sheep, but he doesn’t know where the body went (it was stolen). We also find out the list of suspects: Captain Aureus, Mer Cecil, wife of Esmeralda, apprentice of the physician Evelyn. It is necessary to bring everyone's things Murphy(dog) for identification. Evelyn's coat will be in the bedside table in the hospital, Esmeralda can take underpants(2nd floor of the Bench building, chest in the center of the room).

To borrow things from the mayor, you need to get into the room and find shoes in one of the cabinets (the key will be next to the stairs). Aureus can be borrowed socks(in the nightstand next to the bed). 

We return to the cemetery and talk to the dog, Murphy points to Evelyn. Previously received location information refuge the healer's apprentice, however, in order to find shelter, it is necessary to leave the city (at this level, it is quite difficult to overcome the hordes of the undead, but it is quite possible to clear part of the territory adjacent to the city from the north, or you can go to the western beach). This article is part of the Divinity Complete Walkthrough - Original Sin series.
Keywords: divinity - original sin, divinity, saylis, fire! fire! fire!, burning ship, sailors without a ship, fish thief, elf-orc blood feud, eglander, victoria, librarian, warming up the crowd, enchanted, murder mystery, end of times, king crab, weaver of time, zixzagz, counselor's wife, evelyn, undertaker, body, dog, things of suspects
general information
Plot
In the olden days, the Keepers of the Well healed the sick and wounded with the help of a great power called the Well. But a terrible darkness filled the lands of Rivellon and the Well was forever corrupted. Madness has gripped the Guardians and now they are only destroying everything around.
A few brave Source Hunters are all that stand between Rivellon and the Dark Power that threatens to destroy him. Wherever the Source appears, the Hunters will follow it."
Arrival
At the beginning of the game, we can customize two heroes: the priest Roderick and the robber Scarlett.
The heroes on the ship go to the city of Saisil to investigate the crime. Because of the orcs off the coast of the city, the heroes have to land a little south.
Divinity: Original Sin detailed walkthrough with pictures
We can collect shells on the shore. It's hard to see them with your eyes, but you can press "Alt" to highlight all the items you pick up, this makes the task very easy.
Ahead we see how a group of necromancers runs out of the cave, one of them calls for the undead. We conduct the first battle, get acquainted with the turn-based battle mode. Each action, such as moving, hitting, using a potion, or changing weapons, consumes action points (shown at the bottom of the screen). At the end of the move, press the spacebar.
After the victory, we can go into the cave, but this is not necessary.
Divinity: Original Sin. Walkthrough 
We learn the following features of the game Divinity: Original Sin:
“Water magic can extinguish fire areas.
- Acid clouds can be dispersed with fire magic.
- Oil puddles can be set on fire with fire magic.
- Surrounding objects can be destroyed by blows (hold "Ctrl", press the "left mouse button"). Even wooden doors are destroyed. However, this also reduces the durability of the weapon.
- Locks can be picked with picklocks. There may be traps on the locks, they need to be neutralized with tools.
- You can switch to stealth mode and sneak up on enemies unnoticed.
- There may be mine-type traps on the floor. The higher the level of the trap, the harder it is to spot them. The “perception” ability is responsible for finding traps and other items.
- In the game, you can move surrounding objects such as boxes, chests, vases (select an object, hold down the left mouse button, drag the object, release the button).
- Items can be placed on pressure plates to activate them.
- Heroes can be temporarily separated so that they do not follow each other. To do this, drag the icon of one character away from the other so that the chain breaks between them. You can combine characters in the same way.
At the end of the cave we find ourselves in a tomb, where the undead wizard and a couple of his students come to life. We learn that it was from the grave of this ghost that the necromancers stole the crystal.
Divinity: Original Sin detailed walkthrough with pictures  We go back to the surface. At the bottom of the level near the shore, you can find a quick access portal. Nearby there is a shovel, and a little higher - a light heap of sand, where you can dig out the first cache.
Quest Shell on the beach
From the teleport we go along the coast to the right. At the dead end we find a giant shell. (Here you need to have the Animal Friend perk in order to hear the shell. If we don’t have it from the very beginning, then we need to return here a little later). The shell asks to be thrown back into the sea. There are two options: 1) we take the shell for ourselves and sell it on the market, 2) we throw out the shell, in gratitude it takes us a chest of gold from the bottom (altruist +1).
We go to the upper left corner, we meet two drunken guards on the way. We can fight, but it's easier to negotiate with them and move on to the city.
We go to the big beach. There is already a small battle going on here, and then an orc ship sails in and a few more fighters land. Below, near the orcs, there is a barrel of oil, we can destroy it with arrows, and then set fire to the resulting puddle with fire.
After the victory, we go to the gate, we communicate with the master Arhu, he knows something about our task, and asks to meet in the northeastern part of the city. We enter the city.
We recommend going around the whole city and visiting all the houses. From the city there are several gates outside, but dangerous monsters are found around the city. The weakest of them are level 5. Your task now is to go around all the inhabitants and complete their simplest additional quests in order to gain experience and level up to at least level 3. You can also add two new members to your group.
In the houses you can find many useful items. All of them are highlighted in red, which means that they belong to someone, and you can’t just take them like that. If we are convicted of theft, then the guards will be called, and with them either a losing battle, or a prison. But if you take the object so that no one notices us, then nothing terrible will happen. First of all, it is worth collecting gold dishes from tables and paintings on the walls. Other household items cost a penny, it is pointless to steal them.

Quest: Fire! Fire Fire!
Divinity: Original Sin. Passage of Cyseal
On the south coast of the city we see people extinguishing a burning ship with buckets of water. Time to complete is limited, so act quickly. We run to the central market of the city, we buy the rune "Rain" from the sorceress for 920 gold. We use the rune, we get a new spell on the quick access panel. We return to the coast, arrange rain over the ship. Reward: 900 XP.
Quest: Sailors without a ship
Divinity: Original Sin. Walkthrough
From the extinguished ship we go further down to the edge of the pier. We see three sailors near the broken ship, they ask to find a new job for them.
Jobs can be offered by Captain Jack, who stands in the central market next to the fountain. Reward: 180 XP.
Quest: Charmed, I'm sure
Divinity: Original Sin. Walkthrough We enter the port warehouse, we pass to the right door. In the backyard, two guards are arguing over a female orc. Randomly, a love potion was used on the orc, and now she is in love with one of the guards. The second guard wants to get rid of this possible danger.
Legionnaires ask our opinion. There are two possible answers. If we leave the orc alive, we get a character change "Romance +1". (But when we come back here next time, we will see already dead legionnaires).
Reward: 225 XP.
Quest: Warming up the crowd
Divinity: Original Sin. Walkthrough Warming the Crowd
To the south of the central market there is a separate square where artists perform. 1st artist - Reginald, he entertains the crowd, showing her a magical talking head. Among the spectators we find Gallagher, who works as a ringleader, gathers a crowd around him, and receives money from Reginald for this. At the eastern end of the square we see the 2nd artist - Cedric. He has no audience at all. We communicate with Cedric and tell him about the reasons for the success of another artist.
Cederic asks us to outbid Gallagher's ringleader. We go to Gallagher and try to convince him: intimidate (strength), flatter (attractiveness) or convince (charisma). We choose the method where the characterization of the hero is highest. If everything goes well, we speak about this to Reginald, and then we take the reward from Cederic.
Reward: 125 XP.
Divinity: Original Sin. Walkthrough A Mysterious Murder
We return to the main quest. We go to the barracks in the northeast corner of the city (it is indicated by marks on the global map). On the lower floor we communicate with Captain Aureus, he gives us permission to search the crime scene. We also get three side quests from him - helping ordinary legionnaires outside the city.
On the second floor of the barracks we communicate with the cat - this is the turned magician Arhu. The wizard will tell you everything he knows and advise you to meet with the gravedigger to examine the corpse of the murdered. 
We approach the local tavern "King Crab" to the north of the central market. Mendinus stands at the entrance and offers to join his guild of heroes. Although his description of the guild is more like a modern marketing company, he is not trying to deceive you. After joining the guild, access to a whole branch of additional quests will open. But they need to be done already outside the city.
New hero. Inside the tavern there is a Madora girl. She is ready to join our group. Madora is an expert in two-handed weapons, she can easily break skeletons in half. But you should know that Madora is very belligerent against enemies. If you try to negotiate in a good way with opponents, then this will bring discord in relations with Madora.
There is a locked room in the southwest corner of the tavern, guarded by a guard. We inform you that we have permission from the captain, we go inside.
In the room of the murdered adviser Jake we find a strange Star Stone (1/16), it will create a flash, but it will not cause damage. After that, the stone strangely takes us to another world.

We ended up on a small island of earth in space. Nearby we see an imp named Zikszaks and a large telescope. From the tiny world through the portal in the south we get into the hall with many non-activated portals. Here we are talking to a girl sitting in front of the loom of time. We get the task to collect more magic stones to open all the other portals. The imp will give us a pyramid portal, which can instantly transfer us to another pyramid of the same kind.
To get out of this world, you can use the quick teleport panel (a small button on the right edge of the screen). But this time it is better to immediately teleport using the pyramid. We find ourselves in the bedroom, where the girl washes in the bathroom. The girl raises a panic and wants to call security, you need to convince her in any way. After that, we take the second pyramid for ourselves and leave the room through the south door.
(If you are playing in co-op, then leave it to another character, and keep the original for yourself. Thanks to this, you can port to each other at any time).
We already found the first stone during the main quest "Mysterious Murder". (Opens access to another world).
2nd stone. We enter the hospital of Teliron. We pass into the east room. We solve the dispute about the stone in any way: 1) cure the old man and his family with a stone, 2) cure the young man. When Evelina uses the Starstone (2/16), we will get its energy. (The stone opens access to the Hall of Heroes room.
The following stones will be found further along the plot.
New hero. In the Hall of Heroes, you can recruit one more new hero of your choice (recruitment cost: 600 - 1500 gold). Also, all the heroes that we will exclude from the group will fall here).
Divinity: Original Syn. Walkthrough

We return to the story quest. In the killing room, we need to open the chest of the 5th level. If there are no master keys or a hacking skill of this level, then we can just stand a little and beat the chest with ordinary blows. In the chest we find a letter. We select an inert stone from the floor.
We go to the Funeral Home in the northeast of the city, right above the tavern. Inside we enter the left room, on the lying coffin we take the book and read it. We learn that the dead body was stolen. We rise to the second floor, in the southern corner we communicate with the undertaker. He confirms everything, but you need to verify this personally.
We go to the cemetery in the northern part of the city. Jake's grave we need is the top one, in the northern corner. We dig up the grave of the dead, in the coffin we find the corpse of the animal. The body was indeed stolen.
Quest: Little Bo Bertia lost her sheep
The found body of a sheep can be attributed to the girl Bertia, she stands in the south of the central city square. It was her sheep that was stolen, return it (+300 XP).
Quest: Philosopher
In the cemetery, in the grave to the left of the crying mother, you can dig up the ghost of Nemris. It is necessary to pass a test for knowledge of his philosophical book (the book is located -). Correct answers: no, no, your salvation. +600 XP, chest and achievement.
A dog runs around the cemetery and constantly barks. If we have the skill of communicating with animals, then the dog will say that from the personal belongings of the suspects, she can definitely tell who was Jake's killer. We begin the search for personal items.
1) You can steal socks from Captain Areus.
2) You can steal Esmeralda's panties from the chest on the second floor.
3) In the mayor's house in the northern locked room, boots can be stolen from the closet.
4) In the hospital, you can search Evelina's bedside table in the upper right corner, there we will find a coat.
We take all the things to the dog, she will say that Jake's smell is only on Evelina's coat. Words of a dog cannot be sewn to the point, but for that we got additional experience.
We pay attention to the fact that the dog in the cemetery constantly barks at the grave on the right, where the name David is carved. We also dig this grave, as a result, a revived skeleton appears on the surface. We kill him, we get some experience. (But we do this only after completing the quest with things, since the dog will most likely be killed in a fight with a skeleton).
In one of the southern graves, you can dig up a skeleton bomb. This enemy will try to explode near us. The easiest way to defeat him is with a teleportation spell, moving him away from you.
The Councilor's Wife
Now we need to interrogate the suspects. Chief among them is the wife of the murdered man, Esmeralda.
We go to Esmeralda's store in the southern district of the city. The girl is standing behind the counter, she is guarded by one of the guards. We communicate with Esmeralda. She needs to present concrete facts of her guilt. We tell her about a letter from her lover found at the scene of the murder, but she rejects this evidence as evidence, and confidently considers herself innocent. 
From the store we go up to the second floor with living rooms. Among the things we find Esmeralda's key. We go outside, we approach the same building from the upper north side, with the key we open the door to the room.
On the table at the entrance we find the book "Perfect Murder". In the next southern room we open the hatch in the floor, we go down to the basement.
In the basement, we remove the hanging pieces of meat from the wall, behind them we find the button, press it, as a result, a secret room will open. Inside we find a bloody knife. After that, we can search the entire basement and collect the most valuable things. There is a lot of armor with magical effects that you must first identify before putting it on.
We return to Esmeralda's store. We show her new evidence: a book and a knife. The girl finds logical explanations for this. Esmeralda is definitely not guilty. After interrogation, she advises to take a closer look at the doctor's assistant - Evelyn.
Reward: 1800 XP.
Quest: Murder Mystery (Evelyn)
Divinity: Original Sin
We go to the hospital south of the city center. If you've been here before, you've seen a young girl, Evelyn. But when we come here after Esmeralda's interrogation, Evelyn will be gone. The healer Theliron himself does not know in which direction his assistant went, but he knows where her house is located outside the city. In the next room, on the table between the windows, we examine the left backpack of Evelyn, we find the key to her house.
(In the hospital room, we can quietly take the key and open the southern room. There are a lot of valuable and magical items).
We leave the hospital through the south door. There is a grave in the backyard that glitters from time to time. This is an insidious trap from the developers. If you start digging this grave, you will immediately explode.
Evelina's house is a small house to the left of the hospital. We approach the south door of the house, raise the key near the bucket. We open the doors, inside in the chest on the right we take the spell for shelter. We take Evelina's diary from the table and read it. We learn about her shelter on the northern beach. A marker appears on the map, but we can't go there yet.
Quest: Elf - Orc Bloodfeud
Divinity walkthrough Elf-Orc Blood Feud
In the mayor's house we go up to the second floor, we get into the library. Here you can read about a dozen recipe books for free. An orc girl watches over the library.
New hero. Here in the library we meet the magician of water and air named Jaan. He wants to join our squad. Jaan has spells: teleport enemies, ice shot, call rain, lightning strike, heal. This will be a useful acquisition for the team.
We go outside. Old man Eglandir sits on the landing north of the funeral home. He asks for our help in one matter, and goes to the second floor of the tavern. In his room, he announces that he wants to kill the last orc from the enemy tribe - that same Victoria. We have three options for action:
1) Inform the captain about the impending crime, and imprison Eglandir.
2) Kill the librarian Victoria.
3) Inform Victoria of the danger (+300 XP), take the amulet from her, take it to Eglandir and cheat about killing the orc (1800 XP, Indulgent +1).
Other city quests, vendor locations
Divinity: Original Sin. What is in the city
We return to the south coast of the city. Here on the pier there is a chest, the path to which is blocked by a stretched rope. To cross the rope, you can use the Dash ability that Madora has. You can also transfer the teleportation pyramid. Inside the chest are a couple pieces of armor.
In the kitchen building, not far from the barracks, when we enter for the first time, a chicken will run away from the cook. We have a choice: 1) catch the chicken, 2) keep it alive. If we have the Animal Friend perk, then we can talk to the chicken.
At a dead end from the bottom of the kitchen we find a chest, in it is a dusty parchment "First Sister". (This is the code for the last chest in the End Times).
Having accumulated more money, we can go to the market, there, to the left of the paintings, they sell secret cards. After the purchase of each card, marks with secrets appear on our global map.
Before leaving the city, you need to equip the heroes to the maximum.
Items for warriors are sold in Esmeralda's shop.
Things for archers in the central market to the left of the paintings.
Things for thieves in the tavern on the second floor of the girl Sheriff.
Things for the magicians of air and water at the sorceress in the market on the right.
Things for magicians of fire and earth in the barracks on the second floor near Arhu.
"Talking Statues"
Reward: 3400 experience
On the way to the city, at the beginning of the game, you will notice a corpse, and next to it is a magazine. From it you will learn that a certain statue gave him the ability to fly, which is not particularly noticeable in this body. Put this mystery aside until you arrive in the city.
Once in the city, go north and find the entrance to the cave. The entrance is guarded by ten enemies. Deal with enemies and with the robot that will be in the cave. The robot is needed on the assignment "The Magnificent Five". After defeating the robot, exit the cave using the other exit and head west. At the end of the path you will meet four talking statues.
To complete this quest, you need to use water, fire, air, and earth spells on certain types of statues. Each time you cast the correct spell, an elemental will spawn. They are not particularly strong, but remember that spells from their element will not hurt them, but will heal them. In addition, the elemental leaves harmful areas upon death.
After you correctly cast the spells and kill the four elementals, you will see the entrance to the cave. A captive wizard will sit in the cave. Talk to him and complete the task.
"Brothers - wells"
In eastern Sysil, south of the church you will meet (X=435, Y=315) a wishing well, which will ask you to find your brother, who ended up in Haberheim. This quest can be completed in the second act when you find the way to Haberheim. After killing the Boreas King (X=240, Y=255), there will be one of the statues on the server wall of the room, with which you can talk and answer the question about the real name of the king. Answer: Luurean. Answering correctly will remove the barrier. Go there and with the help of the invisibility potion, bypass the guards and pull the lever, this will allow the whole group to go further. There will be many treasures in the hall and a spell that will transfer the second well to the first. Use this spell near the second well. Return to the first for a reward.
"Warming Up the Crowd"
Reward: 125 experience
In the market, you will meet Reginald, who is entertaining the crowd with a talking head. Talk to Gallagher, who is standing in the crowd and screaming the most. You will find out that Reginald is paying him for this.
Now go to the opposite side of the square, where Cedric will be without spectators. Report that Reginald bribed one person from the crowd. He will ask you to bribe this very man. We return to the ringleader and use the best skills in conversation to convince him to go over to Cedric's side. If you succeed, then Gallagher will work for Cedric.
Return to Reginald and tell him that his employee has started working for a competitor. He will get angry and leave his place. The task ends here.
"Who Summoned the Skeleton King / Invasion of the Undead"
Reward: 13500 experience
The task in which you must find the source of the plague, we receive from the commander or immediately after leaving the temple. However, you won't be able to complete it until you complete the Murder Mystery quest. You will receive the quest about Rex after killing Evelyn in the quest "Murder Mystery". Don't forget to take her amulet.
Now go to the church and fight with the sectarians there. To find a passage to the lower level, you must find and move four paintings, and then press the buttons behind them. The key to the gate is next to one of the benches against the wall. Get down into the open passage and pass through the barrier with the help of Evelyn's amulet. You will see a conversation scene between Terillion and Zombie Jake.
In the next passage there will be King Brakkus Rex.
Tactics: you will need characters of level 7 or 8. The higher the better. Do not immediately fly into the room. Separate the characters from each other (moving the icon to any space), hide (C) and disperse to the corners of the room to block the characters he summons. Break into the room as the main character and talk to the king. The battle will begin and he will call for minions. It will turn out that they will not be able to cover you with mass abilities and they will attack one by one or just run around the room between targets and you will easily kill them. After killing Brakkus, go to Aaures for a reward.
"Journey of the Source Seeker"
Awards: new rooms in your hideout.
Imp, who is in the End Times, will ask you to find and extract stones similar to the one that Evelyn had. The more you find, the more rooms will be unlocked.
To get out of here, look through the telescope, and then the Imp will open a portal in the main hall. He will give a short tour of the place.
After that, we speak with the woman, and then again with the Imp, who will hand us the teleportation pyramid.
After using this pyramid, you will be moved to the room where the woman is taking a bath. Don't forget to pick up the second pyramid. You will need it later.
The first stone can be found in the tavern, at the crime scene during the "Murder Mystery" quest.
The second stone can be found at the skeleton - the captain of the pirates during the task "Crabs vs. Skeletons".
The third stone can be found in the eastern part of the city, where you will encounter a hostile fire undead. Follow this path all the time and after passing the huge magma monster, you will be able to see the stone lying on the road.
The fourth stone is in Evelyn's apartment.
The fifth stone is located in the hideout of King Brakkus Rex, which is located in the basement of the church. You will gain access to it after completing the "Murder Mystery" quest.
The sixth stone can be found during the quest "Initiation" after completing all the puzzles.
The seventh and eighth stone can be found after finishing the Initiation quest - look inside Loika's hideout located in Silverglen Church.
The ninth stone can be found in the treasury of Boreas.
The tenth stone can be found in the temple, which you need to go to get Leandra's blood.
The eleventh stone can be found in Hiberheim Prison.
The twelfth stone can be found after destroying the totem in the goblin village, in the forest of Luculla.
The thirteenth stone can be found in Maradino's cave, required by the quest Frederick's Blood Stone.
The fourteenth stone can be found in the "Temple of the Dead" while searching for Cassandra's grave.
"Reward for Cowardice"
Reward: 6000 experience (if you say that the soldiers cleared the lighthouse) / 3000 experience (if you say that you did it).
The captain of the legionnaires told me about the old lighthouse. He sent several of his soldiers there, but there is no news from them for a very long time. He asks you to check the lighthouse.
Go to the western gate where you will be attacked by the undead. In the first house you will find a corpse of a legionnaire who will have orders regarding the lighthouse. Follow the road to the west and fight the undead. After passing the farm and the house, you will finally meet two surviving soldiers who are afraid to poke their nose at the lighthouse and ask for your help. The boss at the lighthouse is not very tenacious, his minions are a big problem. Try to kill the boss as quickly as possible, and then take care of the rest of the pack.
Also, you can enter the lighthouse and meet the ghost of Samson there, who will issue the task "The Lost Love of the Lighthouse" and tell you his story. Return to the legionnaires and tell us what you saw at the lighthouse. Return to the city and watch the scene of the dialogue between the legionnaires and the captain. You can confirm their words, or you can say that they are cowards. One way or another, the task will be completed.
"Lost Love at the Lighthouse"
Reward: 3150 experience
Inside the lighthouse will be the ghost of Samson, who mourns the loss of his beloved. Desdemona will be in Black Cove. To get to her, you first need to kill Captain Pontius, and then use the key to open the passage to Desdemona and kill the huge crab next to her. We talk about the villainy of her lover and return to the lighthouse to decide the fate of the ghosts. Influence Desdemona's decision and complete this task.
"The Lost Archaeologist"
Full Completion Reward: 3100 experience
Aures asks you to find the archaeologist he sent to investigate the underground ruins in the forest to the northwest.
Archaeologist Wulfram will be hiding in one of the abandoned houses.
He will ask you to take him to the city. If you agree, he will start walking and you need to be close to him to protect him from enemies. After you accompany the archaeologist, he will be in the tavern.
Even if he dies, you must inform the captain early. He will not be pleased with this, but the task will be completed. You will not gain experience if you refuse to accompany the archaeologist.
"Cat Love"
Reward: 1590 experience
In the King Crab Inn you will find a cat named Sam (requires the Animal Friend perk to talk to him). He misses Maxine, the mayor's cat, and asks for your help. Maxine, in turn, says that she can't be with Sam because he's a drifter. We return to Sam and he mentions the collar. The collar can be found at the bottom of the Black Cove dungeon. To gain access there, you will need to kill the captain and take the key from him, which opens the lower part of the dungeon. Kill the crab there and take the collar. Give it to Sam and go to the city hall to listen to the dialogue of cats to complete the task.
"Magnificent Five"
Reward: 2975 experience
The representative of the Fab Five near the King Crab Tavern will offer us a place in their guild, promising wealth and glory. We agree and get the job. It is necessary to destroy the malfunctioning robot that Arhu created. We go to the cave (X=275, Y=375) in the northern part of Saysil. Inside there will be guild members asking for help. The battle with the robot can be simplified if you purchase a robot control panel from Arhu. We press the buttons: "Angry", "Angry", "Sleeping" and eliminate the robot, it remains to deal with the undead. After the battle, we return to the city for a reward to the mayor of the city. The mayor says that he has already paid the guild and they have left the city. This completes the task.
To complete the "Arhu's Failed Experiment" quest, go down to the basement in the building where Arhu is located and find the treasury.
"Greatstaff of Cecil"
Reward: 4500 experience
The mayor will ask you to find a powerful relic for him. He will offer to start searching at the docks. We go to Konrad at the docks, which is located on his ship. He will say that he knows nothing about the staff and advise you to talk to the crew.
Marv will say that during the attack, Captain Ditmar fled with some kind of package under his arm in an unknown direction. Again we speak with Konrad, who will suggest that Dietmar may be on one of the beaches.
Ditmar is located at the following coordinates (x:53 y:328). We deal with him and his henchmen. We go to the mayor with a staff and decide to give the staff or not. One way or another, you complete the task.
"Crabs vs Skeletons"
On the beach to the west of the city, where the orcs and their corpses are, you will find a strange cave. The entrance to it is guarded by a giant orc that fires magical bolts.
The first obstacle inside is the electric field. We put the barrel on the button in the middle of the field and go further.
Further you will meet an orc who is bleeding, and a little further you will see battles between the undead and orcs. I recommend waiting until one side wins and then finishing off the survivors. You will still get experience for those killed.
After that, we go down and meet the boss. After defeating the boss, enter the room behind him. In the room we pull the lever next to the picture. This will make a hidden button appear. Press it and a hatch will appear in the other corner of the room.
We go down to the lower level. At the bottom, we will encounter crabs and a puzzle. You need to pull the right lever to go further. The correct one will be on the right and it will be hidden in the ferns. Pull it and unlock the passage. Go there and fight with the captain of the skeletons. First of all, kill him so that he does not resurrect the enemies you killed.
Don't forget to pick up the bloodstone from the chest on the ship. Using it, you will unlock another room in the End Times.
Killing the Pirate Pontius will complete the quest.
"Headless Nick"
Reward: 4100 experience
When performing "Crabs vs Skeletons" in the central room in the chest there will be a key that opens the door. Open the door and go down the pieces of wood. Pay attention to the traps, blow them up from afar. At the very bottom, you will encounter exploding zombies standing in a puddle of oil. Blow them up from afar, and if you can't, then use "Rain" so that they cannot explode near you.
A little further you will meet the ghost of the daughter and father. The daughter will ask you to find the father's head. If you have explored the city, then remember that you saw the talking head of one of the pranksters. Return to the city and first complete the task "Warming Up the Crowd". Now you need to convince the head to go with you. As soon as you succeed, return to the cave and give the head to your daughter to complete the task.
"Blood Feud of Elves and Orcs"
Eglander, the elf you encounter in the graveyard, will ask you to meet him on the first floor at the King Crab Tavern. Climb up and talk to the elf. He wants you to kill Victoria, a female orc that can be found in Mayor Cysil's library.
You have several options for completing this task.
You can convince Victoria to hand over the amulet so that we can show it to the elf as proof of her death. You can kill Victoria and take her amulet. Hold down Ctrl and start hitting her - after that she will enter the battle. You can tell the orc that you will try to stop the elf. In this case, you need the pickpocket skill (2+) to steal the bloody amulet. After that, give it to the commander of the legionnaires and come to the elf to look at his arrest. We return to Victoria and inform her about the arrest.
If you are having problems with Walkthrough of Divinity Original Sin, you can always use our advice and information for action. We detail the steps you need to follow to complete the game. Divinity Sin. In the most difficult places, we add pictures that can help you. Walkthrough Divinity read on our website.
Quest Murder Mystery
Reward: 8250 experience
So, the first quest in your journal will be exactly this task. You must solve a mysterious murder case. But first you need to get to the city, the path to which is blocked by a horde of orcs. In the dungeon you will be trained. Follow along, watch the cut-scenes, which show how the necromancers leave the crypt. Noticing you, they will call on the undead. Enemies are easy, you will deal with them without much effort.
Now follow further or return to the tomb. Inside there is a tutorial that will teach you the basics of the game. In addition, you will find some gold. Having found the textbook, you can easily find the way out of the dungeon. If you choose another path and go left, then after a while you will find a bridge. Talk to the drunken guards, deal with them, or let them escort you straight to the city walls. If you kill, you can search their corpses for loot. If left alive, they will help you deal with the orcs.
There will be a battle on the beach, in front of the city gates. Pass through the bridge, the cut-scene with the ambush of the orcs and the actual battle with them. First of all, kill the shaman who heals his allies. Pay attention to the barrel of oil, standing in the middle of the battlefield. If you use fire on it, it will explode and deal damage to the orcs standing nearby. Do not forget that the shaman himself can blow up this barrel.
After the battle, approach the city gates and meet Master Arhu, a man who knows the details of the murder case. He will ask you to meet him and Captain Aureus in the northeast part of the city. When you reach your destination, go up the stairs and talk to the cat that Arhu has incarnated as. Find out about the night the murder took place. Arhu will say that you should meet with the gravedigger and inspect the corpse.
On the first floor, talk to the captain, who will allow you to inspect the scene of the murder, as well as receive several side missions. So, first go to the local tavern where the murder took place. The room of adviser Jake (in fact, he was killed) is located on the first floor, the guard will open the door for you as soon as you inform the captain about the permission. When the door is opened, you will be attacked by a magical discharge that did not harm you.
You have to open the chest, and if you don't have lockpicks, then just break it, which will just take you a little more time. In addition, here you can find a stone for the quest "The Story of The Stones". If you haven't accepted this quest yet, touching the stone will teleport you and the quest will start automatically. After reading the letter from the chest, you will receive a new task - "The Story of The Stones", which will be completed as soon as you see the corpse. Go to the funeral home, which is located to the northeast, in the room on the left, look for notes from which you will learn that the corpse has been stolen. The gravedigger suspects four people of this: Mayor Cecil, Captain Aureus, healer Evelyn and Esmeralda, the wife of the murdered man.
You must now complete the quest "The Councilor's Wife" below.
After completing this task, go to Evelyn, but her master Thelyron will say that she fled in an unknown direction, in a hurry. He will tell you where Evelyn's house is located, where you should now go. .but first, take Evelyn's bag from the next room, near the window, and find the key to the house inside. Enter Evelyn's house, open the chest on the right and find the spell to enter the secret lab. On the shelf a little further you can find Evelyn's journal, which says that the secret laboratory is in the north.
The laboratory itself is located on the northern beach. It is important that this spell was used on you. Leave the city through the eastern gate, go north and soon you will be attacked by a large group of undead. After defeating them, enter the cave that they were guarding, where you will find one of the bosses from the side quest The Fabulous Five. After you destroy it, exit through another passage and go to the east beach. Explore the South Cliffs until your teammates say you're there. Use the spell on yourself and open the entrance to the laboratory.
Inside, a cultist will be waiting for you. Kill him quickly before he raises the alarm, and take the key from the corpse. If he manages to get to the orcs, then they will attack you. After killing the orcs, go down one level, where the battle will begin. You will encounter Evelyn and a dozen cultists. In addition, the woman will summon zombies that explode upon death and spray acid in a circle. If one of your heroes has the Zombie ability, then you will win a lot. The most important thing is to kill Evelyn as quickly as possible. Let the one with the stronger damage attack her while the others cover.
After the battle, talk to zombie Jake and he will tell you who killed him. Mission complete.
Quest The Counselor's Wife
Reward: 1800 experience
After you have visited the scene of the murder and opened the chest by reading the letter of the victim, you will receive a quest according to which it is Jake's wife who is considered a suspect. You can find Esmeralda in her shop. Showing the letter to the guard, he will be surprised that Esmeralda has another lover besides him. Esmeralda will tell you that this fact is not evidence of her involvement in the murder.
To make sure of her innocence, we go up the stairs and find the key in her apartment. Climb up the stairs and open the nearest door. Through the basement to find books on how to plan a murder, they are on the table. Return to the next room and climb into the basement through the secret door. Meat hangs to the left of the stairs - remove it and you will find the switch. Click on it and the door to the secret room will open. Demand an explanation from Esmeralda. She will say that the book and the knife belonged to her husband, who slaughtered pigs. The wife of the murdered man will say that it would be better for you to suspect Evelyn of everything.
You can ask the captain to arrest or not arrest Evelyn. Continue through the previous quest.
Quest Talking statues
Reward: 3400 experience
On the way to the city at the very beginning of the game, you can find notes on a corpse. From the magazine you will learn that the mysterious statues gave this unfortunate man the ability to fly, but this turned out to be untrue. You decide to unravel this mystery, but first you need to get to the city. When you are in the city, then move north, find the entrance to the cave and you will see several enemies there. Deal with them, use fire and acid from the enemy. Now go inside where you will meet the robot, which is the boss from The Fabulous Five quest. Below you will learn how to fight him. After defeating the robot, go to another entrance and follow west. Eventually, you will reach four talking statues.
To complete this quest, you need to use water, fire, earth and air spells. Each time you use one spell, a demon of fire, earth, water or air will appear. On their own, they are rather weak, but remember that a fire spell on a fire demon will work as a heal, etc. In addition, after death, the demons leave various kinds of traps - the fire demon - fire, the earth demon - splashes acid, etc.
Quest Entertainment for the public
Reward: 125 experience
In the market, you can meet Reginald, who entertains the crowd by displaying a talking head. After talking with Gallagher, who is one of the representatives of the cheering crowd, you will learn that Reginald paid him for all this. Now go to the other side of the square, where you will meet Cedric, who has no spectators. Tell the one that Reginald paid Gallagher for the fake crowd, and he in turn will ask you to bribe the people.
During the conversation, use your best attribute to convince him to switch sides. If you succeed, then Gallagher will work for Cedric. Return to Reginald, tell him that now his corrupt worker is gone. He will not take it to heart, and the quest will end there.
Quest History of Stones
Reward: New cameras
The imp asks you to find more stones that Evelyn used. The more stones you find, the more chambers will be open for you. To exit this room, look through the telescope, and then hear from the Imp how to open the door to the main hall. Talk to the woman sitting nearby. Talk to the Imp again, he will give you a portable portal that will allow you to move to other pyramids.
After using the pyramid, you will find yourself in a bathroom with a bathing woman. To leave, you need to use the symbol on the right side of the screen and teleport to another location. After you return to the city, you can use the pyramid to find the second stone. If you are playing in co-op, then leave it to another character, and keep the original for yourself. Thanks to this, you can port to each other at any time.
You will find the first stone during the "Murder Mystery" quest, in the tavern, at the crime scene. Then you will unlock the "Hall of Heroes", in which you will find all your comrades who are no longer traveling with you. You will find the second stone to the east of the city, where there is a crowd of fiery undead. Keep walking along the road, and when you pass the Magma monster, you will notice a stone on the road. Thanks to this, you will unlock the "Residential Neighborhoods".
Quest The Scaredy Pact
Reward: 4250 experience
The leader of the guards will share with you rumors that the old Lighthouse is teeming with ghosts. He sent several of his men there, but for a long period of time they never returned. You must learn about their fate. Go towards the western gate, soon you will be attacked by the undead. Kill them from a distance, because. those explode upon death with acid. In the first house you will find the corpse of a guard, who was sent to the Lighthouse. Follow the road to the west and fight another batch of undead. Some of them have bombs attached to their backs. Don't let them get close to you. As a rule, they explode from one shot. Make your way through the farm and the house until you meet two other surviving guards. They are too scared to visit the lighthouse.
Keep walking along the road until you reach your destination. Before entering, fight the mini-boss, his dogs and archers. The boss itself is easy to kill, but getting close to him is more difficult. In addition, the second difficulty is that he can revive his units that have already been killed by you. Therefore, send two people to kill the boss, and two others to distract the dogs. After killing the Lighthouse Guardian, deal with ordinary enemies who now have no one to revive.
Once inside, you will meet Samson, a ghost who will give you the quest "Lost Love At the Lighthouse" and tell you his story. Now go back to the two guards, tell them what you saw, or you don't have to. If you tell them your story, then they will return to the captain and take all your merits for themselves. Then you can interrupt them and tell the captain what really happened. The guards will be sentenced to punishment. If you don't tell them anything, they will go to the Lighthouse themselves. One way or another, the quest will be completed as soon as you return to the captain.
Quest Lost love at the lighthouse
Reward: 3075 XP
You will receive this quest from the ghost of Samson, who is located at the lighthouse and will tell you about his love for one woman. You must find her. Return to the city and exit through the southwest gate, near the harbor. There will be the corpses of an orc and a man, follow the tracks of a large orc and his retinue. The fight with this enemy is described below in the Crabs vs. Skeletons quest. Then enter the cave. Inside you will witness the struggle of skeletons and orcs. Join the fight or wait for them to finish off each other. Then find the key belonging to the pirate leader (lower level) in the Crabs vs. Skeletons quest. Find a ladder that is a meter away from the battlefield and climb it. When you notice the remains of dragons, then know that you are moving in the right direction.
Finally, you will reach a location where you will be attacked by a huge crab. Kill him with ease, because. he is no different from other enemies. Raise the loot, because. you need it for the "Kitty love" quest. Take a few steps forward, then you will see a much larger crab, which is the boss. He has a very strong "water attack" skill, which he will use in close range combat. In addition, he summons ordinary crabs. Use fire and electricity against the boss. After destroying it, move forward and talk to the ghost of the woman you meet here. Direct it to Samson, return to the Lighthouse. Decide whether they will leave together or separately.
Quest Missing Archaeologist
Reward: 3100 experience
Aureus asks you to find the missing archaeologist, whom he sent to investigate the underground ruins in the middle of the forest, to the northeast. Exit through the North Gate, turn left. An archaeologist named Wolfram is hiding in one of the abandoned houses.
The archaeologist will ask you to accompany him to the city. If you agree, then keep up with the man. In addition, you will have to fight the undead. Best of all, if you have a “tank” in the team, then let him run ahead. After you get to the city, go to the tavern and talk to the archaeologist there. Even if he dies, you need to inform the captain about it. He will not be pleased with your work, but the mission will be completed. If you refuse to accompany the archaeologist, then you can not wait for the reward.
Quest Cat love
Reward: 3350 XP
To receive this quest, your character must have the "Pet Pal" skill, which allows him to communicate with animals. This quest will be assigned to you by a cat. If you, of course, can communicate with him. Go to the King Crab tavern, find a cat named Sam and talk to him. He will ask you to find out why the cat named Maxine is not interested in him.
Other cats and cats can be found in the library. It turns out that Maxine doesn't want to date Sam. he is already too old and this may affect his ability to reproduce. Go back and tell that to Sam. For him, you need to find a beautiful collar.
The collar can be picked up from the crab in the Black Cave when you defeat it in the previous task. The cave is located on the beach, near the western entrance to the port. There are orcs nearby. Inside the cave, the skeletons fight the orcs. After the battle, pick up the key from the corpse of the pirate leader in the Crabs vs. Skeletons quest. On one of the walls there is a massive door. Open it with the key, go down, inspect the remains of the dragons. Move in this direction. Soon a giant crab will appear. Surround him and attack. As soon as you kill the crab, the collar will fall off it. Take it. There is also another, more ferocious crab, which you killed in the previous task described above.
Quest Fairy Five
Reward: 2975 experience, joining a guild
Before entering the tavern, you will encounter Mendinus, who will offer you to join the guild. If you accept his agreement, then you will be given the task of destroying the robot operating in the northern cave. Leave the city through the eastern gate, go north, kill the enemies guarding the entrance to the cave. Kill one crab, it will explode with acid, throw fire. Inside you will meet a soldier who will ask you to help in the fight against the robot. Here you will receive an additional task, according to which you need to save as many soldiers as possible.
The boss himself is confident on his feet, but has a weakness to freezing. Use rain and cold spells to freeze the robot. The robot uses fire attacks, and the complete opposite of them is water. Use this fact. When the robot is frozen, it cannot attack you. Therefore, your chances of saving soldiers increase.
After you kill the boss, then go to Cecil's office, then to the tavern and complete the Fairy Five quest.
Quest Cecil Mighty Stuff
Reward: 3825 experience
Cecil will ask you to find for him a powerful relic that was stolen from him. The search must begin with Conrad, who collects goods at the docks. Konrad is on a huge preserved ship, with one of the sailors. He will say that he does not know anything, but someone from his team may have heard something, and you should ask them about it yourself.
Sailor Marv says that during the attack, Captain Dietmar was running with a package under his arm. After you report this to Konrad, he will say that the captain must be on one of the beaches. Look for it there. Go past the cave where you completed the Fabulous Five quest to the beach north of town. How to defeat enemies on the way is written in the chapter above. After you pass through the cave, get to the teleport point to the west, and from there - to the beach. Dietmar is there with two of his sailors. As soon as you approach, he will attack you. Sam uses an invisibility spell, but you can easily deal with the other two enemies. After defeating Ditmar, he will drop his artifact, and you can return it to Cecil. You can decide whether to give the artifact or keep it for yourself.
Quest Crabs vs Skeletons
Reward: 3150 experience
On the beach to the west of the city you will find orc corpses. There is also a strange cave there. The entrance is guarded by a giant orc. Kill him. The first obstacle inside will be the electric field. To turn it off, place the barrel on the device in the form of a circle in the middle of the field. Follow further and meet an orc bleeding. Next will be a battle between the undead and the orcs. Wait until they finish each other.
After winning the battle, go down, through the clouds of smoke and get to the boss. Firstly, the boss is resistant to cold, and is also quite mobile. Do not stand close to each other with partners, because. he will attack you with his strongest weapon - water attack. Use fire against the boss, do not pay attention to ordinary crabs.
After defeating him, enter the room behind the corpse, find a painting under the table, break it, pull the lever and find a hidden button. Press the button and a hatch appears in another part of the room. Go down through it to the lower tier. Below you will find mines and crabs that you need to kill. Either path will lead you to a chamber in the center, where there are several levers. You need to find the right lever, because. the wrong choice will attract the fury of the cave on you in the form of fiery jets, ball lightning, etc.
This lever is one on the stairs on the right, on the outside of the room. Among the ferns.
With this lever, you will unlock the path forward and find the boss, the Skeleton Captain. Of course, his retinue will be with him. Kill the boss first, because. he revives the dead. Destroy the barrel in the center. Undead are resistant to acid. Take the blood crystal from the chest on the ship. This is a nice addition to the quest reward.
Quest Headless Nick
Reward: 4100 experience
After completing the Crabs vs. Skeletons quest, search the room in the center and find a key near the table that will open the next door. Go through the corridor and beware of the traps on the boards. Throw something at them to test. At the very bottom, you'll find some exploding zombies standing in a huge oil puddle. You can blow them up.
Below you will find the ghosts of Father and Daughter where the father is beheaded. The girl asks to find the head of her father. If you looked around the city, then you saw Regenald in the square, entertaining the audience with a talking head. Go back to the city, find this Reginald. If you completed the quest "Entertainment of the Crowd", then the man will give you his head without any problems. To convince the head that she needs to go with you, you will need to defeat her in battle. Once you've done that, return to the cave and give the daughter her father's head. The quest will be completed.
Quest Elves and Orcs: Vengeance
Reward: 1075 XP
First Encounter with Elgandar
An elf named Elgandar is located near the cemetery, he will ask you to meet him on the first floor of the King Crab tavern. Go inside, go upstairs, look into the room with the open door and listen to what the elf will tell you. He wants you to kill Victoria, the female orc that is on the first floor of the library. She is presumably a member of the tribe that killed Elgandar's family.
You have several options:
1. You can convince Victoria to return the amulet the elf wants as proof that the female orc was killed.
2. You can kill the elf and tell Victoria about your feat.
3. You can kill Victoria and take the amulet. Just hit her, do not release CTRL, so that she starts attacking you.
4. You can have the elf arrested. Take away the bloody amulet, you will need two master keys. Give it to the captain. Return to the elf and you will see that he was arrested. Notify Victoria of the arrest.