Ark How to speed up the appearance of dinosaurs. Hyde Ark: Survival Evolved: The best initial dinosaurs and creatures. Additional work with UV
ARK: SURVIVAL EVOLVED - Universal game project in the genre of survival simulator, in which users go to the era of dinosaurs in order to survive and prove their superiority. In this game, you can create personal servers and control them not only with special settings, but also through special console commands for Ark: Survival Evolved.
Why do you need these commands?
Console Commands for Ark: Survival Evolved is a convenient tool for server administrators. If you are, it is enough to call a special console and enter a specific set of characters, after that you will get an advantage, a dinosaur or any useful action. These commands are designed specifically in order to facilitate the gameplay, give server administrators great opportunities and expand their control. After all, the chief creator should be powerful and not to refuse himself.

It remains only to figure out how to use them. In principle, there is nothing complicated. To activate console commands in Ark: Survival Evolved, it is enough to perform a number of actions:
- Press the Tab button to call a special input console.
- We first enter the command Enablecheats AdminPassword. If you decrypt it, it will turn out that the ENABLECHEATS command is the main, and AdminPassword is your password to the admin panel.
- After successful activation, again call the console using Tab.
- Then you need to enter a set of characters that is already programmed under a specific action.
- Click the ENTER button, and the command will be activated.

As you can see, there is nothing complicated in this, so you can safely begin to use new features and achieve your goals.
Call dinosaur
The most relevant and in demand are the console commands for ARK: SURVIVAL EVOLVED, which relate to dinosaurs. Thanks to the collection of these teams, it is possible to cause vast creatures for active use in terms of movement and battles.

First of all, we suggest you familiarize yourself with the collection of teams for the ground beings, which are the most common in the game. We were presented above. Next, we propose to take advantage of the opportunity to encourage aquatic beings.

The commands indicated below will be relevant. The main thing is to introduce them unmistakably.

A small collection of flying beings will be a pleasant supplement that will destroy the boundaries of your movement through the game world.

But you should not limit yourself only by these options. For example, you can use for the game Ark: Survival Evolved Console commands ID-dinosaurs, which are bosses.

Here, in fact, all the versions of creatures that can become faithful companions in your adventure. Call, teach and use them for different purposes.
Player utility set
If you do not need dinosaurs, and you want to get an advantage over other users, then console commands can help in ARK: SURVIVAL EVOLVED for the player. These include: getting experience, increase damage, the ability to fly, freeze opponents, etc. Everything you need is to simply enter the necessary command.

Here are some other teams that will be useful to you. They are also in demand.

Graphics settings
Recently, the game began to actively develop, and now it is possible to make adjustments to the graphics settings using conventional commands and values. Console Commands in Ark: SURVIVAL EVOLVED for graphics look like this:
- r.BLoomQuality 0 (regulation of the Bloom mode);
- r.LightShaft 0 (setting up the level of lighting);
- r.ShadowQuality 0 (Shadow Management).

So far, these are all available commands for convenient editing of visual design settings. In the future, the developers promise to make adjustments and significantly expand the choice of teams. For now you can safely use the specified options and to customize the design of the game at the right time.

Now you have a large selection of various console commands that can be actively used directly during adventure. Use our instructions, carefully dial a number of characters and get the necessary actions. Thanks to them, you can comprehensively monitor the situation on your server, distribute gifts to participants, arrange chaos among the players and just have fun. It was for this that this feature was created, so we recommend that you do not miss it and boldly operate with all the available command options.
Preface
This guide will help first of all the same novice as I am in breeding pets. Perhaps Guru Ark know even more, but nevertheless. In the process, we will analyze what characteristics are enhanced by Dino tamed, as the effect of taming is influenced, how the characteristics of the cub and its level are calculated, is it possible to create Uber Monster and how all this is affected by random mutations.
Hyde written at the time of patch 277.0
Information from official formulas is currently not relevant than t. The developers constantly make changes to the game.
breeding, taming, reproduction, feeding, recipes, cultivation, correlation, domestication, reproduction, feeding, recipes, correlation.
Choosing parents
And so, we are going to grow top dinosaurs. What do we need for this? At a minimum, tame two dinosaurs of different sexes with as much as possible. It is not worth looking for only 150 levels (off server), for our purposes will go dino from 140 and higher. Why is that? Because the characteristic that we need, according to the result of taming, may be higher than a similar characteristic of level 150.
There is an opinion that a somewhat wild dino one level have the same characteristics - this is rooted. Let's figure it out. We will grow pheranodonov. There are basic things that can be viewed on official wiki for level 1:
The increase for each subsequent level increases only one parameter and stunning. If we meet the Wild Peter 2nd level - we will know exactly that it has a stunning equal to 120 + 7.2 and one more parameter other than speed (of course, this point may accidentally lie down in speed, but it will not have any influence . k. Wild dino is not added in speed. From here it follows that the stunned Dino 150th level has 149 spans for distribution according to any of its characteristics in random order. According to probability, of course, it may occur so that all the points will fall into one desired characteristic, But the probability of this monstrously negligible. Nevertheless, the Dino 140th level by the will of the case can get much more points on the characteristic than the Dino 150 level.
It is worth notify that the pumping of the parents will not affect the characteristics of the child who could have happened when crossing them. Only the basic characteristics obtained when taking a parent is transmitted to the descendant. It is necessary to strive to maximize the effectiveness of taming T. K. The future characteristics of a stunned dinosaur depend on it.
And so, knowing how much the level is added to each of the characteristics and knowing the initial values \u200b\u200bof these characteristics, the tricks can already be calculated how many points fell into each characteristic:
We consider health: from the first level 210 received the basic value of the first level 210 and divide the number of points for each level 42. Answer: 28 levels have been in health. Thus, we calculate each characteristic and see the result:
For convenience, you can use the spreadsheet. We see that over the outstanding characteristics there are no. According to the result of taming, the picture can radically change, but it is worth considering one fact: if dino is significantly overestimated by one of the characteristics, then with a lot of probability, it will further strengthen this characteristic.
The same pector after taming:
We also consider the levels, but there are already different factory coefficients for the calculations, TA, TM and some more little things are added to the calculations. We take into account only one largest - TM, the rest will not be, the simpler - the better, although we use a small error in the calculations. We most importantly determine the greatest characteristics and decide whether to pair this animal. For me such formulas
V \u003d (b × (1 + lw × iw × iwm) × tbhm × (1 + ib × 0.2 × IBM) + TA × TAM) × (1 + TE × TM × TMM) × (1 + LD × ID × IDM )
support longing and despondency, they will manage without them.
Mutation - accidentally changes the color and adds level 2 on one random child characteristic. It is better that at the initial stages of breeding mutation did not occur because at the beginning of the way the probability of meeting Dino best than Dino with mutation is quite high. After all, the number of mutations is limited and better to save them for later and improving quite significant characteristics, but here as lucky. All mutations are inherited from parents and dig. You can get a maximum of 20 mutations from the mother and 20 from the Father, i.e. 40 times the parameter will be improved by 2 points. It will give 80 levels in excess.
We see that the endurance parameter was overestimated by two points - this is a mutation.
What is the top dinosaur? This is a child who has enlightened the best characteristics from many parents, having the highest possible amount of mutations in the desired characteristics, brought up with 100% attachment and pumped by a player to all possible 71 levels.
When you have such a couple of pets, you can sell their eggs on the server for an indefinitely expensive price.
When writing the article, about 120 pheranodones suffered. For me, the young of the third generation would be used for me with a 271 level, if it is still to swing at a maximum of +71 levels and make attachment - it turns out to be quite good than 342 levels with a 30% increase in damage and protection.
Unfortunately, official wiki is very rarely updated and you can not always find topical information on its pages. There is a program to create mods on the ARC, called Devkit and it is sewn in the Unreal Engine engine - there is always current information for all Dino in it. It weighs about 120 GB. You can find the necessary information like this: menu line: BluePrints - Open Level BluePrints. Then File - and in the Search Assets field, insert DinoCharactersTatusComponent. We choose the necessary animal. Profit.
I apologize for punctuation and spelling :)
Good luck in search of pets, she will surely need it !!!
Jonathan Reilly, working in Gamedeva over aaa-games and in cinema over special effects for more than 15 years, will tell about the secrets of creating a realistic dinosaur.
The creation of such a extinct creature, as a dinosaur, demanded good preparation and multitude of references. Usually, when I create a monster, I fully rely on the flight of fantasy.
The creature that underlies this project, once really dwell on our planet, so I collected a good reference library for quite a long time to make my dinosaur as realistic as realistic, with real anatomy. The Tyrannosaurus has always been an exemplary representative of this extinct species for me, so when I was asked to recreate something similar, I, without thinking, stopped on it.
01 Setting the scene inMaya.

For similar projects, references are key
By choosing a side reference with the image of a dinosaur, I downloaded it to Maya to be guided by it when creating a dinosaur bayizmesh. Reference, as a texture, I prescribed to a plane with a planar UV scan along the x axis
Then made an image in square for a faster projection, and the material is translucent. The reference was added to the Display layer for which it set the Reference mode so that the image cannot be selected in the MAYA website.
02 Preparation of Badizmesh

Start work on a dinosaur with an extruder of ordinary cube, focusing on the reference
3D modeling of a dinosaur I started with creating a simple cube. Next, with the help of an extrud, I created a silhouette of a dinosaur on the basis of a reference. Bezmesh I model with quads, especially without worrying about small details, I needed only a total volume. Try at this stage to distribute the polygons evenly, but do not deepen much in details that can always be added to Zbrush.
03 Work on the details

Create a couple of areas and place them in place
Then I added a couple of spheres in the scene and placed them on the place of future eyes. In my opinion, Bazmesh always facilitates the face of the face. Further, I switched to creating a language, which was also based on the usual cube. At the end, when the dinosaur base model was ready, I exported the result in format.Obj to continue working in Zbrush.
04 Import B.Zbrush

Import file in format.oBJ. inZbrush and break the mesh into separate sub
File in format.Obj I imported to Zbrush. Then we divided the geometry into separate subtools using the Tool\u003e SUBTOOL\u003e SPLIT\u003e Split to Parts command. Then disguised the various parts of the dinosaur body using ZBrush (+ and Click allocation) and created a polygroup for them using the Tool\u003e Polygroups\u003e Group Visible. Thanks to this approach, it is possible to work conveniently with individual elements of the dinosaur body.
05 Dinosaur Blancher

Try not to pour units without the need
When working in Zbrush, it is important not to pour units from the very beginning. At this stage, I just doubled the resolution of the mesh.
With the help of brushes Move, Claytubes and Smooth, I quickly sketched common forms, trying not to hurry with the muscles. At the same time, I worked in symmetry mode simultaneously on both sides of the dinosaur, which always allows you to speed up the scalpting process.
06 Obstruction of muscles

Use polygroups to hide those dinosaur parts over which you do not work
Then I hid with the help of polygroups those part of the dinosaur, which did not work on. And, again, using brushes Move, ClayTubes and Smooth, quickly outlined the muscles. At this stage, you can begin to raise the number of Sabdives, but I try not to hurry, increasing permission only when it is really necessary.
07 Head detail

Note the abnormal arcs and jaws withClaytubes.
The head differs from the body by the fact that there are less muscles on it, but there are skull bones. In fact, the head is a skull with massive muscles, which create such sharply defined forms.
Absorbing arcs and jaws I was outlined using a craytubes brush. Disassembled the area around the eyes and brush Move created deepening under the eyes. Then, again using polygroups, isolated and carefully worked the inner oral cavity.
08 Body

Practice - the best sculptor teacher
Scalpting is a permanent process of increasing, smoothing and removing geometry, which is practically no different from working with ordinary clay. Volumes I created with ClayTubes brushes, then smoothed into their smooth brush, and the sharpness of the feature brushed the crease.
So, the sculptor, even digital, can create a finished product only with the help of a constant practice, working on and working on geometry until it starts to like it. At this stage, try to pay attention to how the muscles interact with the skeleton and with each other.
09 Texture of skin

Now that muscles are ready, a turn of work on claws and skin of the face, elbows, knees, etc.
Then I worked for claws, folds, wrinkles and leather texture on face, elbows, knees, etc. Skalptile a couple of skin folds on the neck, which brushed the crease.
Wrinkles and spaders on the skin softened by the brush smooth, trying to follow the natural direction of skin growth on the shoulders and clavicle. Next detailed the resulting geometry, increasing the number of units.
10 Klinap geometry

Inflate the body of the dinosaur and draw the guides forZremesh. where you want to get a neat grid
Infused the body of the dinosaur, I painted the guides for Zremesh, elaborating the grid around the eyes, mouth, elbows, shoulders, hips and knees. I also painted the guides around the tail so that the grid was not spiral on this site
It tried not to forget and enable symmetry so that the mesh turned out to be more accurate. I decided to stop at the polygonge of 15,000 polygons, in a matter of seconds received a neat dinosaur with a new topology.
11 CreationUV.- Experience

Creating a polygroup for variousUV.-Shellov
To create a UV scan, I used UV Master in ZBrush. For various UV-shelves, such as head, mouth, hands, body and legs, I created individual polygroups by turning on the Color Painting feature in UV Master. This allowed me to identify areas in which the seams should be.
For the seams, I chose those parts of the mesh that are not visible, for example, the inner side of the legs or skin folds. Thus, I got a scan with seams in clearly designated places.
12 Additional work withUV.

For better work withUV.- Experience export.oBJ.File B.Maya.
Then I decided to work the UV scan more carefully and exported the file in format.Obj in Maya. UV-Shella I set up in such a way that the head and mouth are located on one UV-sheet, and the body with legs on the other. Further, as soon as the geometry and UV scan in Maya began to arrange me, I imported a new baysmesh in Zbrush. I still made a separate texture, because she, because of the accent made on it, was to be sufficient permission.
13 Transfer details

Transfer the detail from the old mesh to the new
At this stage, I needed to transfer the detail from the old meshes to the new one. To do this, I pierced the old Sabtoul with a dinosaur body, made a submissive subwoofer with the UV scan and descended to the lower level of the units of the original geometry.
Next, I used the SUBTOOL\u003e PROJECT\u003e Project All command to transfer the detail from the old mesh to the new one. It switched to a higher level of units of the old mesh and reconciled a new one. Then I repeated this operation until the result began to arrange me.
14 Small details

INZbrush there are some useful alpha
In Zbrush there are several very useful ALP, but personally I usually use your own alpha, in advance created in Photoshop. With alphas, I work the Standard brush with the intensity parameter 10 in the DragRect mode, to carry, thus parts from the image on the geometry.
Sometimes, to increase the speed of work, I turn on the symmetry in some areas, but I try to work with my head and body without symmetry, avoiding the "butterfly effect".
15 Basic colors

Paste Blank with basic colors withPolypaint inZbrush
Basic colors I always snatch using PolyPaint in Zbrush. At the same time, the model is better to paint the model before the depth, since with this approach you can safely work with the symmetry included, which significantly speeds up the work process. For the base coloring, the geometry is quite suitable for the Standard brush in the COLOR SPRAY mode, as well as alfa №07. The undoubted advantage of this approach is that it is not necessary to worry about the seams, such as when working in Photoshop.
16 CardSpecular

UsingPolypaint To create a seamless image in shades of gray
With the help of Polypaint, you can also quickly draw a seamless image in shades of gray, having lazy to the shorter sections and vice versa. Subsequently, these cards can be easily exported in Photoshop using Multi Map Exporter.
In addition, you can create a Cavity card, with which you can also emphasize smaller parts on the render.
17 Disinnese dinosaur

Mind is very important, so it is worth the time spent
The pinch stage is very important, so it is necessary to spend enough time. By this time it is better to understand how it will be the character, as this will significantly speed up the process of positioning. So, I set the character in the T-Posle with Transpose Master, then masked and moved the different elements of the model appropriately.
18 Textural cards

Creating a textural card with basic skin colors withZapplink. andPhotoshop.
To create a textural card with basic skin colors I used ZappLink and Photoshop. To get this card, I focused on the main colors of the skin with a slight value of the Noise parameter.
In addition, you can use the elephant skin references or, for example, rhino, and then with ZappLink, to proper texture on a dinosaur, without taking care of the seams.
19 Baking textures

Cake maps from the final model usingMulti. Map Exporter inZbrush
Next, I bake cards from the final model using Multi Map Exporter in Zbrush. Baked COLOR, CAVITY, AMBIENT OCCLUSION and NORMAL in the 8K resolution. For a dinosaur, I used two sets of textural cards, one for the body, the second for the head (UDIMS).
20 map.Diffuse

Try to work inPhotoshop. with file in format.pSD. with non-selected layers
In Photoshop it is very convenient to work with the image along the layers, storing the file in the.PSD format for a black day. With this approach, you can always make an image of any edits. As a basis, I took the texture with the main colors of the skin, on top of which consistently placed the Ambient Occlusion, Cavity and Base Color card, adjusting, if necessary, brightness, contrast and transparency. Try to work at this stage carefully and carefully so that then you did not have to deal with the light on the render.
21 Additional details

Create a small fake bar, copying the blue channel from the exported cardNormal
On top of all the layers, I created a small fake bar, copying the blue channel from the exported Normal card. Then retired brightness, contrast, transparency, and layer overlay mode. At the same time, I tried not to forget that I had two different UV-sheets, which were supposed to be seamless, so any changes in one demanded instant changes in the other. By the same principle, I ranked tongue and eyes.
22 Revision B.Photoshop.

Improving the final picture using filters
In Photoshop, I posted a dinosaur render obtained in Keyshot, on top of the background image. He spent a small color correction of different layers, set out overlay and multiply overlapping mode for some of them. The effectiveness of the render can also be enhanced by various filters, stylizing the image accordingly.
.As in any other game, the higher the LVL of any creature is that it is stronger, more dangerous and thicker. It becomes more difficult to destroy. And a strong player himself will kill everything that moves. What is the level of a dinosaur and player in Ark and how to pump faster? The answer is below.
Dinosaur levels
Living organisms in the game are gaining experience and value in the column are somewhat different than a character. The creatures have three types of levels in Ark Survival Evolved: wild, homemade and born in captivity.
The first is an indicator with which the wild creature lives constantly. Dinosaur or other live creature are born with a certain number in the graph. And do not change it while the player does not take care of tame. The wild beast can not have more than 150 LVL.
In the process of tachying, at maximum efficiency, the creature can be added another 75 levels. Consequently, ideally it will be tamed with a value of 225 levelets.
After taming, you can additionally dig a pet, adding it 71 to the level of the digit obtained during the production. To do this, you need to apply the effectiveness of taming and dial the maximum 2525000 points of experience. In this case, with the perfect scenario, a homely diluted dinosaur (mammal, bird, etc.) will be able to have a maximum level of 296.
But LVL born in captivity of the creature can twice the maximum home level. It may happen that the newborn will receive 450 LVL - the largest of those that are allowed on official servers.
How to put a dinosaur with a high level in Ark Survival Evolved
If there is no desire to seek a creature with a high ledge for taming, you can simply call it with the help of console commands. Cheat codes operate either on local servers (in a single game), or when using them on its own online server.
Before using the cheats, you will have to register the EnableCheat command to the console. After that, you can safely cause a dinosaur with a specific level. To do this, you need to register the following:
admincheat Spawndino "BluePrint '/ Game / Primalearth / Dinos / Allosaurus /
Allo_character_bp.allo_character_bp '1 1 1 200
Where the number 200 is the desired level, instead of which you can substitute any value. After the spa, a creature will appear with the desired LVL, which remains tamed or kill.
The character is also limited to the maximum Level in Ark Survival Evolved, like a dinosaur. The final digit is 100 levels (before ascending) and 115 after (5 pieces are added after each tech-cave tier).
To achieve the maximum level 100, it is necessary to earn 1798538 points of experience. At the same time, the character will receive 3144 points of Engramm for the whole game (which is less than the number of engrams in the game ARK SURVIVAL EVOLVED).
If you consider taking into account the levelets added by the caves, it is necessary to earn 6473538 experience points for lifting to mark 115. In this case, Engramm glasses will be 4194 (which, however, is still less than the number of available Engramm).

How to raise levels faster
Pumping is a useful thing, but very tedious. Therefore, raising levelas want to quickly. What do you need to do for this in Ark Survival Evolved? For Dino and people, different requirements.
How to pump a player
Several useful tips, how to become an experienced player as soon as possible:
- To quickly earn a new LVL at the initial stage, it is enough to actively produce resources and krafting things (in particular, tissue hat).
- The next step is the taming of the creature. It will be easier to hunt with other lizards (in priority - stembos) and produce resources.
- After 14-16 LVL, you can go on the hunt and kill dinosaurs. For it is a lot of experience.
- With progress in learning, tame all the stronger lizards (Raptor -\u003e Spinosaurus -\u003e Tyrannosaurus and so on).
The more you kill animals, craft things and collect resources - the faster your experience is growing.
How to raise dinosaur
With dinosaurs, not as many actions are available as with a player. Therefore, it is important to immediately take care of the maximum pumping of the future pet back at the stage of taming. Try to get the maximum LVL with all forces.
If the lizard is already tamed, its level is rapidly pumped by hunting for serious opponents. Therefore, grab the pet and go to destroy the local fauna. The more you kill - the more resources you have, and the pet has experience.

Ark: Survival Evolved - Very complex survival action for beginners who immediately have many questions. And when you have already built your first housing and already more or less rose to your feet, then the question arises, and who is worth taking? And we will try to answer this question.
Hyde written by the experience of the game on the map The Island., Therefore, it may not coincide with the game on other maps.
Fomiya

These guide creatures live almost everywhere on the island. And this is one of the easiest beings for taming. The fact is that if you attack Fomiya, then she will just try to escape from you. If you make her get stuck in some rock or wall of someone's base, it can be easily stunned even with a battle, and then just tame with berries, and the taching is quite short.
The only nuance is best to tame a wild optomic level 80 and above, because only then it reveals its good potential for the beginner. It can be used as a driving animal, although it is very slow. But, honestly, the newcomer before taming the pheranodone, it is not far anyway and no need to ride. Also, Fomiya is a good fabric animal, in addition, it can be used as a good fighter. If you pump fomi in health, it will be completely able to cope with 1-2 diot and one rapetor will win without any particular problems. And if you tame two fioms, then you can not worry about your safety on the beaches at all.
Parasavr
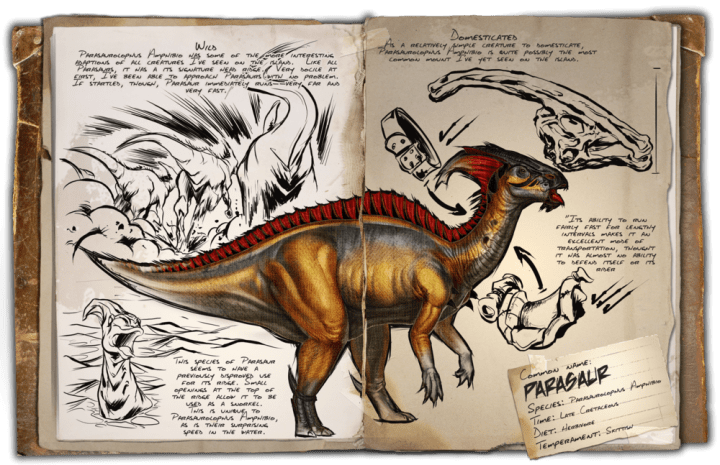
In fact, almost the same as Fomiya, only less health and endurance, but more speed, damage and weight tolerance, but the paraplan is tamed a little longer. Cowardly, like fiesty. You can drive somewhere into the wall and score a bubble or slingshot.
Dilofosaur

If you think that it is better to tame, dylophosaurial or a rapetor, then the first option is best. Yes, Dill is not as strong as a raptor, and it cannot be rolled, but it is tamed much faster. Even 150 diot to tame very simple. And besides, in battle, he will not interfere with the way as Raptor who is constantly spinning around his victim.
But the most important thing is why dylooposaurs are needed - these are their eggs from which you can make food as much for three types of dinosaurs. Moreover, two of them are useful dinosaurs-specialists of the Ankilosaurus and Dedicus (Kolobok). So a few individuals in the future will be very needed.
Triceratops (Trike)

Take this dinosaur not as simple as previous, and a lot of time is required. But in general, the task is not too complicated for the beginner. Tray can be seen on the beach, where you will not interfere with strong predators. The main thing is to stun it with arrows that are not required too much. And even put wood fences around it and start to blame it with berries.
But if you tame it, then you will get a very good fighting Dino, which can cast your enemies, as well as the riding animal. He is also not bad for the carriage of goods. But it is valuable most of all what can produce berries well. A couple of hundred valuable drug holders can be collected literally in a few minutes (the berries attack on the bushes). The main thing is not to overestimate this dinosaur and do not go deep into the island. Maybe 100+ Trike and will be able to defeat Rex or Spinosaurus. But God forbid you run into the stink of Allosavrov, who will ruin you and your trades just in shreds, and not the fact that you can escape from them.
Dodo

Dodo in this list is only for one reason. These are their eggs, as they carry with a huge speed. And from eggs you can make food for three dinosaurs, with the food it is very easy to prepare. It does not need dried meat, which means that it does not need oil and thermoshkaf. And who will tame this feed, talk further.
Pteranodon
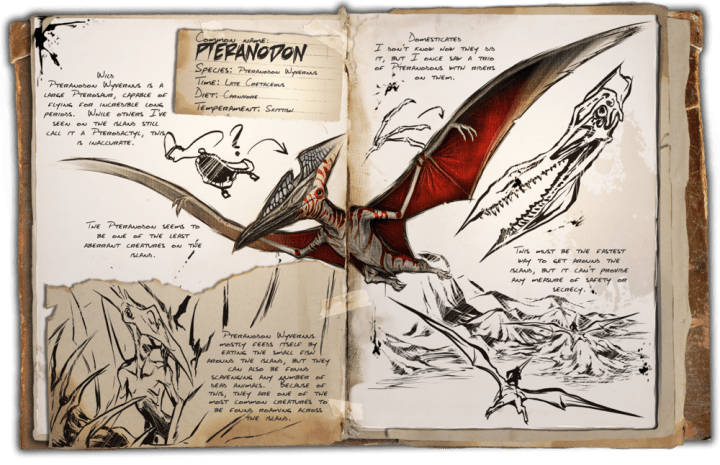
Pteranodon is the best dinosaur for the beginner. Firstly, it is very easy to tame, it is enough to immobilize it with Bolas, and then stunning, best with the help of arrows with a tranquilizer, then flush it with feed from Ejice Dodo. The main thing is not to tame very low-level pheranodones. On those who are lower than 70 levels, it is better not to look at all.
The tamed pteranodone has plenty of advantage. First, it is one of the fastest flying beings. To take off for a beginner - it means to change your position at times. Now you can safely explore the whole island, find the most rare resources, learn in what kind of dinosaurs live.
Plus, Pteranodon is an excellent fighter. It has a very powerful attack on the key "C", with which you can kill even dinosaurs such as brightness, spinosaurus or rex. In addition, with the help of this attack you can produce a large number of meat.
The saddle for this creature is crabmed at 35, but this can be very quickly achieved, probably in one day of the game. A tamed pheranodone is worth it. You yourself will notice how it will be easier to you, and you will no longer play lunch role when tamening pteranodone.