BDO where. All about homes: species, purchase and upgrade. Personal house. What do all these houses need
Did our site like? Your reposities and ratings - the best praise for us!
All the necessary information is collected in this guide for the most quick and comfortable pumping in Black Desert.
How faster pumping in BDO? Grind or Quests?
Of course, the fastest way to pump in Black Desert Online is Grind, but if you swing the first character, we strongly recommend that you pass the plot chains (about 56 levels) to get acquainted with the game. At first, BDO seems very difficult, so the accelerated pumping is recommended only to those who are confident in their forces. It should also be noted that some quests (for example, from the Black Spirit) are mandatory for each character. A reward for them, you can get additional slots in bags, glasses of knowledge, energy and influence. If you miss important quests, later you will still have to return to them. That is why we advise not to hurry and pump at least one character on quests.
Pumping in BDO using friends
If your assistant has a high attack indicator, and you have all the buffs on experience, pumping up to 56 levels takes only 2 hours. And again, if you swing the first and main character, this method will not suit you, because so you will not earn the right amount of skill glasses and you will not be able to get talents. In other words, such a method of pumping should be used only if your friends are being desire to help you further. Otherwise, you will stay without money and skill glasses.
It should also be remembered that if the helper level exceeds your own on 10 or more units, you will not get prey.
Introduction
After creating the character, the game will suggest you to undergo training and visit different locations for beginners. If you are not playing not for the first time, you can skip training. Training takes a lot of time and practically does not give anything (except, except for, moving skills).
If you are not inherent in anywhere, you can buy a cart yourself or execute a quest on the wagon in Velia. In the wagon you can store potions and prey to calmly grind, without returning to the city too often.
In addition, we recommend buying 2-3 pets in the in-game store.Pets will collect production automatically and save you a lot of time. In fact, the pet is a prerequisite for successful Grinda. If you do not have extra real money, try to buy a pet at auction.
All points for pumping specified in this guide were repeatedly tested on European, North American and Russian servers. Characters are pumped without a char at equipment and without special bonuses, so any other player can safely follow our recommendations. Equipment was mined as pumping, that is, fell from killed monsters.
We also want to remind you that some classes (for example, Walkiriya) are swinging slower than others, so for them it will be wiserfully searching for a group.
- Use maximum boughs for experience:
- + 200% Look for a channel with activated bell
- + 100% weekend bonus
- + 50% of the war
- + 30% bonus from premium set
- + 10% costume
- + 200% for 1 hour or + 100% for 2 hours - Daily bug from achievements
- Some pets give + 5% experience
- Events in the game are mainly related to holidays.
- Various consumables (candy, bouquets, tea, beer). Basically, all this is taken at the auction.
- At night, experience is rising
- If this is your first character, be sure to try to get a vehicle's vehicle as soon as possible. It can be bought at auction or get a reward for one of the starting quests.
For the most fast pumping 1-60, use the items highlighted with green font
Level 1 - 15
Level 1 - 9: Training
After creating a character appears in the village called Olivia. If this is your first character, be sure to go to them entrance quests. To turn on the aggress, press the T key and set the point on the map. Sooner or later you will take on the right place and you can start learning. Some players do not understand what to do in training quests. In fact, everything is simple - you need to approach the mannequin and execute instructions that are written in the top of the screen, that is, click on the desired keys.
After that, the Black Spirit will give you another quest and send you to kill the beetles. Open the Black Spirit menu by pressing the "/" key. By this time you must reach 5 levels.
Relieve the quest and run to the West Guard Camps, killing all the monsters on your way. So you will reach 9 levels. If you do not know where the West Guard Camp is, look at the map:
Level 9 - 13: Grove Hermit

- Monsters: Weak Ancient (Middle Fight), Adult Chapel (Far Fight), Young Still (Middle Fight)
- Experience: 3/5
- Difficulty: 1/5.
- Mining:
- Branch of woody spirit
These monsters do not represent any threat, and they are easy to kill. Ancient dwells for the most part on the hills. The branches of the wood spirit can be sold to a merchant who is at the left entrance to the guard camp. Right-click on the subject in the inventory to see the location of the merchant on the map.
Having achieved 13 levels, go back to the West Guard Camps and take the quest for Jaret's Domonargart, who stands in a tent. Perform quest - it will allow you to awaken the black spirit and improve items.
Level 13 - 15: Mine Hidel

- Monsters: De-Rudopop (Middle Fight), Small Bad Rudopop (Far Fight)
- Experience: 4/5
- Difficulty: 2/5
- Mining:
- Rough kirk
- Valuable amber [Crete. hit]
- Granat Ain [Damage]
These are also very simple opponents. They cost comfortable, and they are easy to kill. Beware of small demons, as they attack in far battle. In packs also come across elite demons, which impose the effect of periodic damage. They usually appear at the foot of the hill. The location density of monsters in the mine is rather high, so you can kill them without interruptions. Here you can face an impressive amount of silver, so if you need money, you can stay in a mine for a couple of extra levels.
Level 15 - 24
Level 15 - 18: Farmetti Plantation

- Monsters: Scarecrow (Middle Fight), Field Keeper (Middle Fight)
- Experience: 4/5
- Difficulty: 2/5
- Monster location density: 3/5
- Mining:
- Necklace Storam Fields
- Pugala stick
Entering into battle with these monsters, be alert. They apply a strong damage and pose a threat to poorly dressed characters. Also there are elite frightenings from which Adgeri gloves can be extracted. On different fields, monsters appear at different speeds. Change multiple points to choose the best option for you.
Level 18 - 24: Ruins of the castle

- Monsters: Al-Rundi's notch, sorcerer Al Rundi, Archer Al Rundi (Far Fight), Warrior Al Rundi, Pathfinder Al Rundi, Soldier Escort, Bodyguard
- Experience: 5/5.
- Difficulty: 3/5
- Mining:
- Chip of the gayman
- Rusty helmet
- Helm Adgeri
- Bronze dagger
- Long Sword Ain.
- Valuable grenade of animals [damage]
This is a good place for Grinda, but for the sake of it will have to make a big hook. In the castle and beyond the large number of monsters, from which Rusty helmets and swords of Ain can be obtained, as well as bronze daggers and adgerry helmets. Bronze daggers are suitable for lean. If you manage to get such a dagger, we carry it without removing. We advise you to kill monsters in the castle, since it is there them most. In their mining list, both armor chips, crystals and a good starting weapon are also listed. All this can be sold and work well.
Level 21 - 24: Marsh Glisha

- Monsters: Bolotnaya Naga Marauder, Swamp Naga-Warrior and Swamp Naga-Scout
- Experience: 3/5
- Difficulty: 3/5
- Monster location density: 3/5
- Mining:
- Zhara Nagi
- Black stone (weapon)
- Valuable grenade of animals [damage]
- Hasos earrings
- SELES ax
- Black stone (armor)
This place is suitable for those who do not want to run far. It is located on the way from the Swimming of Feretti to the bloody monastery. If you swing first character, we recommend that you still look into the castle and go to the swamps only if there are too many players in the castle. With Nag falls good items and even black stones. All monsters attack in the near battle and stand pretty tight, so you can beat them, running in a circle. These packs also meet elite monsters, from which black stones fall, however, to kill them, you will have to try.
Level 24 - 35
Level 24 - 29/30: Bloody Monastery

- Monsters: sectarian sorcerer (far fight), sectarian giant, sectarian warrior
- Experience: 5/5.
- Difficulty: 3/5
- Mining:
- Black stone (armor)
- Old bandage
- Old ax
- Amulet Helrick
- Armor Adgeri
Monsters in a bloody monastery are mainly in the courtyard. It is easy to kill them, especially if you do not cling too much at a time. In the courtyard there is also an elite monster, but you can kill him at the expense of Oo with the rest. We recommend swinging in the monastery to 29 levels, and then go to the gangsters camp. In principle, you can go to the bandits and at 28 levels, and you can ride in the monastery to 32 levels and go to the cave of Siruto. If there is too much people in the monastery, you can kill monsters outside the courtyard - the effectiveness of such pumping, of course, will be slightly lower, but at least you do not have to take monsters from other players.
Level 29 - 34: Bandit Camp

- Monsters: Rogue-warrior, robber-giant, robber-archer
- Experience: 4/5
- Difficulty: 4/5
- Monster location density: 3/5
- Mining:
- Black stone (weapon)
- Necklace Yuri
- Bracers of health
- Granat Ain [Damage]
- Power gloves
Try to bring monsters to the chests with a stupid or go inside the fortress. All monsters, with the exception of archers, attack in the near battle. Summer Paks to Archers - so it will be easier to use anyone abilities. Try not to come in traps - there are plenty of them in the bandit camp. The traps are caused by a little damage, but the grinding is greatly interfere.
Level 28 - 34: Orc Camp

- Monsters: Sizakek-veteran, Sizajek-Berserk, Saying warrior, Saying-scout, Saying, Young Sizes, Sizak-Shaman (Far Fight), Sizak-Officer
- Experience: 3/5
- Difficulty: 4/5
- Monster location density: 4/5
- Mining:
- Black stone (armor)
- Acute Klyuk Sayzhek
- Klyuk Sayzheka
- Valuable amber [Crete. hit]
- Adgeri shoes
This point seemed not to us too successful, so if you have the opportunity, head immediately into the Cave of Siruto or Biragi Laugh. Saged is small here, and most of them are attacking in far battle. Nevertheless, you can get black stones for weapons, so it is not necessary to finally write off this point. If you still decide to shift in the train camp, you actively apply Oo-spells.
Level 30 - 35: Castle Knights Delpe

- Monsters: Garpia, Garpia-kidnapper
- Experience: 4/5
- Difficulty: 4/5
- Monster location density: 4/5
- Mining:
- Black stone (armor)
- Brilliant feather
- Malachite I [Jump]
This point is well suited for pumping the sorcerer, the linens, a wizard or a sorceress, as they have the abilities that allow you to shoot down the harpi on the fly. If you play any other class, go to another place. Garpia flies quickly and beat hard, but it is not too difficult to kill them. Follow the level of health, and everything will be fine. The most profitable packs are located on the top floor, there you can walk from the wall to the wall, constantly killing Garpius. If you end the potion, look at the merchant on the first floor.
Level 30 - 35: Siruto Cave

- Monsters: Suruto Shaman, Siruto-Fighter, Suruto Scout, Siruto Warrior, Siruto Marauder
- Experience: 4/5
- Difficulty: 4/5
- Monster location density: 4/5
- Mining:
- Black stone (weapon)
- Axle Callis
- Tallis earrings
- Amulet Juber
- Talisman Kallis
- Temory Oros.
This place is great for Grinda. The cave is full of monsters, but you can grint and outside. In the absence of competitors, you pump very quickly, aligning pumping with earnings. The best packs stand in the center of the cave, there you can swing without breaks. Collect as many monsters as possible and bring them to shamans so that they do not have time to beat you by spells from afar. In addition, there is an elite monster on the stairs. He hurts very hurt, be careful with him.
Level 35 - 42
Level 35 - 40: Caphrase Cave

- Monsters: archer darkness, obsessed giant, warrior darkness, gangster darkness, obsessed magician
- Experience: 3/5
- Difficulty: 3/5
- Monsters location density: 2/5
- Mining:
- Black stone (armor)
- Armor Taritas
- Amulet Juber
- Talisman Kallis
- A piece of sculpture
- Dust darkness
The entrance to the cave is east of the village of Florin, in the preservice of the brie. In the depths of the monsters cave more than at the entrance. Wizards and archers cause strong damage, but they can be quickly killed by Oo-spells along with the rest. In general, the cave is not too comfortable for Grinda, and we recommend visiting it only if all other places are already busy.
Level 35 - 40: Abandoned Mine

- Monsters: infected
- Experience: 4/5
- Difficulty: 2/5
- Monster location density: 4/5
- Mining:
- Black fragmentation
- Stigma
- Valuable grenade [attack strength]
- Footwear Taritas
- Taritas gloves
Numerous monsters live in this mine, which can be killed by Oo-spells. Remember that the center has an elite monster. He slowly moves, but hits very much. Pilons that attack players in far-fighting are also placed in the mine. If the cave was chosen by other players, go to the north, can also be shown there. Do not forget to rent traders mined trash to earn a little.
Level 38 - 40: Abandoned Marny Farm

- Monsters: Monsters Ruins
- Experience: 3/5
- Difficulty: 4/5
- Monster location density: 3/5
- Mining:
- Helmet Tallis
- Tallis belt
- Rough Dark Crystal
- Dust attraction
This is another optional point. It is not as good as the above options, but competitors are quite rare on it. Numerous monsters live on an abandoned farm, on which you can pump and earn. These monsters are slowly moving, but they have a lot of health, and in some classes these circumstances cause tangible difficulties.
Level 38 - 42: Preserve Brib Forest

- Monsters: Ancient Tree, Round Ruin Tree, Tree with Face, Little Tree, Big Tree, Triangular Ruinen
- Experience: 3/5
- Difficulty: 4/5
- Monsters location density: 2/5
- Mining:
- Black stone (armor)
- Damned crystal
- A piece of sculpture
- Armor Dobarta
This place can not be called successful. Monsters are small here, and they cost far from each other. Monsters are thick, and from the point of view of production, everything is not too good. We advise you to keep this place as a spare option.
Level 42 - 50
Level 40 - 45: Evi Pass

- Monsters: petrified gnome, petrified minister, petrified mad minister, petrified sapper
- Experience: 3/5
- Difficulty: 3/5
- Monster location density: 3/5
- Mining:
- Silver ore
- Rough Emerald
- Rough diamond
- Malachite [Resistance]
Go to the center of location, there are the biggest packs. In the mine themselves do not go - there is no one. Beware of drank, they apply a strong damage and often block the path to the most inappropriate moments.
Level 40 - 45: Marnie Pass

- Monsters: Chimera, Horned Chimera
- Experience: 5/5.
- Difficulty: 3/5
- Monster location density: 4/5
- Mining:
- Necklace Pares
- Tallis Necklace
- Valuable amber [Crete. hit]
- Valuable grenade [attack strength]
- Powder death
This is a magnificent point for pumping, especially if you know where the biggest Paks are. Nevertheless, this place is very popular, so be prepared for competition. The optimal route looks like this: Kill the pack in the ravine, climb the mountain, killing everyone in your way, and then go down to the ravine again.
Level 42 - 45: Sonyl Base

- Monsters: Lizard, Elita Sonyl, Warrior Sonyl, Private Sonyl, Archer Sonyl, Elder Sonyl
- Experience: 4/5
- Difficulty: 4/5
- Monster location density: 5/5
- Mining:
- Black stone (weapon)
- SELES ax
- Steel dagger
- Onion Pares.
- Armor Tallis
- A piece of armor
This is a great place for pumping and earning. With monsters, you can get relics that are sold from the auction about 500,000 silver. If you don't really need money, the relics can be turned into a scroll by posting them in the form + in inventory. Run around the camps, collect monsters and use the spells. Try not to go too far from magicians. In the depths of the camp there is an elite monster. Be careful, he hits very much.
Level 44 - 45: Giant Camp

- Monsters: Giant Fighter, Giant Berserk, Giant Warrior, Giant Drachun, Spotted Hyena
- Experience: 5/5.
- Difficulty: 3/5
- Monster location density: 5/5
- Mining:
- Tallis shoes
- Ancient spear
- Ax pares
- Tallis Necklace
- Armor Adgeri
Numerous monsters live in this camp, however, a convenient place for Grinda will have to search. It seemed to us that it was worth going deep into the camp. With monsters, you can get relics that are sold from the auction about 500,000 silver. If you don't really need money, the relics can be turned into a scroll by posting them in the form + in inventory.
Level 44 - 50: Forest Mans

- Monsters: Speaker, Warrior, Brown Bear, Drone
- Experience: 5/5.
- Difficulty: 3/5
- Monster location density: 5/5
- Mining:
- Fastened crystal
- Jerez shoes
- Granat Ain [Damage]
- Powder battle
- Shield Aksion
- Rutter loss helmet
- Ring hearing Entov
- Necklace Fogrov
- Potted necklace
- Old necklace
This is one of the last points when pumping up to 50 levels. Monsters here go to packs of 6 pieces, and it is easy to kill ay-spells. Pay special attention to the northern part of the location. Beware of large flames - at least until you reach 50 levels. Later you can still farm with them the best amulets in the game. In addition, a scrolls for calling boss-goblin, as well as relics, which can be sold at auction on average for 500,000 silver, are produced from monsters in the mans forest. If you don't really need money, the relics can be turned into a scroll by posting them in the form + in inventory.
Level 50 - 56
Level 45 - 52: Water Camp

- Monsters: Water, Elite Water-Fisherman, Water-Water, Water-Fisherman, Fat Water
- Experience: 5/5.
- Difficulty: 3/5
- Monster location density: 5/5
- Mining:
- Black stone (armor)
- Black stone (weapon)
- Armor luck
- Mysterious bag
- Pink salmon
- Tolstolob
- Root Loss Boots
- Helmet Taritas, Helmet Tallis, Shlem Adgeri
- Earrings whispering enta
- Belt poem
- Necklace Pares
- Piece of crystal from ancient ruins
- Granat Ain
- Summon Summon Gias
Water camp is the best place to pump up to 50 levels. The quest is made here, which gives the Black Spirit at the level level. With dodging in the camp, you can get black stones for sharpening armor and weapons, as well as other useful items. Monsters appear very quickly and move in large groups, which increases the efficiency of the Grinda. Here you can swing up to 52 levels and even further, especially if you need money.
Level 50 - 55: Settlement of Clana Tugu

- Monsters: the leadership of the Clan Tugu, the Hunter from the clan Tugu, the fighter from the Clan Tugu
- Experience: 5/5.
- Difficulty: 3/5
- Monster location density: 5/5
- Mining:
- Black stone (armor)
- Black stone (weapon)
- Many types of weapons and armor
- Necklace Secarra
- Earrings of Oka Assula
- Ring Oka Asulla
- Printing ancient guards
- Working potion
- Sharp Decoration Clan Tugu
- Eternal prohibition
These are quite complex monsters, so only those who have already managed to collect good equipment (approximately 90 attacks) at the Clena Clan Tugu. In addition, there is a luxury monster in this location, which causes a strong damage in a long-range battle. In general, the point is well suited for pumping. You can go down to the mines, but without good equipment, the murder of monsters in them will take too much time.
Level 51 - 55: Ellic Temple

- Monsters: Ellic Caster, Magic Section Ellik, Ellic follower, contaminated swamp, Ellick fanatic
- Experience: 5/5.
- Difficulty: 3/5
- Monster location density: 5/5
- Mining:
- Black stone (armor)
- Black stone (weapon)
- Fanatic proof
- Stones for inlay
- Weapons of Crei
- Armor of power
- Leather boots Derek
- Belt Oka Asulla
- Ring Zagoya
- Old books
- Eternal prohibition
Monsters in the temple appear packs of 4-6 pieces. With a large chance, black stones are falling with a big chance, items from the kit of the grudge and weapons of Creia, which can be done well. Most monsters attack in the near battle, but priests use spells and can deliver a lot of trouble. You can grind in the temple itself or in the south of it. We recommend going to the mountains, as you can find Paks out of 10 and more monsters.
Level 53 - 55 (90+ attacks): poisonous forest

- Monsters: Cloud mushroom, snow mushroom, high poisonous mushroom, soaring mushroom bubble
- Experience: 4/5
- Difficulty: 3/5
- Monster location density: 4/5
- Mining:
- Black stone (armor)
- Footwear Lemoria
- Doll Voodoo Manshair.
- Forest breathing
- Stone Life
- Purest black stone
Pumping in the forest is preceded by an awakening, that is, it is designed for 53-55 levels. By complexity, location is approximately equal to the lair of thieves-wallet and the lair of the Grieving tribe.
Poisoned mushrooms are growing in the forest, which cause 10 units of damage every 3 seconds. Most likely, you will have to actively use the potions, especially if you do not kill monsters too quickly. Mining with mushrooms weighs a bit, so it will have to return or send the maid only for potions. Going into the forest Polly, be sure to capture with you tools for collecting resources. The best items that can be extracted with mushrooms is an equipment from a set of lemoria and a voodoo manshara doll. Dolls are needed to create scrolls (by analogy with relics).
Level 52 - 58: Fort Saosh (100+ attacks)

- Monsters: rebellious spear, rebellious warrior with gun, rebellious warrior
- Experience: 5/5.
- Difficulty: 4/5
- Monster location density: 5/5
- Mining:
- Black stone (armor)
- Black stone (weapon)
- Weapons of Crei
- Parts of the set of health and grudge
- Gladiator's belt Shchulza
- Necklace Gladiator Schulza
- Stones inlay
- Red Nose Call Scroll Scroll
- Eternal prohibition
The aqueous fort is one of the best places for pumping at 54 levels and above. Here you can swing to 56-57 levels, along the way, collecting equipment for more complex locations. If you have not gotten enough, look for a group. Remember that monsters from the fort are damaged by a strong damage and know how to discard opponents. You can get items from the health kit and grudge, weapons of rising, as well as black stones. Nearby are the spikes of the village and the strengthening of Sarma, where you can buy potions and sell trash. In addition, you can rent a nearby house and use it as a warehouse.
Level 55 - 57 (100+ Attacks): Fort Ingan

- Monsters: Inan-Warrior, Inan-Infantryman, Inan-Archer, Inan-Koldun
- Experience: 5/5.
- Difficulty: 3/5
- Monster location density: 5/5
- Mining:
- Black stone (armor)
- Shard armor Ingan
- Protective stone
- Helm Lemoria
- Lemoria gloves
- Doll Voodoo Manshair.
- Purest black stone
- Fire rage
Fort Ingani is a zone for pumping from 55 to 57 levels. It looks like a water fort.
Monsters in Fort have a small margin of health and quickly die. We recommend running between the cliffs, but it is worth remembering that this place is very popular. Nearby is a camp in which you can buy potions or repair equipment. The best items that can be extracted with Ingani is an equipment from the lemoria set, the rage of the forest and the doll Voodoo Mansha. Dolls are needed to create scrolls (by analogy with relics).
Level 55 - 58: Pirate Island

- Monsters: Drunk Treasure Finder, Deck Fighter, Elite Fighter, Elite Gladiator Pirate
- Experience: 5/5.
- Difficulty: 5/5.
- Monster location density: 5/5
- Mining:
- Black stone (armor)
- Black stone (weapon)
- Red Coral Ring
- Blue Coral Ring
- Red Coral Earrings
- Blue Coral Earrings
Pirates appear on the two islands, the most convenient point for Grinda is located on the North Island. Location is intended for pumping in a group of 5 players. It is hardly the best place to pump up to level 60. If you have not had time to dress well, keep care and do not cling too big packs. If you are dressed well, you can grink alone or together with a partner in the east or in the West. To get to the island, you need a ship and horse for the transportation of mining. Instead of the fishing boat, you can use escort epios, as it has a greater capacity. In the port on the island there are merchants who can buy potions, repair equipment and exchange currency.
Level 56 and above
Level 56 and above (100+ attacks): camp clan bassim

- Monsters: Calla Piciner, Calla Commander, Calla Veteran, Kerda-Ceury, Okhunesi, Okhonsei Mag
- Experience: 4/5
- Difficulty: 3/5
- Monster location density: 3/5
- Mining:
- Armor Rozhhar
- Black stone (armor)
- Black stone (weapon)
- Ring of Lost Char Asulla
This location is located inside the canyon. There are many monsters in it, but they are unlikely enough for a group. The Klanian district of Bassim is not in the desert, so you will not need purified water and tea from Badaina. With monsters in this location, unique items do not fall, but you can freely swing there, if your equipment leaves much to be desired. Production includes items from the Rochar kit, as well as black and precious stones on which you can earn. If you want to farm silver in pure form, we advise you to go to the aqueous fort.
Level 56 and above (110+ Attacks): Desert Castle

- Monsters: desert naga-guard, deserted naga commander, desert naga-priest, desert naga warrior
- Experience: 4/5
- Difficulty: 3/5
- Monster location density: 4/5
- Mining:
- Gloves Rohava
- Black stone (armor)
- Black stone (weapon)
- Necklace Serap
- Scrolls with text in ancient language
- Earrings of Lost Char Asula
- Traveler map
The desert area is close to the eastern bazaar, in the desert, that is, you will need purified water and tea from Badyan. The horse can be left by the knotting manager. Numerous monsters are inhabited in the desert area, which is easy to win. As a production, you can get black stones, necklace serap and scrolls with text in ancient language.
Level 56 and above (110+ attacks): Titum Valley

- Monsters: Desert Foganan Guard, Desert Fogian Warrior, Desert Fogan-Dug-Field, Desert Fogian Predictor, Desert Fogian-hour
- Experience: 5/5.
- Difficulty: 3/5
- Monster location density: 4/5
- Mining:
- Necklace Serap
- Shoes Ryhava
- Black stone (armor)
- Black stone (weapon)
- Scroll with text in ancient language
- Detail of compass
- Ring of Lost Char Asulla
- Grenade III accuracy
The Titum Valley is far away in the desert, and it is difficult to find it without a compass. Going there, pour with purified water and tea from Badyan. The horse can be left in the valley. In the Titum Valley, many monsters, but they do not represent a special threat. Despite the fact that Greengets in the Titum Valley is very profitable, few players go there - apparently, they are frightened by the need to travel around the desert.
Level 56 and higher (145+ attacks): Forgotten ruins

- Monsters: Commander forgotten Ruins, Guardian forgotten Ruins, Cadry Gladiator, Cadry Witch, Cadry Warrior
- Experience: 3/5
- Difficulty: 4/5
- Monster location density: 4/5
- Mining:
- Black stone (armor)
- Black stone (weapon)
- Weapon Rochar
- Necklace Serap
- Ring Defender Ruins
- Scroll with text in ancient language
- Lost Char Asulla belt
- Granat III Crete. Hit
Forgotten ruins are far from the most convenient place for Grinda, however, there you can get some rare items. Ruins are located in the west of Valencia, not in the desert, not far from the eastern bazaar. Monsters in the ruins are provided abound, but all of them are very strong, therefore it is difficult for characters with poor equipment. Mining: black stones, Rochar weapons, scrolls with text in ancient language. In addition, here you can get a ring of the defender of the ruins. The ring is collected from several parts. Serap necklace falls only with monsters.
Level 56 and above (130+): Robber Gorge

- Monsters: Sand Marauder, Sandy Killer, Sand Elite Warrior, Sand Arrows
- Experience: 3/5
- Difficulty: 2/5
- Monster location density: 3/5
- Mining:
- Black stone (armor)
- Black stone (weapon)
- Weapon Rochar
- Necklace Serap
- Scroll with text in ancient language
- Black Spirit Clamp
- Earrings of Lost Char Asula
- Amethyst III barrier
The robbers gorge is not far from the shcat, not in the desert. Optimal requirements: 175 attacks / 220 protection. One of the best spots for pumping. The only minus is a great competition.
Level 56 and above (150+ attacks): Crescent Temple

- Monsters: guard crescent, Sonyl-sectance Crescent, Sonyl-Guard Crescent, Guard Lizard
- Experience: 4/5
- Difficulty: 4/5
- Monster location density: 4/5
- Mining:
- Black stone (armor)
- Black stone (weapon)
- Ring defender of the temple
- Necklace Serap
- Scroll with text in ancient language
- Rusty Ring
- Lost Char Asulla belt
- Malachite III Resistance
The chime temple is in the desert, so you will need a compass. Going there, pour with purified water and tea from Badyan to get rid of desert deba. Monsters in the temple a lot, and they are very strong, so that this point is intended for characters with good equipment. Even if you grinstand in the group, do not forget to follow your health level. The monsters of the temple is immune to the discard, and it is very annoying. Optimal requirements 175AP / 220-230DP. This place is very popular, as it is possible to get a rare prey - black stones, a serap necklace and a scroll with the text in ancient language, as well as a ring of defender of the temple. The ring can fall in the "pure" form or in the form of a rusty ring that must be cleaned.
Level 57 and above (180+ attacks): Snake Valley

- Monsters: Vasilisk Vasilisk Vasilisk, Vasilisk Dollhouse
- Experience: 4/5
- Difficulty: 4/5
- Monster location density: 4/5
- Mining:
- Black stone (armor)
- Black stone (weapon)
- Armor Roshava
- Belt Vasilisk
- Parts of Vasilisk belt
- Scroll with text in ancient language
- Lost Char Asulla belt
Snake Valley is in the west of Valencia, not far from Altinov, where you can repair the equipment and sell trash. Vasilisk's gorge is sick of complex monsters. If you are not dressed too well, watch the level of health carefully. Optimal requirements: 185AP / 230DP. The gorge is very popular, because here you can get rare prey - black stones, scrolls with text in ancient language, items from Ryhava's set, precious stones and Vasilisk belt, which is also assembled from parts.
Level 57 and above (170+ attacks): plain taftar

- Monsters: Centaur Warrior with Ax, Centaur Hunter, Centaur
- Experience: 3/5
- Difficulty: 4/5
- Monster location density: 3/5
- Mining:
- Black stone (armor)
- Black stone (weapon)
- Helmet Rohava
- Kentura belt
- Old belt
- Scroll with text in ancient language
- The Necklace of Lost Char Asulla
- Amethyst III soon. skills
Plain Taftar is located in the west of Valencia, not far from the Eastern Bazaar. Monsters on it are not very much, they go to groups of 6-7 pieces, quite far from each other. Centaurians have immunity to knockdowns, so the battle with them can not be called easy. Optimal requirements: 190AP / 230DP. Plain Taphtar does not use specially popular with players, since pumping on it does not differ in particular efficiency. As a production, you can get black stones, a rohaw helmet, a bentaur belt and precious stones.
Level 58 and above
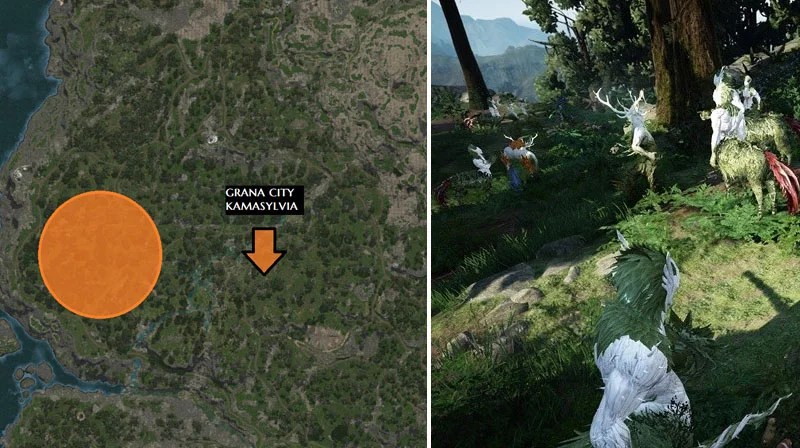
Level 58 and above (190+ attacks): Luga Navan

- Monsters: Griffin, Riding Peritsa, Royal Griffin, Black Panther
- Experience: 4/5
- Difficulty: 4/5
- Monster location density: 4/5
- Mining:
- Black stone (weapon)
- Stone defeat
- Stone Life
- Helm Griffon
- Doll Voodoo Manshair.
- Forest breathing
- Purest black stone
Luga Navan is designed for level 58 characters. Unlike other locations from the first part of Camashion, for Grinda meadow, the best equipment is not required, and therefore this place is very popular. For an effective Grinda, find the group and go fishing and potions. By the number of experience, the meadow of the navel can be compared with the most ancient wise men. If you need only money, pay attention to other locations.
There are a variety of monsters in the meadow, and we recommend in advance to study their abilities. The best object for Grinda is feathered wolves (provided that you do not need claws of the griffin for the potion of the same name). Pernaya wolves appear large groups and know how to discard opponents. Be carefull! On the meadow can also be found funylov, black panther, elephants and peris. Try not to cling your unnecessary monsters if you are not sure about your abilities. From ordinary and royal griffins falls the griffin helmet.
Level 58 and above (190+ attacks): sulfur mine

- Monsters: Lavova Predator, Lavova Paparun, Lava Tuka, Lava Iznachka, Lavova Powern, Lavova Torun
- Experience: 3/5
- Difficulty: 4/5
- Monster location density: 3/5
- Mining:
- Black stone (armor)
- Black stone (weapon)
- Necklace Sichil
- Scroll with text in ancient language
- Scraps of an unknown card
- Children compass
- Traveler map
- Black Spirit Clamp
- Dirty necklace Sichil
- Blue sulfur
- Amethyst III barrier
Sulfur shops are located in the north-east of Valencia. You can get there from the capital, leaving a camel or a horse at the entrance. The shops are not considered the desert, but dangerous monsters live in them. Go there along with the group. If there are no groups, kill monsters outside. Mining: Black stones, scrolls with text in ancient language and spare parts for compass. You can also get a Necklace shychila (rusty or ready, as in the case of a ring from the Crescent Temple).
Level 58 and above (200+ attacks): Pillap prison

- Monsters: Adept Kafras, Railway Jimmer, Vicious Ball, Defeated Hooligan
- Experience: 3/5
- Difficulty: 4/5
- Monster location density: 5/5
- Mining:
- Necklace Sichil
- Scroll with text in ancient language
- Scraps of an unknown card
- Children compass
- Traveler map
- Black Spirit Clamp
- Dirty necklace Sichil
- Malachite III speed
- Disappeared
Pillap prison is located in the south-east of Valencia, not far from the city of Murikun. If you are out of law, you will not be difficult to get to prison. Otherwise, you are waiting for a long and tedious journey. The prison is not considered the desert, the monsters in them there are many, the location itself is just a huge, so you can grind without stopping. The only difficulty lies in the fact that monsters have a large margin of health and impressive attack power.
Level 59 and above (210+ attacks): Forest Manshar

- Monsters: Foins Manshar, Hunter Manshar, Warrior Manshar, Priest Mansha
- Experience: 4/5
- Difficulty: 4/5
- Monster location density: 5/5
- Mining:
- Black stone (weapon)
- Fire rage
- Protective stone
- Doll Voodoo Manshair.
- Particle of land
- Purest black stone
- Lemoria gloves and shoes
- Necklace Carnaca
Forest Manshar is a location designed for high-level characters (59+). Very dangerous monsters live here, for victory over which Kutum's weapon is extremely desirable.
Most likely, you will need a group, but not out of five, but from three players, since the monsters fall only three treasures. Carefully follow the priests and hunters - they apply the strongest damage, and they need to be killed first.
Level 59 and above (220+ attacks): Alv Forest
- Monsters: Warrior Lonas, Scout Lonos, Archer Lonos
- Experience: 4/5
- Difficulty: 5/5.
- Monster location density: 4/5
- Mining:
- Black stone (armor)
- Fire rage
- Ring Lonaros
- Protective stone
- Doll Voodoo Manshair.
- Forest breathing
- Ring Lonaros
- Lemoria gloves
- Particle of land
Lonaros is a location designed for level 59 players and higher. She is similar to Pillap prison, a group is required for successful Grinda.
Lonosov does not use specially popular with players, because there is difficult grinding there, and many prefer Griffins. In this location, you can get a ring of Lonasa, however it is believed that it is inferior to the knob of the defender of the temple.
Level 60 and above (230+ attacks): Anacreon Temple / Histria Ruins

- Monsters: Anacono Guard, Anacreon Career, Anaconon's Ball, Anacreon Designer, Ancreonon Ancient Guardian
- Experience: 3/5
- Difficulty: 5/5.
- Monster location density: 5/5
- Mining:
- Black stone (armor)
- Black stone (weapon)
- Scroll with text in ancient language
- Detail of a good compass
- Sign of the secret organization
- Black ancient fragmentation
- Detail of compass
- Traveler map
- Stones inlay
- Tunra necklace
In these locations, you can only get through the portal, which is randomly appearing in the desert. Both are particularly difficult and designed for groups. It is believed that the Anacreon Temple is easier than histories ruins, but it is not suitable for solitary passage. The passage of these locations does not give too much experience and money, but they can produce rare materials to create a tunra segue, as well as black stones, compass spare parts and scrolls with texts in ancient language. To get to the Anacreon Temple or Histria's ruins, it is necessary to pump up to 59-60 levels, collect good equipment and find yourself a group.
Level 60 and above (230+ attacks): Mirumog Forest Ruins

- Monsters: Choose Tree Observer, Purned Tree Keeper, Mirumog, Ent-Ghost
- Experience: 4/5
- Difficulty: 5/5.
- Monster location density: 3/5
- Mining:
- Bark of young enth
- Purest black stone
- Forest breathing
- Helmet and armor lemoria
- Weltar shine belt
- Doll Voodoo Manshair.
- Fire rage
- Forest breathing
- Wind particle
The ruins of the forest of Mirumog are designed for levels of level 60 and above. In difficulty, they are similar to histories ruins, that is, a group will need for passage.
Poplar-observers and old poplars deserve separate attention. They apply a strong damage, and observers also explode before death, imposing a negative effect on the players.
Level 60 and above (240+ attacks): Gaphinracia temple

- Monsters: an ancient witch tool, an ancient instrument tool, an ancient combat gun
- Experience: 5/5.
- Difficulty: 5/5.
- Monster location density: 5/5
- Mining:
- Black stone (armor)
- Stone defeat
- Fire rage
- Parts of Sethene Lemoria
- Lunar light stone
- Tunra belt
- Wind particle
The gayfinracia temple is designed for level level 60 and higher. In difficulty, it looks like a historic temple, that is, it is one of the most difficult locations in the game. Optimal requirements: 220 + AP, 280 + DP, Cutum weapons.
Over all locations are placed the towers that need to be destroyed in the first place. Monsters appear packs of 3 pieces and have a big margin of health, so we recommend collecting a group for a campaign. The Gaphinracia Temple is considered to be a top content for well-dressed characters, here you can get a lot of experience and silver.
In addition, the Temple Monsters falls the best belt in the game, the tunra belt, as well as the rage of the forest, which is used for the manufacture of new gemstones.
The vegetable garden is a favorite entertainment in MMORPG games, allowing the game character to have his own land block, plant seeds, care for shoots and, as a result, collect valuable harvest. In Black Desert Online, this exciting occupation is even put in a separate branch of the craft - "harvest".
Many get acquainted with a garden in BDO thanks to the plot quest, which gives Gnomkas Wormsbane's gnome on the Hidel Watch post.
But the garden ("woven") of the jamkas is far from perfect - it is possible to plant only one unit of cultures. That is, seeds that require two slots for planting, it will not be possible to grow with a similar fence. But it, in contrast to the rest of the fences, can be obtained completely free.

For those who prefer more serious scope in gloomy, there are several other options. It should immediately make a reservation that the garden in Black Desert cannot be purchased for any money. It takes exclusively for glasses of influence for rent in some NPS-OB (non-chairs).
Where to take a garden in Black Desert?
In total, there are four types of gardens - fences in the game (including the free woven Jamkas Wormsbaine).
The next garden in BDO can be rented in several NPS, for example, Martina is on Pinto plantation (not far from Velia) or Enzo on the Farm Diaz (near Calfence).

In just 3 points of influence, this "light fence" will allow the novice gardener to get the first experience in the "harvest" craft and at the same time raise up to 4 seeds.
The third utility is a vegetable garden - this is a "ordinary fence", which can be obtained for 6 points of influence, for example, in the mistress of wheat fields of the Rate (node \u200b\u200bNorthern Wheat field).

A plot that will provide a good old standard can accommodate up to 7 plants, which is very wondering than previous land ownership.
For the avid gardeners who want to use their horticultural abilities to the maximum, the third and most extensive garden in Black Dessert is "strong fence".

In order to get it, you will need 10 points of influence and a trip to the calfone (or in Glyha, for example) to the trader tools. The Cerano NPS in the capital will gladly provide this garden to everyone, if there is, of course, the necessary influence.
This fence will allow simultaneously to grow to 10 plants, which is an absolute record among all other fences.
Also, we should not forget that in the game Black Desert there is an opportunity to put several gardens at once, that is, if the player decided to seriously take up horticulture and gardening, you can find a good place, put a whole plantation and enjoy the work on a garden and harvest.
How to put a worker to care for a garden in BDO?
Until recently, Black Desert did not exist to use hired labor to care for care. Which is very frustrated, because Even with the burgy installed on the garden, the pests are still periodically at the growing fruits, and you have to constantly monitor the state of seedlings in order not to lose the crop.
March 2, 2016, when a new great update was installed on the game servers, "Valencia. Golden Era, "The developers of the game were very pleased with the gardeners with one of the innovations. Now for the care of the harvest in Black Desert, you can use the worker.
Unfortunately, he cannot collect harvest and sow seeds, but is quite capable of ensuring unhindered cultivation of all seedlings without losing their quality and health. The owner of the garden will only have to plant the necessary plants, put an employee to the garden, and at the right time to return for ripe and healthy fruits.
To order a worker to care for a garden (it should be free from other tasks and have energy), you must press the "Garden" button on the top left pane.


In the menu that appears, a complete list of areas owned by the player, as well as their location and type. In the "Work" tab, and you should select the desired mercenary, while all the "subtleties" of the upcoming operation are clearly described in the task menu that opens.

Pressing the button will launch the care of the garden. At the same time, it will be possible to observe this very mercenary. He will finish its work "Gardener" only when he runs out all the energy, and will not go to rest earlier, even if the entire harvest is 100% ripe.

This is so simple way to easily facilitate my life, learning to send a worker in Black Desert to care for the garden.
Milk and eggs
You can refline in Hide and the northern wheat field on the aromatic food, a by-product of cooking or to make a cow. The procedure is a mini-game in which you need to press the mouse buttons in turn, have time to fill the vessel in 30 seconds. The process is spent in the process of character. You can find the daisy cows near Olivia and on the ranch of Farrs next to the calf.
Eggs, like chicken meat, mined workers on nodes Pinto plantation, Farm Bartelli.
Flour
It turns out when chopping cereals (potatoes, bathata, wheat, barley, corn). The manufacture of the manufacture is activated by pressing the L button by pressing the flour button depends on the level of character manufacturing skill.
Cereals
Mining workers on nodes:
Batat - Farm Suri;
Potatoes - Farm Lodge, Pinto Plantation, Farm Bartelli;
Wheat - Big Plantation of Fereretti, Costa Farm, North Wheat Field,
Corn - Tuscany Farm;
Barley - Northern Wheat Field;
On the same nodes, you can collect cereals manually, equipping the sickle.
Vegetables and spices
Vegetables include tomato, pumpkin, cabbage, olive. You can get when collecting from the appropriate plant or grow in the garden. The same applies to spices - red and black pepper, aloe, bow, garlic. Alo aloe can produce slaves on EHTO farm.
Fruits and flowers
Strawberry and grapes can be grown in the garden. In addition, grapes can be collected in Olivia and Velia. Tulips and roses can be collected from the plants (you will find entire fields next to the capital of a calfone) or grow. Sunflowers - just grow in the garden. The rest of the fruit, except grapes, sells Milano Belucci fruit trader in the capital of a calf.
Mushrooms
Grow through the whole map. Most of the whole mushrooms in the forests of a calfone, but you can find them in the desert. Any kind of fungi, besides truffles, is grown in the garden (disputes of truffles in the game are not available). Some mushrooms can be bought from Brandio in the capital of a calfone (standing in the same building with a basker Basque).
Honey
In the Baluminos Forest, NPC Daphne can be rented for glasses of the effect of a rifle for training. Next to the forest on the trees there is a socket of wild bees, knocking on, which can be selected wild bees hive. Grinding 3 hives, you will receive one or more portions of honey or good honey (green quality). Please note that with the help of a wick gun used for hunting, it is impossible to knock down the hive. In much larger volumes, honey can produce slaves on the farm Alejandro.
Fish and seafood
Caught on the fishing rod in most reservoirs (except the smallest puddles). Seafood includes: turtle, mollusk, squid, cancer, jellyfish, crab, starfish, octopus, sea horse. All the rest of the livestock caught on the fishing rod - fish. Dried fish, two portions of which in cooking can be replaced with one raw fish, can get workers on the islands of Ruwiano, Efed Roun, Beirouva, Fuzar, Dellenghart, AFFS, Ruruba, Stoen, Albresso, Varatherra, Randers, Serge, Vajaja, Modik and Grenada.
Meat
Animal meat: raccoon, wolf, boar, foxes, ferret, stone rhino, lamb, beef, venison, memborean.
Poultry meat: chicken, yellowing, flamingo
Hard meat: Lizards, Varagon, Worm, Waste Dragon.
It, as well as the meat of snake and scorpion, can be assembled with the help of a tone from the carcass of the murdered animal (with the exception of chicken meat). Salt, sugar, butter, salty salt, olive and grape oil, yeast, water for cooking, the base for sauce is selling any NPC cook (as well as the chef and the hosts of the restaurants).
Ingredients for Alchemy
Grass
They, as well as weeds, calendula and azalia, can be obtained by collecting wild and forest herbs using a sickle and grow in the garden. Slaves on nodes can be mined:
Calendula - Balohenos Forest, Ruins of the Fortress Wall;
Azalea - Lynch Farm Ruins, Western Sereland Plain.
Blood
Cold - bat, lizards, yellowing, worm;
Giants - Troll, Bear, Rest, Dinosaur,
Dark - Flamingo, Wolf, Dragon Waste, Buvol.
Buuray - Sheep, deer, Bizon, Varagon, Pigs;
Animals - foxes, raccoon, ferret, monkeys.
You can collect blood with a syringe with a murdered animal carcass.
Collection with trees
Juice from the tree can be collected using a syringe. At the same time, there is a chance of a drop of a bitch of a bloody tree, the crust of the old tree, the branch of the monk, a magical leaf, a red kidney. The same ingredients can be obtained when wood harvesting with an ax.
Fruit
This includes the fruits of the sun, ocean, charm, magic, storm, absolute, defeat, nature. Each of the fruits can be accidentally obtained when collecting plant sickle, including in the garden.
Dust
It can threaten when producing characters of stones and ores with the help of kirk. Many dust types as a by-product receive workers, recalculated on the billet of ore. Depends on the type:
Fire dust - copper and titanium ore;
Centuries - zinc and lead;
Darkness - iron,
Destruction - coal,
Attraction - tin ore.
Most types of ore are mined on many nodes scattered throughout the map. The tin ore can be mined only in the origins of the bear river in the countryside.
Powders
Mining workers on nodes:
Varvarov - Lynch Farm Ruins;
Powder of chaos - place of excavations;
Ash - Forest Mans, tree Rui;
Earth - Place of excavations, ancient stone hall;
Initiality - Ruins of Glyš;
Battle - Bernito farm;
Fixing - the stone hall of the ancients;
Hunters - Ruins of Glysh, Ruins of Lynch Farm;
Harm - Forest Mans;
Memory - Sanctuary of pilgrims: modesty.
Death powder is thrown from the undead in the locations of the Cemetery of Hexes and the Knight cemetery, in other way it is impossible to get it. The shining powder necessary for the manufacture of alchemical stones is sometimes created as a by-product.
A few words about beds
In Black Desert, the garden allows not only to reduce the time to search for resources, but also to grow ingredients in green and blue quality. The garden is cultivated:
Cereals;
Spice;
Vegetables;
Fruits;
Flowers;
Mushrooms;
Herbs.
Consider that some types of ingredients in any way except growing in the garden, it is impossible to get it. When weeding a garden, you can collect weeds, a monk branch, a magic leaflet. In addition to plants, chickens and cows can be grown on the garden:
Chicken nest. Created by grinding 20 coarse stones and 100 barley. Allows you to get eggs and chicken meat. It takes 3 slots.
A stack of hay. Created by drying 50 weeds. Allows you to get milk and beef. It takes 4 slots.
Like cultivated cultures, chicken nests and a stack of hay can be green blue quality - good and selected, respectively.
To buy houses, eye glasses are needed:
Please note that the description says how many points spent at the moment at home. These glasses are obtained during the tasks. They can always be returned by selling the house. However, be careful. Points, especially at the beginning of the game, will not be so much. Also, silver may be needed for the purchase of a house. Unlike influence points, when selling at home, silver does not return.
In each city and in some nodes you can buy a house. The largest groups of houses are in Hidele and in the calf. In the leadership, I will focus on considering lines of houses in Velia, Haidele, Glyha and Calfean, since it is their players who are most often used to establish trade connections and opening house lines.
How to buy a house?
In order to purchase a house, press the "M" key to open the map and find the city on it:
After that, click on this icon with the left mouse button. Here, for example, what will appear if you choose Hidel:

1. - Means that the house has not yet been purchased and is necessary for opening or continuing a group of houses.
2. - Means the house is purchased and built. Icon in the right corner is the type of house, I will tell about this further.
3. - Means that the house has not yet been purchased.
4. - means that the house is purchased and in the process of construction.
Let's figure out the example of a group 1 in Hidee, we'll share how to buy a house and how the group of houses works. Choosing a "blue" house in the group (this is 1-1):

1. - One of the purchase options. Do not make mistakes with the choice.
2. - Bonuses and differences at home levels.
3. - Purchase button.
4. - Points of influence required to buy this house.
5. - Your current influence glasses.
6. - Time to build.
7. - The cost of building.
8. - Your current amount of silver.
9. - Inside.
After that, click "Purchase" and see such a window:

Here you can also know again how much buying will select the influence points and how much will last. In case the construction requires more silver, then the window will look like this:

Also, you can purchase several groups of the group at once. For this, we can click on the "gray" house in the group (this is 1-2):

And then - "Viewing the Conditions of the Purchase". Here we can see which groups of the group need to buy to open the desired house and even buy them with one button "Comprehensive Purchase":

Some houses have two and even three floors. To open houses of the first floor in the group, home the second and third floors is not necessary to buy.
Subsequently, you can change the type of house purchased. If silver was required to purchase, then it will also be needed to change.
Attention! If you sell or change the type of a residential building, then all the furniture and homemade household items will go to the warehouse in that city in which you have bought a house.
Types of houses
Black Desert Online has several types or types of houses. As it was seen on the example, the type of home can be chosen when building.
At home can be divided into such types:
- Warehouse.
- Barracks.
- Stall.
- House.
- Production:
- Processing shop.
- Melting.
- Sawmill.
- Kraft:
- Armory.
- Forge.
- Carpenter.
- Craft workshop.
- Jewelry repair shop.
- Dresses.
- Weapon Improvement Workshop:
- Board improvement shops:
- Foundry.
- Workshop of siege guns.
- Workshop.
- Furniture workshop.
- Kareny shop.
- Kareny workshop.
- Workshop steps.
- Shipyard.
- Boat workshop.
- Trade:
- Barn.
- Melting.
- Sawmill.
- Mushroom farm.
- Fish shop
Why do you need all these houses?
Warehouse - To increase places on your warehouse in a particular city. Thus, buying a house with a warehouse in Hidel 1st Ur. Expand your warehouse in Hidee for 3 units.
Baraca - To increase places for workers in a particular city. Workers can be used for work, both in the city and on the nodes that are connected to the city. Resources mined by workers are placed in a warehouse in the city.
Stall - To increase places for horses in the stable of a particular city. Default in the stable 3 places.
House We are needed for your stay in it. It is an instance in which you can place the furniture and homemade items.
Houses type "Production" We need for the processing of workers produced in black stone powder, ingots and other items.
Houses type Kraft We need to create and improve weapons and armor, as well as kraft jewelry, costumes, equipment for the Mounts and other things.
Trade houses Needed to create shopping packs.
Please note that when producing materials for crafting on remote nodes and transfer them to a city with production, if the node is not connected to the city, the cost of cargo transportation will be overwhelmed three times.
Levels of houses
Part of the houses has several levels. Players are usually interesting at home that can be upgraded by several levels. In this case, you do not invest the influence glasses, and upgrade the house for silver. That will maximize the benefits of home. Warehouses will bring additional places on your warehouse in the city:
- 1 UR. - 3 places.
- 2 ur. - 5 places.
- 3 UR. - 8 places.
- 4 UR. - 12 seats.
- 5 UR. - 16 seats.
Baraks will provide additional beds working:
- 1 UR. - 1 extra worker.
- 2 ur. - 2 additional workers.
- 3 UR. - 4 additional workers.
- 4 UR. - 6 additional workers.
- 5 UR. - 8 additional workers.
Stall - Additional places in the stable:
- 1 UR. - 1 extra place.
- 2 ur. - 2 additional places.
- 3 UR. - 3 additional places.
- 4 UR. - 4 extra places.
- 5 UR. - 5 extra places.
Production houses will provide new crafting options.
Filters
The city interface has a very convenient and practical filter search by such parameters:

Bought or loose houses

Type of house

House level
Houses Velia
In Velia, only 12 houses:
![]()
Types of houses Velia *:
|
number |
Maximum level |
Address |
|
|
Processing shop |
|||
|
Melts |
|||
|
Sawmill |
|||
|
Armory |
|||
|
Carpenter |
|||
|
Craft workshop |
3-2 1 floor, 5-2 |
||
|
Mushroom farm |
|||
|
Fish shop |
Hidey houses
In Hidel 59 houses:
![]()
Types of hide houses *:
|
number |
Maximum level |
Address |
|
|
5-4 2 floor, 6-4 2 floor |
|||
|
8-1 4 Cabinet |
|||
|
Processing shop |
5-4 2 Floor, 8-1 5 Cabinet, 9-4 |
||
|
Melts |
|||
|
Sawmill |
|||
|
Armory |
|||
|
Carpenter |
|||
|
Craft workshop |
|||
|
3-3, 4-1 2 Floor, 4-2 2 Floor, 9-1 2 Floor |
|||
|
Mushroom farm |
|||
|
Fish shop |
* - The table indicates only at home that are important to upgrades. These are warehouses, barracks, production (processing shop, melting and sawmill), Kraft (weapon, forge, carpentry, craft workshop and jewelry workshop) and trading houses (barn, melting, sawmill, mushroom farm and fish shop). In the order of the listed queue.
Glisha houses
In Glisha, only 6 houses:
![]()
Types of houses Glyš *:
* - The table indicates only at home that are important to upgrades. These are warehouses, barracks, production (processing shop, melting and sawmill), Kraft (weapon, forge, carpentry, craft workshop and jewelry workshop) and trading houses (barn, melting, sawmill, mushroom farm and fish shop). In the order of the listed queue.
House Calfeon
In the calfone 238 houses:
![]()
Types of houses Calpheon *:
|
number |
Maximum level |
Address |
|
|
10 addresses |
|||
|
6 addresses |
|||
|
Processing shop |
7 addresses |
||
|
Melts |
|||
|
Sawmill |
|||
|
Armory |
Bazaar 3-6-2. |
||
|
Callis Square 1-4-2 floor |
|||
|
Carpenter |
Bazaar 1-4 2 floor |
||
|
Craft workshop |
Bazaar 1-4 2 floor |
||
|
Mushroom farm |
|||
|
Fish shop |
* - The table indicates only at home that are important to upgrades. These are warehouses, barracks, production (processing shop, melting and sawmill), Kraft (weapon, forge, carpentry, craft workshop and jewelry workshop) and trading houses (barn, melting, sawmill, mushroom farm and fish shop). In the order of the listed queue.
Purchase
I hope until this point you already have an idea of \u200b\u200bthe system of houses and building an economic chain. Now let's talk about personal dwelling. I thought for a while, in what city the house I should buy. It is still far from Calpheon, and in Velia I will not spend my time constantly. So the choice was obvious - Hidel.
Before buying a personal house, make sure that it is suitable for its inner view and size:

I really like the external and inner view of the houses in Black Desert, there is nothing to spoil the atmosphere of a small European city with medieval architecture. Personal houses in Hidee cost only 1 point of influence, therefore you can buy different and watch they look. For these parameters, as well as a convenient location near the central road of Hidewings, I chose a house 2-1-1 in Hydel.
After buying a house, you will have such a menu in the upper right screen:

Pressing the left mouse button on the image of the house, you can pave the path to your personal house.
Rating houses
Personal house in Black Desert is instance, so you can only use it. However, your friends and in general, anyone can see what your house looks like. For this, before entering the house, click "F1":


Exquisitely and pretty. I really like this style.
Furniture
Most furniture in Black Desert Online, in addition to decorative, performs the functions of the Buff Stations, Machines and Other Functions. In addition to those specified in this guide of the methods, any furniture can be bought at the auction. That's how I furnished my house before writing Hyde:

1, 2, 3, 6 is the Buff Station, I wrote about them in this guide. I recommend to get acquainted, because it is very necessary for a good farm and of course for PVP.
4 - bed. Accelerates the regeneration of energy points twice. You can buy a bed in the shop, or give the task to scream workers in the furniture workshop:

Or buy friendship glasses in a mini-game with NPP-trader furniture:

5 - carpet. Does not give any bonuses, only needed for extra interior points. You can purchase from NIPA or scream in the furniture workshop.
7 - stove. I wrote about her and cooking on it. But, in addition to buying a Nip-chef or receiving, as a quest reward, the slab can be screaming in the workshop:

It is worth noting that a higher-level slab is cracked only in the workshop.
In addition to listed things, you will need you in the house: an alchemical table, anvil and a rack with books. The rest of the furniture, like the vases, dishes, tables, chairs are decorative. Still, during fishing, you can catch a seashell. I will focus on really necessary.
Alchemical table can be purchased from Nip-Alchemist:

Or, by analogy with a stove, scaffold in the workshop.
The rack with books is sold in the shop. On it, every 3600 seconds. You can get random knowledge. While your character reads, you can move with a book around the house:

Separately tell about the anvil.
Anvil
Anvil can be purchased from Nip-Kuznez in Hidel:

But to use it, you need knowledge "Repair". To get this knowledge, find this anvil near Nip-Blacksmith in Velia and talk to it:

It will take as many as 25 energy points, but believe me, it is worth it! Now, you can use anvil. To do this, install it at home and click "R":

To repair the equipment, move the subject to the anvil interface and click Repair. Unlike the repair of equipment from the Nip-blacksmith, each item must be fixed separately. Once every 40 seconds. You will recover 1 unit. Strength:

Interior decoration
To place the furniture at home, you need to go to installation mode:

After that put the furniture you need:

1. - The number of interior points for a separate subject.
2. - Final number of interior points.
3. - Received interior points when installing the subject.
Furniture from the shop can be bought directly in this mode (marked icon "P").
In this mode it is very convenient to see how long the consumables remained strength.
In addition, you can choose here for your home new wallpapers, curtains or parquet. These items are bought in the shop, Nipov or crafty in the workshop. In general, it is possible to distinguish the types of furniture and homemade items:
- Outdoor:
- Bed.
- Table.
- Chairs.
- Sofa.
- Cabinets.
- Racks.
- Machines.
- Buff Station.
- Wall:
- Curtains.
- Pictures.
- Lamps.
- Desktop:
- Dishes.
- Vases.
- Chandeliers.
- Wallpaper.
- Parquet.