How to solve the rubik's cube and save the nervous system. How to assemble corner and edge elements in the third layer of Rubik's cube How to rotate the corners of the last layer
How to collect the corners of the last layer Rubik's cube 3x3 scheme - STEP 6.
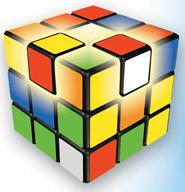
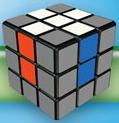
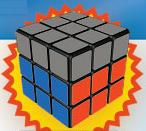
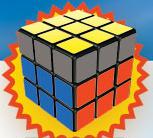
We will assume that you have coped with the previous stages, and came to the sixth step with a 3x3 cube in which two lower layers and a yellow cross are collected on the last layer (hat). In the illustration below, we have depicted in what state your cube should be.
The picture above shows a 3x3 Rubik's cube with the assembled
with a cross on the last layer and assembled with the two bottom layers.
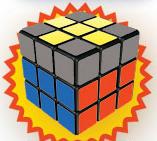
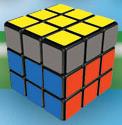
At the end of this step, all the corner cubes of the last layer should be in place. Orientation does not matter, as in the last step of the 3x3 puzzle assembly, we will rotate (orient) all the corner pieces.
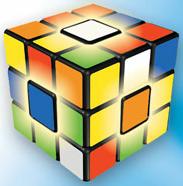
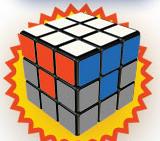
In the illustration, we have drawn a 3 by 3 Rubik's cube at the end of this stage. Your cube should look something like this.

The figure shows a 3x3 Rubik's cube with two lower layers assembled,
yellow cross on the last layer, and correctly spaced corner pieces.
Now let's move on to two easy algorithms for beginners to rearrange the three corners of the last layer.
Diagrams for arranging the corners of the last layer of the Rubik's cube 3x3
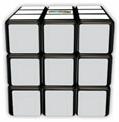
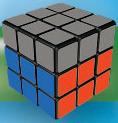
At this stage of solving the Rubik's cube 3x3, you will face the fact that three or four corners on the top layer will be out of place.In the picture below, we tried to depict this.
On the top right side of the cube, you see two green-red-yellow (near) and green-yellow-orange (far) cubes. And as you can imagine, they must be rearranged to the green side (facade).
This is called putting the corners in their places!

The picture shows a 3x3 cube with incorrect
spaced corners on the last layer of the assembly.
How to collect corners Rubik's cube 3x3 scheme number 1
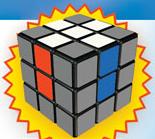
The principle of operation of this scheme of the penultimate stage of easy Rubik's cube assembly is quite simple. The three corner cubes of the top layer will move clockwise as shown.
The image shows how they will move
the corners of a 3x3 cube under the action of this formula.
Look carefully. If one of the corners of the last layer is already in place, take a cube so that this corner is located in the far left corner. And follow the formula below.

In the animation above, a diagram is shown that moves the three corners of the last 3x3 Rubik's cube clockwise.
After you complete this assembly diagram, check - the corner that you placed in the far left-upper corner should remain in its place. And the other three corners should move clockwise as shown above.
Rearrangement of the corners of the last layer scheme No. 2
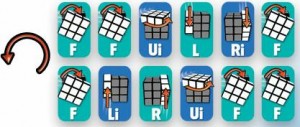
The second scheme for the arrangement of the corner elements of the upper layer, a mirror image of the first. It consists of only eight movements. We hope you've noticed the repetitive side movements. The point is small, remember all these movements.For those who are too lazy to learn this formula, we will reveal a secret - you can get by with only one scheme. You just have to repeat it not once, but twice.

The figure shows the movement of three corner
3x3 cube elements counterclockwise.
As before executing the first scheme, you look to see if there is a corner that is already in place. If there is one, take the cube so that it is in the upper-left-far corner and follow the algorithm.
If there is no such corner, do one of the schemes of this step, and then look for a corner that is in its place. Orient the cube and make the formula again.
Continuing to update the puzzle solving schemes. This time I found on one of the foreign sites rubiks.com quite a decent, well-illustrated instruction for the classic Rubik's cube 3x3x3. The assembly method is somewhat different from the method from Science and Life magazine, but just as simple. I translated, added pictures from the original, here and there I added a few words from myself, I think it turned out well. Also here is a link to.
You can buy the classic Rubik's cube 3x3x3 at ozon.ru
Stage 1. Getting acquainted with your Rubik's cube.
The names of the parts of the Rubik's Cube:
Rib parts or ribs- parts with two colors. In total, the cube has 12 edge parts located in the middle of the edges.
Corner pieces or corners Are pieces with three colors. In total, the cube has 8 corner pieces located in the corners.

Central parts or simply centers- parts with one color. In total, the cube has 6 central parts located in the center of each face. The center pieces do not move and represent the colors of their edges.
Centers always opposite to each other:
- White is the opposite of yellow.
- Orange is the opposite of red.
- Green is the opposite of blue.
Each side of the cube is indicated by a Latin letter
R - right side - the right side of the die L- left side - the left side of the cube
U- top face - the top side of the cube
D- bottom side - the bottom side of the cube
F- front face - the front side of the cube
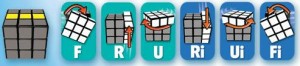
B- back side - back side of the cube Comment: the letter "i" after the letter of the face means backward movement or counterclockwise movement when looking directly at the face.
Very important
When performing the movements below, keep the cube fully turned with one side towards you, as shown in the picture. The dark gray color in the pictures means that the real color of these parts does not matter. Every move is one fourth of a full turn 360 degrees.

Stage 2. Putting together the white cross.
Task: Keeping your cube so that the white center is on the top (U), you must assemble the white cross as shown in the picture below. Much of this stage is achieved through trial and error, but there are still a few clues.
Hints:
Be sure to remember that you need to collect the parts of the white cross in the following order - blue, orange, green, red.
Notice how the edges in the picture above are matched with the top white center and the side red or blue center. This way, you can simply determine that the edges are in the correct places.
Keeping the white center on the top face, move the blue-white edge to the bottom face (D). Next, rotate the bottom edge until the blue-white edge is just below the blue center. Now take the cube so that the blue center and white-blue edges are on the right edge (R).
Rotate the right side (R) 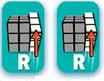 until the blue-white edge is on the top (U) face above the blue center.
If your cube looks like the picture below, then take the cube so that the orange center is on the right edge, and assemble the side with the orange center in the same way.
If your cube looks like the image below, then follow the sequence below, making sure the blue center is on the right (R) face. 
The remaining parts of the white cross are collected in the same way.
Congratulations!
If your cube has a white cross the same as in the picture, then you can go to stage 3!
Stage 3. Collecting the white corners.
Task: take the cube so that the white cross is on the top (U). Now you have to collect the white corners and get a cube like in the picture below.
Hints:
The corners will have one white edge and 2 other colors.
If the corner is already on the bottom edge, rotate the bottom edge until the corner is directly below where it should be. After that, your cube may look like one of the 3 three pictures below. 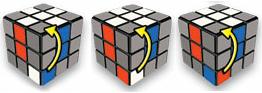
Then follow the sequence below 1, 2, or 3 times, or until the corner is in place and oriented correctly. 
Repeat the entire process for all four corners.
If the corner is located on the top face, then move it to the bottom face by following the sequence: 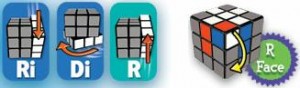
Now rotate the bottom face until the corner is just below its place on the top face.
Congratulations!
If your white layer looks like the picture below, then you have completed one third of the cube and you can go to stage 4.

Stage 4. Assembling the middle layer.
Task: Take the cube so that the completely assembled white layer is on the bottom edge. Now you need to collect the middle layer by placing the side edges in their places.
Hints:
Pay attention to the vertical blue stripe (it can also be red, orange, green) - this is critical.
Collect such a vertical strip by rotating the top face until the color of the edge on the top face without yellow matches the color of the center of the face. The color of the upper part of the edge on the upper face determines the direction of movement of the edge, that is, in which direction this part should be displaced.
1) If you move the edge in the same direction as in the picture, then follow the sequence of pictures below.


2) If you move the edge in the same direction as in the picture, then follow the sequence of pictures below.


Repeat these steps until all the side ribs are in place.
Comment: if one of the edges is already in place, but not oriented correctly, do one of the above sequences and it will appear on the top layer. After that, follow the appropriate sequence of actions to place the edge back in its place in the middle layer.
Congratulations!
If the bottom two layers on your cube look the same as in the picture below, you can proceed to stage 5... You have passed two thirds of the way!
Stage 5. Putting together the top layer. We get a yellow cross.
Task: compare the state of the yellow edge of your cube with the templates below. Then follow the appropriate sequence.
Clue: the yellow parts on the top edge should not yet match the color of the side edges.
Step one: Collect the yellow cross.
Switch to step two and start collecting the corners of the yellow edge.
Follow these steps:

Option 3. 
Option 4.
 Step two: Make all the corners of the top face yellow.
Take a look at the top face and match the state of the cube with the options below.
If there is not a single yellow corner on the top yellow facet, then you must take the cube so that the yellow facet of one of the corners is on the left side of the cube. See drawing.
If the yellow face has one corner, follow the sequence below.
Option 3. If there is not a single yellow corner on the top yellow face, and also there is not a single corner that could be used in option 1(that is, all corners have faces on the right). Then take the cube as shown in the picture below. The yellow part of the corner should be on the front edge of the cube.

Follow the sequence below 1.2 or 3 times to get a fully assembled yellow facet. After each execution of the sequence, re-compare the state of your die with the options described above.

Congratulations!
If your cube looks like the picture, you can go to stage 6!
Stage 6. Putting the yellow corners in place.
Task: Holding the cube as shown in the picture, rotate the top face until at least 2 corners are in place. These 2 corners should be located at locations A, B or A, D or B, C as shown in the picture below.
If all four corners are in place, then go to step 2.
Step 1. Put the yellow corners in place.

While holding your die as described above, look at the top edge. Place two correct corners on the back face at position A, B or diagonally A, D or B, C.
If corners A and B are in place, then swap corners C and D by following the sequence below.
If you need to swap the diagonal angles B and C or D and A, then follow the sequence once. Then, rotate the entire cube so that the two correct corners are on the back face, and repeat the sequence.
Congratulations!
If your cube looks like in the picture, then you can go to step 2.

Step 2. Place the yellow edges correctly.
If one edge is in place and three are not, then take the whole cube so that the correct edge is on the back face. Next, determine in which direction you need to move the remaining edges: clockwise or counterclockwise. Follow one of the sequences below depending on the direction of travel.
If all four edges are out of place, do any of the sequences once. After that, one of the edges will be in place. Then go to the beginning of stage 2 and repeat the procedure.
To move E F G or EFGH clockwise

To move EFG or EFGH counterclockwise.
Congratulations, you have completed the die!

Step 7.
At the beginning of this stage, all the corner cubes of the top face should be in their places, while they may be incorrectly rotated. This formula will unfold the corner cubes clockwise.
See illustration below.
How to rotate the corner of a 3x3 Rubik's cube
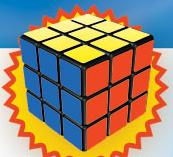
At the end of this 3x3 puzzle assembly step, your cube will be fully assembled!See picture of complete puzzle.
Depending on how you disassembled the 3x3 rubik, you may have options for the location of the side elements of the last face:
- The two corner cubes are rotated incorrectly. 3x3
- Two opposite corner cubes are rotated incorrectly.
- Three parts are rotated incorrectly.
- All four elements are rotated incorrectly.
Rotate the corner of the third layer of Rubik's cube
This formula is designed to rotate a corner piece clockwise.See drawing.
Important!
This algorithm must be repeated until the right cube of the upper face turns in the correct way!
Next, rotate the top face and repeat the formula until the corner piece is oriented correctly.
Rotate the top face once:
and / or
Rotate the top face two times:
When you execute this formula, you may get the impression that everything is confused. Don't be alarmed. If you repeat the sequence of actions a few more times, then everything will fall into place.
Don't be upset if you didn't get the puzzle right the first time. I myself did not immediately understand everything, but now I can put it together in less than 2 minutes, without looking at the formulas. They are already in my head.
Or rather, not in the head - the hands themselves remember the algorithms.
If you were able to complete the Rubik's puzzle, click -
In 1975 the sculptor Erne Rubik patented his invention called "The Magic Cube". For over 40 years, all rights to the puzzle have belonged to the company of the inventor's close friend, Tom Krener, called Seven Towns Ltd. The British firm controls the production and sale of the cube all over the world. In Hungary, Germany, Portugal, and retained its original name, in other countries the toy is called the Rubik's cube.
Varieties of the puzzle
The classic Rubik's cube measures 3 by 3 squares. Over time, they came up with a huge number of shapes and sizes for toys. No one will be surprised anymore with a puzzle in the form of a pyramid or a cube size of 17x17. However, humanity never stops there.
Obviously there is no beginner's build scheme for this cube. The process of assembling and solving a puzzle can take years. Recently, interest in the cube has been growing not only in Asia and Europe, but also where the toy was not very popular, for example, in the USA. One of the fans of the Rubik's cube filmed the assembly of the 17 by 17 puzzle. The total length of the video is 7.5 hours, the shooting was carried out during the week.
Growing demand creates supply. Sometimes the models sold are incredible and it is not always clear how they will look when assembled. Each country has its own favorite varieties of toys.
What is speedcubing?
The fans of the game arrange real competitions in the speed of the cube assembly. There are special "speed" puzzles on sale. The mechanism of rotation of such Rubik's cubes is very high-quality, and rotations of faces and rows can be done with the movement of one finger.
The World Cube Association (WCA) is a non-profit organization supporting the speed cube movement. The WCA regularly hosts competitions around the world. There are representatives of the organization in almost all countries. Anyone can become a participant in the speedcubing event, you just need to register on the website and meet the assembly standards. The most popular discipline in such competitions is the high-speed 3x3 Rubik's cube. The standard for participation is 3 minutes, but even if a person cannot solve the problem in the allotted time, he will still be admitted to the event. You can sign up for any discipline, but you need to come with your own puzzle.

The record for the 3x3 Rubik's cube assembly belongs to the Sub1 robot, created by engineer Albert Bier. The machine is able to solve a puzzle in a split second, while it takes a human 4.7 seconds (Mats Valk's achievement in 2016). As you can see, the participants in the speedcubing movement have someone to look up to.
What are the algorithms for solving the 3x3 Rubik's Cube?
There are many ways to solve the famous puzzle. Variants of 3x3 Rubik's cube assembly schemes have been developed for both beginners and advanced people with complicated schemes: 4x4, 6x6 and even 17x17.

The 3x3 puzzle variation is considered a favorite classic by most fans. Therefore, there are much more instructions on how to solve a 3x3 Rubik's cube than any else.
What should the puzzle look like?
You can assemble a toy according to the scheme only from a previously prepared position. If the patterns on the edges of the cube are located incorrectly, then it will not work out for beginners to solve it through the 3x3 Rubik's cube assembly algorithm. There is a set of such positions for different solutions.

The picture shows or just a "cross" - the starting point of the easiest way to solve the Rubik's cube 3x3. It is recommended to disassemble and fold the toy correctly.
Designations of schemes and methods of cube rotation
Before proceeding with the disassembly of the 3x3 Rubik's cube formulas, it is worth learning the notation used in speedcubing. All puzzle movements are indicated by capital letters. The absence of an apostrophe above the symbol means that the rotation is clockwise, if there is a sign, then it should be rotated in the opposite direction.
The first letters of English (or Russian) words denoting movement are considered generally accepted:
- front - F or Ф - rotation of the front side;
- back - B or T - back side rotation;
- left - L or L - rotation of the left row;
- right - R or P - rotation of the right row;
- up - U or B - rotation of the top row;
- down -D or H - rotation of the bottom row.
Pointers can also be used to change the position of the cube in space - the movement of the interception. Here, too, everything is simple, from the school geometry course everyone knows the coordinate axes X, Y and Z. Movement X means that the cube must be turned by face F in place of face U, when shifting Y - F, it must be in place L, and when rotating Z - F moves to R.
The following group of designations is rarely used, it is used in drawing up patterns of patterns:
- M - turn the middle row, between right (R / P) and left (L / L);
- S - turn the middle row, between the front (F / F) and back (B / T);
- E - turn of the middle row, between the top (U / B) and the bottom (D / H).
Why do they collect patterns on the edges of the cube?
At speedcubing meetings, they compete not only in solving the puzzle, but also in the ability to make various patterns on a 3x3 Rubik's cube. They do this in order to quickly and easily collect the cube in the desired position.
There are a huge number of schemes for assembling a variety of patterns: "points", "chess", "points with chess", "zigzag", "meson", "cube in a cube in a cube" and many others. There are more than 46 of them for the classic puzzle alone. Masters of speedcubing consider it shameful to disassemble a toy. Also 3x3 Rubik's Cube patterns is a great way to train and improve your skills.

The figure shows variations of the different patterns of the puzzle. Below are a few more formulas for assembling the most interesting patterns from the cross position:
- chess - M 2 E 2 S 2;
- zigzag - (PLFT) 3;
- four z - (PLFT) 3 B 2 H 2;
- Plummer's cross - TF 2 N "P 2 FNT" FN "VF" N "L 2 FN 2 V";
- cube in a cube in a cube - V "L 2 F 2 N" L "NV 2 PV" P "V 2 P 2 PF" L "VP".
Algorithm for solving Rubik's cube 3x3 for beginners
Although there are many ways to solve the puzzle, simple and straightforward schemes for beginners are not easy to find. With each passing stage of the assembly, the 3x3 Rubik's cube formulas become more complicated. It is necessary not only to correctly change the pattern, but also to save what was done before. Below is one of the options for how easy it is to solve the Rubik's cube 3x3.
Conventionally, the whole process can be divided into the following stages:
- Assembling the cross at the top of the cube.
- Correct compilation of the entire top edge.
- Work on the middle layers.
- Correct assembly of the ribs of the last row.
- Assembling the bottom face cross.
- Correct orientation of the corners of the last face of the cube.
Puzzle solution - preparation work
The first stage is the easiest. Beginners can try their hand at drawing up cube patterns according to the instructions provided, but this process will take a long time.

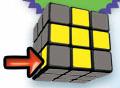
You need to choose the top edge and the color that will be collected first. The 3x3 Rubik's cube solving algorithm for beginners is developed from the "cross" position. It is not difficult to make it, you need to choose a central color, find 4 edge elements of the same shade and raise them to the selected face. The colored arrow in the picture indicates the part you are looking for. The options for the location of the desired element may be different, depending on this, 2 sequences of actions A and B are described. The difficulty lies in continuing the cross along the sides of the cube. You can take a closer look at the final appearance of the stage in the image above.
Solving the puzzle - working on the middle row

At this stage of the 3x3 Rubik's cube assembly scheme for beginners, it is necessary to find and assemble the corner elements of the upper face. In the end result, the face with the cross and the top row of the puzzle must be completely solved.

The image shows three possible edge patterns. Choosing one of the methods A, B or C it is necessary to collect all 4 corners of the cube. By memorizing rotation algorithms and practicing them, skills and mastery of puzzle assembly are acquired. It is pointless to consider formulas and represent the process, it is much easier to take a cube and try all the methods in practice.

The third stage seems simple, but it is only an appearance. To solve it, two situations of patterns are described and, accordingly, two rotation formulas are drawn up. When applying them, it is worth remembering to maintain the previously achieved results. The masters constantly keep in mind the last 3-4 spins in order to return the cube to its original state in case of failure.

To solve the puzzle, you need to rotate it along the coordinate axis in search of the necessary elements and work with them. Such movements are rarely displayed in formulas, only in special cases. It is recommended to start assembling the edge faces from the elements of the lower rows, after such rotations, all the necessary cubes will go down from the middle to the lower row.
Puzzle solution - making the second cross

At the fourth stage, the toy is turned upside down. Solving the last facet is the hardest part of the 3x3 Rubik's Cube for beginners. Rotation formulas are long and complex and will require special care. The purpose of the actions is to arrange the edge elements in their places for further drawing up the cross. The orientation of the rib parts may not be correct. There is only one formula of cube movements and it should be applied until the goal of the stage is achieved.

The rotations of the fifth stage are aimed at turning the elements on the right side. Its peculiarity lies in the fact that the same rotation formula is applied for all three patterns in the figure, the only difference is in the orientation of the cube itself.
The formulas for the movements of the 5th stage are as follows:
- (PS N) 4 V (PS N) 4 V "- option" A ";
- (PS N) 4 V "(PS N) 4 V - option" B ";
- (PS N) 4 V 2 (PS N) 4 V 2 - option "V".
C H is the clockwise rotation of the middle row, and the exponent above the bracket is the number of repetitions of actions in brackets.
Puzzle solution - last spins

In the sixth stage, as in the fourth, the required cubes are placed in their places, regardless of their orientation. The puzzle should be rotated so that the element, which is already in the right place, is located in the far left corner at the top of the cube. The options proposed for solving the formula mirror each other. It is necessary to repeat the rotation until the desired result is achieved.

The seventh stage is the most solemn and most difficult. When the cube rotates, violations in the already assembled rows are inevitable. You will need to fully focus on the movements, otherwise the result of the assembly may be irrevocably ruined. As in the fifth stage, there is only one sequence of movements, but it is repeated 4 times. First, rotations are performed to orient the element, then reverse - to restore the broken rows.
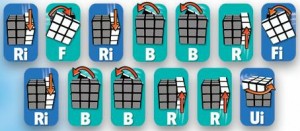
Do not forget about recording movements using the characters of the English alphabet. The formulas for the movements of the faces and rows of the cube of this stage are as follows:
- (RF "R" F) 2 U (RF "R" F) 2 - option "a";
- (RF "R" F) 2 U "(RF" R "F) 2 - option" b ";
- (RF "R" F) 2 U 2 (RF "R" F) 2 - option "c".
В - rotation of the upper face by 90 degrees, В "- rotation of the same face counterclockwise, and В 2 - double rotation.
The complexity of the stage is in the correct assessment of the location of the elements and the choice of the required rotation option. It can be difficult for beginners to immediately identify the pattern correctly and match it to the correct formula.
Rubik's cube and children
A tricky puzzle is interesting not only for adults, but also for children. Teenagers became world champions in solving Rubik's cube. In 2015, Colin Burns, then only 15 years old, assembled the toy in 5.2 seconds.
A simple but addicting toy continues to interest the younger generation for 5 decades already. Children's hobby often develops into a profession. There are mathematical ways to evaluate the solution to Rubik's cube problems. This section of mathematics is used in the compilation and writing of algorithms for solutions for automated computers. Robots that really look for ways to solve the cube, and do not perform a pre-hammered algorithm of movements, solve the puzzle in 3 seconds, for example, CubeStormer 3.
For children and adults sometimes an overwhelming task how to solve a 3x3 Rubik's cube. A diagram with pictures for beginners in this business is one of the main assistants.
Also, to make everything clear and transparent, you can use video instructions. We will actively apply both of these aids in practice, so that you finally learned to solve the eternal rubik's cube puzzle.
You can collect the Rubik's cube in different ways and methods. You can do it in 15 moves, in 7 moves, or even as much as 20... For many years, all sorts of smart people have been struggling to find the optimal solution to this problem. After all, the Rubik's cube is a mechanical puzzle that lends itself to a completely logical solution. You only need step-by-step instructions, as well as a small amount of logic and patience.
Before starting, directly, the assembly algorithm, you should explore key concepts.
The name of the toy itself speaks for itself - the cube consists of 6 sides (faces), 12 edges, 8 corners. The faces of the cube are made up of 9 small colored elements that can rotate at the same time, but only clockwise and counterclockwise. Russian alphabet letters the names of the faces will be denoted as follows:
F - facade;
T - rear;
P - right;
L - left;
B - top;
H - bottom.
 In many descriptions and diagrams, there are designations for the faces of the cube in English.
 The next secret of the rubik's cube lies in the arrangement of small colored elements.
- Center cubes determine the color of the entire side of the Rubik's cube. It is these cubes that we will call by analogy with the names of the faces (Ф, Т, П), etc.
- Edge cubes are adjacent to two faces at once, therefore, the name will be double (for example, FP, PV) - depending on the faces with which they interact.
- Corner cubes contain 3 letters in the name at once, since they refer to three faces at the same time (FPV).
And one more mini secret - when you study face rotation schemes, letters without any additions will mean rotate 90 degrees clockwise, and letters with the additional sign '' are counterclockwise.
Having understood all these conventions, it will be much easier for you to add the Rubik's cube and you will do it correctly and quickly. Also, for a change, you can learn how to do.
How to solve a 3x3 Rubik's cube: the easiest way, assembly scheme
The easiest and most reliable way to solve our Rubik's cube starts with the bottom cross. Assemble the cross on the bottom edge of the cube and proceed to the step-by-step solution of the puzzle, how to solve a 3x3 Rubik's cube: the easiest way, the diagram of which is right in front of you.


 And, of course, the most understandable tool for building a cube will be a video lesson with a detailed description of an experienced virtuoso.
3x3 Rubik's cube assembly scheme for beginners in pictures
At the first stages of the practice of collecting the Rubik's cube, we will use the same cross method, but this time we will have a cross made of colored cubes on the upper edge. As you understand, high-speed assembly of the Rubik's cube is waiting for you ahead, at this stage you should learn how to correctly determine the location of the faces and moving them in the plane of the cube.
 There are different ways to solve the cube, and now you have to learn how to solve the rubik's cube 3x3: The beginner's circuit consists of 7 steps. For each of the steps, pictures describing the assembly process are available for you. Perhaps you will spend more time on this puzzle than expected, but you will solve a puzzle that is not available to all inhabitants of our planet! It's worth sweating for it.
By the way, the last one world record for solving Rubik's cube the speed was set in 4.73 seconds. And it belonged to Australian student Felix Zemdegs, who defeated the previous record holder by just 0.01 seconds. We have nowhere to rush in this matter, so we carefully study the instructions and begin to collect the first layer.


The principle of solving the Rubik's cube from the initial cross not that hard. Here you need to properly study the location of the faces. And then - a matter of technology, as they say. We have already passed the basic concepts and rules for solving the Rubik's cube for dummies.
We are sure that the 3x3 Rubik's cube assembly scheme for beginners in pictures helped you set your own record and in further attempts you will reduce the time to a minimum.


If all these steps and formulas seemed complicated and confusing to you, we suggest revisiting the video, in which the whole process is shown in detail using the example of a virtual Rubik's cube.
Formulas Rubik's cube 3x3: calculating the moves
If you think that the previous methods of solving the notorious cube were intended solely for the dumb, catch a few formulas.