Is it possible to insert an SD card. How to make applications installed on a memory card on Android. How to connect a USB flash drive as internal memory
Articles and Life Hacks
If we are short on the internal memory of our mobile device, this problem can be easily solved. Our article will tell you how to insert a memory card into your phone.
To begin with, the original Apple smartphones do not support this feature. If we have an iOS device, we will have to limit ourselves to the amount of memory that the manufacturer originally provided.
Inserting a memory card
The specific sequence of actions depends on which one mobile device we use. There are many tutorials on this topic online today (including YouTube video tutorials).- First you need to find out what type of memory cards our phone supports (for example, micro-SD), and then start installing.
- Usually the memory card slot is located on the side, or under the back cover next to the battery.
- To remove the tray, lightly press on it and slide it out, holding it with two fingers.
- Touching metal parts is strongly discouraged.
- Now we install the memory card and push the tray back until we hear a slight click.
- If desired, we can also delve into the settings of the mobile device and specify that all data is saved to the memory card, and not to the internal memory.
- It is recommended not to delete anything from the memory card until we copy it to our home computer (provided that we need this information, of course).
- In addition, it is best to buy the largest possible card if possible, since the extra gigabytes will never be redundant. This is especially true for those users who actively take pictures and listen to music.
What to do if the phone does not see the map

- First, we remove the card and try to install it again.
- If the problem persists, reboot the mobile device as it may be caused by a software glitch.
- It is worth making sure that our phone supports the type of card you are using.
- In addition, old mobile devices sometimes do not accept large memory cards.
- It happens that the problems are not connected with the phone or with software, but with the card itself.
- If the simplest means of verification did not help us, we take a card reader and install a memory card there, after which we connect the card reader to the PC. It is good if the computer recognizes the card immediately.
- If we have a Windows computer, go to "My Computer" and look for a removable disk. That is, a memory card.
- Click on it with the right mouse button and select the "Properties" item from the context menu.
- In the open window, select "Service" and look for the option to check the removable disk for errors.
- We mark the point of recovery and check of damaged areas, after which we carry out a check.
- Reinstall the memory card into the phone. You can also try to format it by first copying all important data.
Do you ever need download or copy the disc to your computer?
For example, you were given a dvd disc with some files (video, games, music, documents, etc.) for a while, which you need to quickly return, and there is no time to look at everything at once.
Let's say you need to quickly copy either one thing from the disk, for example, download a video or game from the disk to your computer. Or you need to copy music from disc to your computer. Or do you need overwrite disk to computer generally entirely.
Another reason you may need to copy dvd disc to computer if you are going to frequently use information from the disk. In this case, full copying of the disc to the computer and launching the already copied disc from your PC saves the disc itself and the drive (drive) from their frequent use.
In addition, the launch speed of files already on the computer is higher than the launch speed of the same files launched from a disk through a floppy drive.
To understand how to copy files from disk to computer I'll look at this process using two different disks as an example. First, let's see how to copy a disk “ Osteochondrosis - No" v operating system Windows 7, and then we'll see how to copy files from another CD in Windows XP.
How to rip from disk to computer in Window 7
So, to begin with, let's look at copying the disk "Osteochondrosis - No" in Windows 7.
I sell this disc on a separate page here.
Therefore, this article is also an additional help-instruction for my clients who buy a version of the course on a physical disk and who need to download the disk to their computer for easy study.
We insert the disc into the drive. Go to the Start menu -> All Programs -> Accessories -> Explorer:

We find in the left part of Explorer the disk that was inserted into the drive and click on it with the left mouse button. A list of all folders and files that are on the disk will appear on the right side.
Now to copy all these files, i.e. the entire disk to your computer, you must first select all these files. Let's use hot keys. To do this, you can simply press the combination on the keyboard:

Thus, we select all files:

So, - files are selected.
Now for copying we use another combination of hotkeys, -:

Thanks to this function, all selected files are temporarily memorized by the computer (the computer places them in its Clipboard). And now we need to find a place on the computer where to save all these disk files.
To do this, create a separate folder on our computer, for example, NOT on the system drive. Let's call this folder Osteochondrosis:


The process of copying the disc to your computer begins:

If the copying process has not started, it means that the copying functions using hot keys have not worked on your computer. In this case, use the copy functions with the mouse, as shown below using the example of another disk in Windows XP.
After the files on the disc are copied to the computer, the disc can be unloaded from the drive — the disc is no longer needed.
That's all about copying the disc!
Now you can run the copied disk on your computer simply by clicking on the autorun.exe file. The course menu will appear for studying it already without a physical disk:

How to download video from disc to computer
There is a need to copy a disc to a computer, not entirely, but of its individual parts, for example, you just need to copy some video from a disc or some kind of music in order to then view or listen to it on a computer or on your mobile device (phone, tablet, etc.). NS.)
To do this, you also need to launch the disc, and through Explorer, find the desired folder on the disc with the video. Next, you need to select the necessary video or music files by simply holding the Ctrl button on the keyboard while clicking with the mouse on the desired video files.
We selected the necessary videos, clicked on any selected video file with the right mouse button and then Copy:

Thus, these files are stored by the computer in Clipboard.
It remains to create a separate folder on the computer and paste the copied videos there using, or right-click and select Insert:

The selected files will be copied to this folder on your computer.
This is how we examined the process of copying as a whole disk " Osteochondrosis - No»And individual videos to a computer in the Windows 7 operating system.
Now let's look at a similar copy of another disk in Windows XP.
How to copy dvd disc to computer in Windows XP
The process of copying a disk to a computer in Windows XP is the same, only now we will consider additionally how to use not keyboard hotkeys, but use a mouse.
On the left side of Explorer, we find the disc that was inserted into the drive (as shown in the picture below).
Since the Explorer screen is divided into two parts, you can visually see the contents of the disk, and select the necessary (or all) files of this disk in order to copy them to your computer. The left side displays the contents of the disk folders, and the right side also displays the files:

To select all files for copying, left-click just below the last file and, while holding this left mouse button, select files up to the first file until all files are selected (as you can see in the picture above).
Thus, all these files are placed in the "temporary memory" of the computer (Clipboard). Now you need to decide where to paste (copy) these files on your computer.
Create a separate folder to copy disk to computer.
In my case, on drive D, I created a DISKS folder in which I have different drives copied earlier. And now I created another one in it: Confident PC user:

Now in this folder I right-click and in the window that appears, left-click on: Insert.
The copying of files from the CD begins, which becomes clear from the operation of the drive (it makes a noise when reading information) and the window that appears:

After the end of copying, the copied files will already be on the computer and you can unload the disc from the drive.
You can now start the disc on your computer by clicking on autorun:

That's all! If you need to download a disc to your computer or copy some files from a disc, for example, from 5 movies that are on the disc, you need to copy two of them, then hold down the Ctrl button on the keyboard and select the necessary files with the left mouse button.
After selection, release the Ctrl button and right-click on any selected area. In the emerging additional menu select: Copy... Well, then you already know!
As you can see, the process of copying or downloading a disc to a computer, which is in Windows 7, or in Windows XP is very simple. You can follow the same principle if you have a different operating system.
You just need to start the disk, select all or some of the files, copy and paste them into the desired folder on your computer.
Good day!
I want to tell you about a rather interesting, unusual, uncommon, but at the same time relatively useless adapter (capable of turning your SD card into a "real SSD"). Meet - an adapter for connecting SD cards to the IDE connector, for their use as a PC hard drive. Yes, you heard right - this is a working SD -> IDE adapter. Answers to questions - "How ?!" and why?!" under the cut.
Set
The kit was damn rich, it had absolutely everything that was needed for the card to work. That is, the card itself and the antistatic bag in which it was wrapped.
Appearance
Everything is in order here, the adapter is a brutal piece of black PCB. 
The assembly is well done - no snot and no loose connectors. However, over time, the solder faded, and the Molex connector turned yellowish and the card began to look less gothic.
How to use it
It's very simple, just insert the SD card into the connector on the adapter, and connect the adapter with a ribbon cable to the IDE connector on the motherboard. 
Then we turn on the computer, go into the BIOS and rejoice - we have an "IDE SSD". 
And if we pre-roll the system onto the SD card, it will even be possible to boot from our IDE SSD. By the way, booting from another HDD is problematic, the adapter is in the MASTER position and always starts first. And even when using this miracle, it is necessary to wear rubber gloves, since 5 and 12v power is connected to the board, and the tracks and contacts on the back of the board are not isolated by anything.
Why is it needed
To be honest, now I could come up with an excuse for buying it. The thing is certainly interesting, but the application in real life I can't think of her. So far, the only thing it came in handy for is downloading LiveUSB on an old computer with physically closed usb ports and running Windows from it, as a sporting interest. Basically, you can use it to carry drivers for USB flash drives under Windows 98 :). But this is some kind of fantasy. And now, in fact, why is it difficult to find a use for this gadget - it only supports SD 1.0, that is, cards no more than 2GB, and therefore low speed.
Experience of use, test
I checked the card as follows, rolled the LiveCD image onto the SD card and booted, there were no problems at this stage. After booting, Windows detected the SD card as follows. 
And Paragon Manager said - "unknown model". 
And finally, an obligatory dish, a test of the speed of the device. 
As you can see, there is simply no speed, comfortable work is out of the question. Unless the card is suitable for some kind of lightweight linux distribution.
Output
As you can see, the thing is certainly interesting - but at the same time useless. Due to the limitations on memory cards and as a consequence of the low speed, even in spite of the low power consumption and the absence of noise, it is hardly possible to use them constantly in everyday life. Specifically, I will not recommend this model for purchase.
P.s. There are similar devices with SDHC support, if anyone is interested, look in their direction.
I plan to buy +10 Add to favourites I liked the review +51 +99MicroSD cards are high-capacity memory cards commonly used in phones and tablets. An SD card is considered “installed” (connected) when a mobile device recognizes the card and opens access to it. Most devices mount the SD card automatically after inserting it into the microSD card slot. If you are using a Galaxy smartphone or Android device, you can manually connect the SD card via the Settings menu. If the device does not recognize the SD card, then the card may be damaged or there is a problem with the device itself.
Steps
Connecting a microSD card in Android devices
Insert the microSD card into the appropriate memory card slot of your Android device. Before doing this, charge the battery of the device and turn it off. Insert the card slowly until you hear a click. If you cannot find the memory card slot, read the instruction manual of the device or contact the manufacturer.
Turn on your Android device.
From the home screen, tap Settings. The icon of this application looks like a gear. By clicking "Settings", a screen with device settings will open; then click "SD & Device Memory".
Click "Reformat". The reformat process will prepare the device for installation new card memory and only takes a few seconds. If this process takes a long time, restart your smartphone and repeat the described steps again.
When the reformat process is complete, click "Connect SD Card". The device will connect the memory card and make it available for use. If the “Connect SD card” button is not active, click “Eject SD card”, wait until the process of removing the card is complete, and then click “Connect SD card”. This step will also help you get rid of the Android system crash that prevented the memory card from plugging in.
Turn on your smartphone. Press the button at the bottom of your smartphone. If the device does not turn on, then most likely its battery is dead. Connect your smartphone to a power source and wait fifteen minutes, then try turning it on again.
From the home screen, tap Apps. After turning on the smartphone, the main screen will open. In the lower-right corner of this screen, look for a white pound icon; under the icon you will see the word Apps. Click on this icon.
Click "Settings". The icon of this application looks like a gear. Clicking on "Settings" will open a new screen. In the upper right corner, find the icon in the form of three white dots. In older Galaxy smartphones (4 and older), you will see the word “General” under the dots. In modern Galaxy smartphones (5 and newer) you will see the word "More" under the dots. Regardless of your smartphone model, click on the three white dots icon.
Click on "Memory". Clicking on this button will open a new screen. Scroll down the screen and find the "Connect SD Card" option. Click on this option and wait for the card connection process to complete. If the option "Connect SD card" is not active, click "Eject SD card", wait until the process of removing the card is completed, and then click "Connect SD card".
Troubleshoot device problems
Remove the SD card from your device's memory card slot. In the "Storage" section, click "Eject SD Card". Wait until the message appears on the screen that the memory card can be removed. Pull the memory card out of the slot slowly to avoid damaging it.
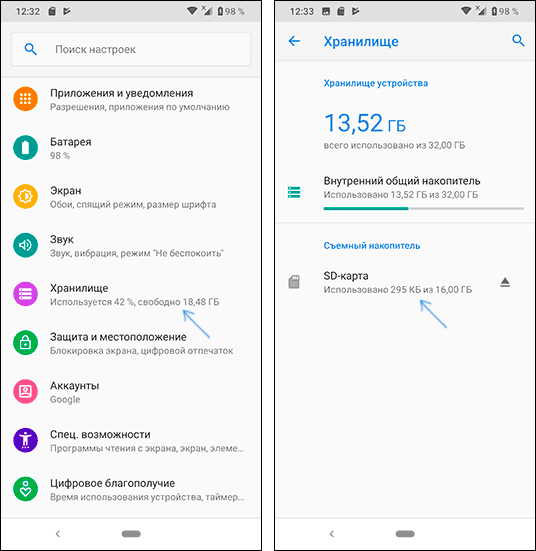
If your Android 6.0, 7 Nougat, 8.0 Oreo or 9.0 Pie phone or tablet has a memory card slot, then you can use a MicroSD memory card as the internal memory of your device, this feature first appeared in Android 6.0 Marshmallow.
At the last Android version all the steps for turning a microSD memory card into an internal one are almost the same, but just in case, I will describe the steps separately and give screenshots (do not forget that all data from the memory card will be deleted in the process, take care of saving important files):
This completes the procedure. All the features of operation and the method of returning the memory card to the mode of operation as a portable storage remain the same as for previous versions Android.
Video instruction
Features of the memory card as internal memory of Android
It can be assumed that when to the inner Android memory size N is attached to the size of the memory card M, the total available internal memory should be equal to N + M. Moreover, approximately this is displayed in the information about the device storage, but in fact everything works a little differently:


As a result, after the moment when the SD memory card began to be used as internal memory, the user does not have access to the "real" internal memory, but if we assume that the device's own internal memory was larger than microSD memory, then the amount of available internal memory after the described actions will not increase, but decrease.
Formatting a memory card for use as internal storage in ADB
For Android devices where the function is not available, for example on Samsung Galaxy S7-S9, Galaxy Note, it is possible to format SD card as internal memory using ADB Shell.
Since this method can potentially lead to problems with the phone (and it may not work on any device), I will skip the details of installing ADB, enabling USB debugging and running the command line in the adb folder (If you do not know how to do this, then , perhaps it is better not to take it. And if you do, then at your own peril and risk).
The necessary commands themselves will look like this (the memory card must be connected):
- adb shell
- sm list-disks(as a result of executing this command, pay attention to the issued disk identifier like disk: NNN, NN - it will be required in the next command)
- sm partition disk: NNN, NN private
After formatting is complete, exit the adb shell, and on the phone, in the storage options, open the "SD card" item, click on the menu button in the upper right and click "Transfer data" (this is mandatory, otherwise the phone's internal memory will continue to be used). At the end of the transfer, the process can be considered complete.
Another possibility for such devices, if root access is available, is to use the Root Essentials application and enable Adoptable Storage in this application (a potentially dangerous operation, at your own peril and risk, do not perform on older versions of Android).
How to return the memory card to normal operation
If you decide to disconnect the memory card from the internal memory, it's easy to do - transfer all important data from it to the computer, then go, as in the first method, to the SD card settings.

Then, in the menu of actions with the memory card, select the item "Portable media" and follow the instructions to format the memory card.
Comments (268) on SD card as Android internal memory
08.03.2019 at 13:52
05/23/2019 at 15:41
05/23/2019 at 20:12
08.03.2019 at 10:47