A quick way to build a 3x3 rubble cube. Impossible is possible, or how to assemble the main models of Rubik Cube. What is a cube rubik
So, you met with a puzzle cube rubika 3x3x3 and it came to you. But how to learn how to collect a cube, and even better to collect it faster, you do not know yet. Especially for you, novice puzzle lovers, I do this instruction, which will not only help learn how to collect a Rubik's cube, but also to do it faster than 1st minute (in the future it is planned to create instructions for those who want to collect a cube faster than 30 seconds).
Let's start with what you can, especially this is relevant for those who want to collect a cube quickly, and the old cube does not allow it for technical reasons \u003d) ..
The most common method of assembling a cube 3x3x3 is a Jessica Fritrich technique. This technique breaks the rubble cube assembly to 4 stages. And on initial level Assembly (at a speed of up to 1 minute) you need to study not so much and many formulas. I will try to make an instruction that will be understandable and will contain all the necessary information.
To start briefly about the assembly stages.
Rubic Cube Assembly Stages

1. Collect the cross. The task of this stage is to accommodate 4 cubes around the White Center (many use exactly white as the main one when assembling, you can use any).
2. In the Jessica Fritrich method at the second stage, the first 2 first layers are collected ( F2L - FIRST TWO LAYERS). But for a beginner puzzle collector, it will be quite difficult, so we will look at how to make this stage for 2 steps, a little simplifying the task.

3. Assembling the yellow side of the cube ( Oll - Orientation of the Last Layer). At this stage we collect the yellow side of the cube. The assembly of this stage is not always advanced using one formula. We will look at how to collect a yellow party in a few steps.

4. The last stage of the cube assembly is called PERMUTIATION OF THE LAST LAYER (PLL).At this stage, it is necessary to put the corner and rib cubes in the last third puzzle layer.
Well, now from theory go to practice.
So, proceed to the assembly of the cube. For the convenience of learning, please remember that the cube needs to be kept the white center down, and yellow up!
The cube assembly begins with the cross on the main side, is usually white. In this manual, the White will be the main. This stage is carried out completely intuitively, there are no formulas here, but there are typical situations that are worth remembering to speed up the assembly.
Important! We collect not just the White Cross on the White Side. Each roiter cube has two colors, and it should coincide with two centers, with white and one of the other four colors (in the photo it can be seen as an orange-white and green and white edge coincide with orange and green centers).
1. Check the side with the White Center for the presence of white ribs. If they are, it simply rotates the bottom layer of the cube can be compared to the edge with the second center. We look at how to do it in the video below. Let me remind you that you need to collect a cube with a white center down!
2. If you have already completed the first item of this stage, please contact the top of the cube (side with a yellow center). If there are white rib cubes near the yellow center, they are easy enough to install them on the right side on the main side (with a white center). To do this, it is necessary to rotate only the top layer to compare this edge with the second center (orange, red, green or blue) at the same time turn the party on which the center and the edge of the face coincided. After the edge coincided with an additional center, you need to turn the front line twice so that the white color is not at the top of the cube, but at the bottom (where there is a white center). We look at visual use in the video below.
3. All other situations are solved using a white-side cube raising up (side with a yellow center) and a turn down to the white center as in paragraph 2. Below the video with visual examples.
The assembly of the first first layers I propose to perform in two steps. After assembling the White Cross, our task is to install four corner cubes into place, after which four more ribs.
Like an assembly of a cross, it can do everything exclusively intuitively.
Installing corner cubes in the first (bottom) layer
For the ease of perception of information, I will demonstrate how to install angular cubes.
To install angular cubes in place, you need to explore one reception, which among the speedcubers is called "PIF-PAF". The formula of this reception looks like that R u r 'u'. read here.
In the video, I looked at 4 situations that occur during the installation of corner cubes.
 Corner cube looks a white face to the right (cube. Hold the white center down). We perform the form u'f'uf.
 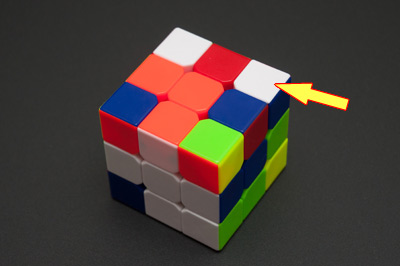 The corner cube is looking to the white edge to the left (the cube is holding the white center down). We carry out the form URU'R '.
  A corner cube looks a white face up (cube. Hold the white center down). We perform the form R U R 'U' R U R 'U' R U R 'u' (three mutual pafa) the corner cube is in its place, but turn over (the cube is kept by a white center down). We carry out the form R u r 'u' (one mutual paf), after which the corner cube will be on top (on the side with a yellow center). From this position, we carry out one of the formulas described above.
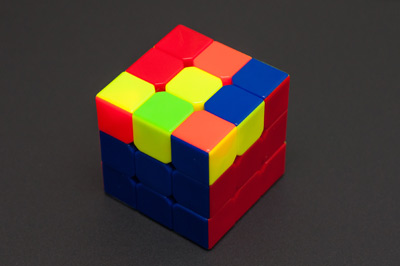
 After installing all the corners to the place, the cube should look like this:

Installing rib cubes
After you have placed all the angular cubes in the lower layer, our task is to install rib cubes into place. After that, the F2L step will be completed.
Installing rib cubes is performed using one formula and its mirror design. Before performing the formula, the main thing to install the roar cube to the desired location is performed by turning the upper layer.
The roar cube needs to be installed so that the color of the side face coincides with the color of the central cube of the middle layer.
1. If, after that, the roar cube is to be left to the left of its place, we carry out the formula URUR 'U'F'U'F.

2. If the roiter cube is on the right of his place, then we carry out the mirror formula u'l'u'l ufuf '.

3. There are cases when rib cubes are not in their places, or in their places, but at the same time inverted. The above formulas will help raise the roar cube on the top layer, after which you without problems install it in the right place.

After assembling the first first layers, it is necessary to assemble the side with a yellow center, this stage is called OLL. At the same time, our task is to simply collect the yellow side, at this stage it is not at all necessary for all the cubes in their places.
We look at the video how to install rib cubes when assembling the first two layers
1. Corollar
After you have collected the first two layers, the yellow side of the cube may look like this:

But in practice, during the assembly process, other combinations may fall. Consider how to leave all these situations with the help of universal formulas.
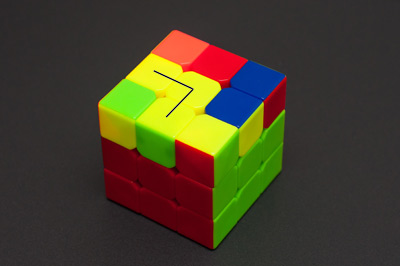
Our task is to make a corner of yellow cubes. After assembling the first first layers, you can see completely different combinations of yellow cubes at the top, but most often we get either a corner or nothing. Under anything implies what neither the corner neither the cross nor the fish. On the images there are several possible combinations that can be up to the assembly of the corner.
Corner collect very simple. We carry out the formula: F RUR'U 'F'. After executing the formula, you will receive one of the multitude of combinations that are possible when the OLL assembling, which contains the corner. Go to the next step.
2. Cross
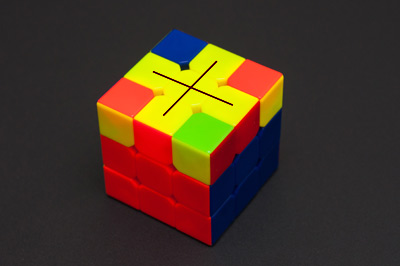
The cross can be collected using one formula, but only at the stage of the hardened corner. The combinations on the base of the corner can be a lot, but for assembling the cross you need to know only one formula. So, before assembly you need to take a cube so that the vector of the corner watched: one left, the second looked up. Next, we perform the formula: F Rur'u 'Rur'u' F '(turn the front, we make 2 mutual pafa and return the front). As a result, you will receive one of the combinations based on the Cross:

 After that, you can move to the assembly of the fish.
3. Fish
We need a combination of fish in order to collect all the yellow faces using one formula. In fact, after assembling the cross, one and the same formula will help you make a fish, and after the fish and completely Oll.
For this operation there is a universal formula that will help us - RU'-RU-RU-RU'-R'U'-R2 (mirror version on the left: L'u-l'u'-l'u'-L'u- LU-L2). In the video, I tell in what cases what formula to use.
2. Alignment of angular cubes
In the video, I show how the corner cubes should be placed in the two most common cases.
The formula for the case is one (to execute the formula follows from that position as shown in the video): R'U2RDR'U2RDR'U2RDDR'U2R
Formula 2 (executing the formula follows from that position as shown in video): R'U2RD2R'U2RD'R'U2RD'R'RU2R
These formulas is easier to teach intuitively than just memorizing memory.
The designations of the parties and the language of rotation by Russian letters
First of all, we agree on the symbol system. Cube's faces are denoted by letters F, T, P, L, B, N - initial letters words facade, rear, right, left, top, bottom. What edge of the cube to count the facade - blue, green, etc. - depends on you and from the resulting situation. In the process of assembly, you will have to take several times for the facade one or another face convenient for this case. The central cubes define the color of the face, that is, it can be said that even in a fully confused cube, the central cubes are already selected and each of them remains to attach 8 cubes of the same color. Central cubes are designated by one letter: f, T, P, L, B, N.
Rib cubes (their 12 pieces) belong to two faces and are denoted by two letters, for example fP, PV, FN etc.
Corner cubes - three letters on the name of the faces, for example, fPV, FLN etc.
Capital letters F, T, P, L, B, N Elementary operations of rotation of the corresponding face (layer, slice) of the cube are 90 ° clockwise. Designations F ", T", P ", L", V ", N" correspond to the turn of the faces 90 ° counterclockwise. Designations F 2, p 2 and so on. They talk about the double turn of the corresponding face ( F 2 \u003d FF).
Letter FROM Denote the rotation of the middle layer. The substitution index shows from which face the face should be viewed to do this turn. for example With P. - from the right edge, With N. - from the bottom, With "L. - from the side of the left, counterclockwise, etc. It is clear that With n \u003d s "in, With n \u003d c "l etc. Letter ABOUT - Rotate (turnover) of the entire cube around its axis. About F. - on the side of the facade face clockwise, etc.
Process recording (F "P") H 2 (PF) Means: Rotate the front face counterclockwise 90 °, the same is the right face, turn the lower line twice (that is, 180 °), turn the right line 90 ° clockwise, turn the front line 90 ° clockwise.

Along with the letter of processes, the matrix form of recording is also used, where elementary operations are depicted with a pattern of a facade face with the corresponding arrows indicating the direction of turns of the corresponding face.
The layering algorithm of the Rubik cube assembly is far from the only one. There are other ways to which - on other pages of this section.
To be continued...
Date: 2013-02-13 Editor: Thied Vladislav
How to collect a cube Rubik 3x3 concerns many today.
There is the most common and complex method of quickly assembling a rubble cube, Jessica Frederich method, also known as CFOP.
The name of the method is the abbreviation collected from the first letters of the four assembly stages used in the method: Cross (Cross English), F2L, OLL, PLL.
It is assembling, a kind, cross from four rib cubes on one of the edges of the Rubik Cube. The stage is not difficult for those who have at least some kind of practice on the assembly of the cube, but still, takes some time, especially, in unprepared.
Professionals often use the main custody of the assembly - relativity. In other words, if you collect a cross on the verge of white, the white-blue cube is already on it with a white color to the center of a white face, it means that the media with a blue face is not so important, you should simply put the white-green cube on the opposite side Cube, and on the left and right - white and orange and white-red. Next, you can rotate a white line in any way, and at the end with one movement to docile the side centers with cubes "Cross". For the successful implementation of this simple, inherently surgery, it is necessary to remember the order of flowers on the cube clockwise - blue, red, green, orange.
F2L (first two layers)

This is the longest stage. The main thing here is to completely assemble the layer with the cross and the intermediate layer. This is done like this: we put eight cubes - four corner cubes for the lower layer, and four side edge for medium - to the place. A column consisting of angular and rib cubes, in contrast to methods for newcomers, here should be collected immediately. For this there are about 40 ready-made algorithms, you can use any of them, or to trust your own intuition.
A couple can also be collected by three movements:


The stage is complicated, first of all, the need to be able to find paired cubes. There are only 16 positions in which these cubes can be 8 positions in the last layer, 8 positions in the columns. Without a certain training and ideas about the correct search for cubes, the stage may take a fairly long time, however, the pros cope with it in a matter of seconds due to the infinite eye and the elementary memory of the fingers developed by long classes.
OLL (orientation of the last layer)

The essence of this step is to register the cubes of the last layer so as to collect the last (yellow) face. This is done at least 6, a maximum of 14 moves, according to any of the 56-known algorithms, each of which is applied according to a certain current situation. Of course, learning 56 algorithms - real torture, especially for those who do not claim to be the champion's laurels, but simply passionate in the process of assembling a cube. This case is invented easier and more convenient, but not so fast version of the 2-Look Oll. It consists of two stages: assembling the cross, then assembling corners. For such a variant of possible algorithms of only 10.
PLL (rearrangement of the last layer)
Once inventor Erno Rubik gathered his cube for a month, and a modern record - a few seconds.
Many years have passed, and the interest in the Rubik's cube is increasing. There is even a rug cube assembly competition! On many sites, enthusiasts are discussed which cube assembly schemes are easier to remember which rules it is easier to perform which algorithms are faster, and what fingers for what to keep.
Let us not be going to participate in competitions, but just want to learn, or even just learn how to collect Rubik's cube - the general principles of solving this puzzle. Newcomers do not need to learn detailed algorithms and schemes. Remember 2 or 3 formulas, and practice to better learn knowledge. I will try to explain the easiest way I managed to find by studying at the same time much unnecessary :). Full assembly instructions fit on this small web page.
There are different assembly strategies, and for sure there are other simple rules. We will not even consider options. This is the topic for self-study.
If you keep the cube exactly, by one face (side) to myself, then his verses are indicated by the words: F. Ront (the face is close to you), IN Rod, L. EVO, P Ravo.
The instruction for assembling a cube consists of formulas. The formula is recorded part of the assembly algorithm, which performs part of the task. The correct formula changes in places or turns some kind of cubes without disturbing the position of the others. The formula is a sequence of the first letters of the words denoting the edges of the cube: F, B, L, P. On this page, the face is marked in red. Letters can be with strokes.
 IN
IN
The letter in without a stroke indicates the top of the top face clockwise 90 degrees.
 IN"
IN"
The letter in the touch indicates the turn of the upper face counterclockwise 90 degrees.
 IN""
IN""
The letter in two strokes denotes the top of the upper face 180 degrees.

Formula 1. VP "in" "PP VP
For memorization:
VP VP VP, first and third time p ", second time in" "
(2 long-range cubes of the upper crosse change in places)

Formula 2. P "VLV" PVL "B"
For memorization:
PVLV PVLV, first the strokes on the edges, then in the second pair
(Cyclically move 3 near corner cubes of the upper face)

Formula 3. F "P FP" The desired number
For memorization:
Forward - Forward - Back - Back
(The near corner cube turns without changing its place)
Formulas need to remember. The remaining rules must be understood. In my experience, with my bad memory, the formula "Forward-back" I never forgot, in the formula PVLV I forgot where the strokes, and in the fomule I forgot the order of letters in and P. In the end, I learned the hardest PVLV formula, and I remembered that the letters of VP go in another jog than in the word PVLV.
You probably noticed that the central cubes always remain in place. Therefore, to assemble one face, you need to collect "cross" and angular cubes of the same color as the center.

A pair of angular cubes
Order assembly
(1) Lower Cross.
(2) 2 lower layers. In turn we collect 4 pairs of angular cubes.
(3) Upper Cross in the color of the center
(4) Formula 1 to correct the upper cross
(5) Formula 2 for the correct arrangement of corner cubes of the upper face
(6) Formula 3 for rotation of the corner cube. Turn the top face with another wrong angular cube to yourself. Again, execute the formula 3., etc. While the entire upper face will not be correct.
(1)
 Nizhny Cross
(2)
 2 lower layers
(3)
 Upper cross is assembled
(4)
 Upper Cross Fixed
(5)
 Corner cubes are collected
(6)
Corner cubes are fixed
It is convenient to collect the necessary cubes in the upper layer, following the safety of the already collected two lower layers:
(1) Rotate, for example P. At the same time, a pair of cubes of one corner rises into the top layer
(2) Rotate the upper face in or in "or in" "
(3) reverse rotation (P ")
After that, the lower cross and one of the lower corners are completely restored. A pair of cubes that you raised upstairs should be either not yet collected (then not sorry), or should remain inseparable pair with further manipulations until you return them to place after reaching another goal.
I wish you success! After a few hours of study, you can collect Rubik's cube in a couple of minutes.
Rubik's Cube — interesting puzzle childhood. Although many adults are not averse to winning this wonder. At first glance, it can be said that this is an ordinary cube with six faces of different colors. But this is only at first glance. The puzzle is quite complicated and under the power not every brave. Therefore, today we will try to explain how you can explain how to make a toy from our childhood.
The main thing in the article
How to learn to collect Cube Rubik?
- The initial idea of \u200b\u200bthe magic cube was to train students of the mathematical theory of groups. So B. 1970s For years, Hungarian architect Ernu Rubik created a mechanical tool, which was a training cube to understand three-dimensional models and move independent parts.
- After a short time, the Great Glory came to the magic patented Cuba. They were interested in people of different professions and from different countries. So, B. 1980s For years he knew all the world, he won a lot of contests and was awarded all sorts of awards.
- The mechanism includes an internal and external part. Inner is a figure consisting of three connected cylinders. External - fastening to the inner mechanism of the face, which in turn consist of squares.
- Rotating the edges of the faces in different directions, you can collect a ruby \u200b\u200bcube. After many years, many worked on the magical cube, as a result of which a lot of techniques were created. Now there are even some algorithms, using which, you can quickly collect cube.
- The cube consists of three elements: centers - 4 angles - 8 and ribs - 12 .
How fast and easy to assemble a ruby \u200b\u200bcube: major rules

- It is necessary to rotate not only the color sectors, but also the cube itself.
- You need to focus on the central figures.
- In the original version, the yellow is always located opposite the white, orange opposite the red, and the green opposite the blue.
- It is necessary to move the average and angular sectors, in accordance with the colors of the central figures.
- Each new movement creates a new angle and center segment.
- The center does not change, in what kind of confusing the position you did not bring the cube, at the top will always be white, below - yellow, ahead - green, the back - blue, right - red, and on the left - orange.
- The rib elements have two stickers, and the corner - three.
- Since the color fragments do not change its position, then the cube will always be collected equally.
- There are ribs comfortable - Watching the left and right, and uncomfortable - Below or at the top. There are also ribs that stand still or under the cross.
How to collect one, two sides of the Rubik cube?

- In order to collect one of the sides, you need to create a cross from one color on any of the faces. The starting point will serve as a central fragment of one of the colors.
- By selecting the desired color located in the center, send fragments of a similar color to it, creating a cross.
- Next, it is necessary to assemble the angles of similar colors. To do this, you need to move the color found to the face of the part.
The cross will be assembled correctly if the centers will coincide with the ribs in color.
- Find a white center.
- Then put comfortable ribs that look at you.
- After acceptable for uncomfortable. Scroll the face left or right and make it convenient for the design of the cross.
- After - scroll through the top to make room for the rib.
- Next, put the corners. They are either from above, or below. Originally move the upper corners.
- Select the angle and move to the center of those colors, the color stickers of which are located with a white angle.
- After twist the formula "bang Bang"until the angle will fall into place.
So that all the center coincides with the edges, always twist one by one movement clockwise and check.
When the moment comes that the center and ribs do not coincide on two edges, then you need to use the formula "bang Bang".
- Formula "bang Bang" - Algorithm of repetitive movements. White Cross looks upstairs, clockwise move the right side to one move, then the top move clockwise. After, the right part move counterclockwise, that is, return back, and return back counterclockwise.
The second side is assembled in the same way. To do this, first collect the correct cross, the first side and move the ribs so that they coincide with the centers in color. Next, move the angles by the formula.
How to collect a ruby \u200b\u200bcube completely?

In order to collect a fully mechanism, you need to use the lesson to collect one side. After the second, and the remaining parties are going.
How to collect Rubik Cube Angles?
- The corners of the cube are divided into the upper and lower. The first is moving the top, as they are easiest to move.
- The secret is that when finding the top corner, you need to move a white sticker so that other angular stickers are located with their centers.
- And then the angle moves by the formula "bang Bang".
How to collect Rubik's cube layers?

- Collect the right white cross.
- Create one white layer.
- Find the ribs without yellow stickers.
- Remember the color of the rib and compare it with the appropriate color.
- Now make your right hand.
- Place two centers in front of them at an angle 45 °.
- Hide the color element in the other side so that it is not visible, turning the face with one movement.
- Raise the right corner.
- Return the hidden edge.
- And return the corner. There should be a pair of two colors.
- Next, move along the same algorithm to move all the fragments into place.
How to collect a rubble cube with pictures for beginners: step-by-step instruction

How to collect Rubik's cube: understandable scheme and formula

How to quickly assemble a cube rubik 3x3, 5x5?

- Cross. - assembly of the cross, four edge cubes on the bottom face;
- In order to very quickly collect the mechanism, you can use the method - CFOP, which is deciphered as:
- F2L (First Two Layers) - assembly of two layers - lower and medium;
- Oll (Orient The Last Layer) - the correct orientation of the cubes of the upper layer;
- PLL (Permute The Last Layer) - alignment of the cubes of the upper layer.
- Also at high-speed assembly, the mechanism itself has an important meaning as well as it is lubricated. After all, the speed of moving faces depends on it.
- Another secret is to skillfully use both hands and all your fingers, directing the brinks them in the right direction.
- The pause should not be, at the end of one turn, it is necessary to move on lightning.
- Having studied all the algorithms, it is necessary to know how your next step will be.
- Practice, and only she helps in rapid collection Magic Cuba.
How to collect Rubik's Cube for 20 moves?
Number of God — 20 Steps for which you can collect the positions of the magic mechanism. Represents an algorithm of actions whose number is 20 . The video below shows a slow scheme consisting exactly from 20 Steps.
In this video, a scheme is presented from 18 Steps for advanced speedcubers.
How to assemble a ruby \u200b\u200bcube: the easiest way
To make it more clear, look at the video on which the easiest method of collecting a magic cube is clearly and clearly explained.
How to collect Rubik's cube per minute?
Ability to collect a mechanism for 1 minute It is that you know all simple algorithms. With the help of them and the speed of your fingers, you can easily solve the tangled rubble mechanism.
How to collect Rubik's cube with eyes closed?
To be able to fold a cube with closed eyes, I need to know all the algorithms and the location of all colors in Cuba. And for this you need practice.
How easy to assemble a cube-ruby for children?

- Before learning children, the mechanism of Rubik's cube, you need to acquaint them with the terminology that is understandable to the child.
- After you need to enable imagination and ask questions that will help the child understand how to move the figure.
- Maxim Maxim Chechnev helps children of different ages to master the fast collection scheme.
How to collect Rubik's cube: Maxim Chechhv
Methodik Maxim Chechnev It helps to collect a magic mechanism even to children. In his training, he tells in detail how correctly and quickly comprehend the basics of skill. His video lessons are aimed at understanding the Cuba mechanism itself. He is interested in children with entry issues and helps to master the right technique for a fairly rapid time.
How to Collect Rubik Cube: Jessica Fritrich Tips

Jessica Friedrich - Speedcubber, which in 1980s For years at the collection of mechanism, the first place was taken by the mechanism. To all, she created its collection methodology - CFOP., it is divided into 4 stages:
Tips from Jessica:
- High-quality mechanism;
- Silicone Grease;
- Patience, excerpt and practice.
How to collect disassembled, broken cube-rubik?
If your cube broke or you wished to look at the mechanism from the inside, then we suggest you take a look at the video, where it is described in detail about the assembly of the magic cube.
How to assemble a ruby \u200b\u200bcube: video slowly
Magic mechanism allows you to develop not only memory, but also logical thinking, small motor Hands, diction and ability to make quick and right solutions. With the help of a magic toy, you can develop intelligence, to introduce children with an uncomfortable game and spend time not wasted.