Code for all spells in skyrim. The Elder Scrolls V: Skyrim codes. Cheats for interacting with objects and NPCs
All those codes that will make it easier for you to play
To open the console press [~] (tilde) and enter the following cheat codes:
tgm - invulnerability mode
tcl - walk through walls
tmm 1 - open the world map (all points on the map)
killall - kill everyone (friends / enemies) in sight
psb - Get All Spells, Dragon Shouts and Talents
qqq - exit the game
advlevel - raise the level. Does not add ability points
tfc - "free" camera mode
tdetect - theft without consequences. Disable the sight of the NPC.
tcai - disable and enable artificial intelligence... After cast, everyone stops fighting.
set timescale to 0 - stop time. By default: 20. If you enter 10000 instead of 0, then one day will pass in a few seconds.
SexChange - change sex to the opposite one. The face will not change at the same time :)
Showracemenu - open the character creation window, where you can change: race, gender, appearance and character name. After changing the race, in the early versions of the game, your character's level will become 1. This will also lead to the reset of all pumped skills. In game version 1.3.10.0, after changing the race, the character's level remains the same. Remember to save your game before using this command command
player.setav invisibility 1 - enable invisibility. After that, neither enemies nor friends will notice you. To turn off invisibility, instead of 1, enter 0
player.modav carryweight X - increase the maximum carrying capacity of the character by X units
player.setav speedmult X - set the speed of movement X%. It is used after running with the key pressed. Default: 100%.
player.setscale X - increase the growth of your character, where X: 1 - 100%, 2 -200%, etc.
setgs fJumpHeightMin 100 - jump height 100% (default).
player.setav Stamina X - set max. amount of stamina in X units. If you install great importance, then the character will not get tired while running.
player.setav attackdamagemult N - increase weapon damage by N times
player.setav leftweaponspeedmult N - increase the attack speed of the weapon in the left hand by N times
player.setav weaponspeedmult N - increase the attack speed of a weapon in the right hand and two-handed weapons by N times
player.setav LeftitemCharge N - load the weapon in the left hand for N charges
player.setav RightitemCharge N - charge the weapon in the right hand for N charges
player.additem 0000000F N - get N gold
player.additem 0000000A N - get N master keys
player.placeatme 0010BF90 - Summon Spectral Horse. Can be used indoors
player.setcrimegold 0 - cancel the bounty on your head
player.addspell 00092C48 - Lycanthropy. Skill for turning into a wolf / werewolf. Appears in the "Talents" section. Use the [z] key to activate. You cannot cancel the skill. The reverse transformation into a person will occur automatically, after a certain period of time.
player.addspell 000B8780 - vampirism. Adds Sanguinare Vampiris disease. 3 days after being infected, you have a 10% chance of becoming a vampire. If after 3 days after using this code in the section "Magic" - "Active effects" appears "Vulnerability to fire" - you are a vampire. And if nothing worked, use the command player.removespell 000B8780, after which again player.addspell 000B8780
player.removespell 000B8780 - will be cured of vampirism, the disease "Sanguinare Vampiris", which appears at the first stage of transformation (after a bite). After turning into a vampire, this code does not work.
setstage 000EAFD5 10 - recover from vampirism. Always heals, but only works once, since the heal occurs after the quest is completed (this code ends the quest)
player.moveto (without brackets) - teleport to the specified object (character)
coc qasmoke - will move to the test location. There are all game items and tools for making any items here.
coc riverwood - exit the test area, move to Riverwood. If instead of "riverwood" you enter another name, then a teleportation will occur to the specified location. How to find out the names of locations for teleportation, read a little below.
player.setpos [axis] [number] (without brackets) - move your character to the specified coordinates. Instead of the axis, you must specify x, y or z. And instead of a number - an offset along the selected axis
prid (without brackets) - select an object by its ID. Analogous to the following: open the console - click on the object. After this command, the console should display "" (object ID). Then you can apply all the cheats written below without highlighting the object. Using this cheat code, you can select a very distant object and apply the necessary action to it. For example, resurrect someone or see the contents of the inventory.
In order for the following codes to work, it is necessary to approach the creature (animal or character) from the front "point-blank" or required object, open the console and click on it with the mouse, and the inscription "" (object_id) should appear in the console. Then enter these cheats:
stopcombat - stop the fight with the specified friendly character
Before using this command, apply player.setcrimegold 0 If there are several enemy NPCs near you, then to end the battle, you must apply this cheat for all at once, without closing the console.
If at least one NPC will attack you (you did not apply this code to him), then all others will start attacking.
If nothing works - take the attackers out of the city (before that, it is recommended to turn on the tgm invulnerability mode) - use the tcai command (so that everyone freezes and does not move anywhere) - take a comfortable position (so that everyone is in sight) - without closing the console apply the stopcombat command to all in turn. After the command has been applied to all characters, enter tcai and tgm again (if these modes were enabled).
All characters hostile to you are shown by red dots on the compass at the top and until these dots disappear they will attack you.
For permanent enemies (monsters and storyline NPCs), those who always attack you, this command does not work.
kill - kill the selected character / animal
resurrect 1 - resurrect
resetai - restore default dialogs - erase the memory of the selected NPC. This command must be used only if you killed someone, resurrected, and after that he refuses to talk to you
openactorcontainer 1 - open the inventory of the selected creature. You can exchange items
removeallitems - clear the inventory of the specified character. equipitem item_id - equip the selected character with the specified item (item ID, see below). With the help of this cheat, you can dress any character, give him a weapon and put on armor on him.
inv - show the contents of the inventory (list) of the selected object
duplicateallitems player - copy all items from the inventory of the specified NPC or object to your inventory
resetinventory - reset the contents of the inventory. Dress the selected character in the default outfit, the original
setownership - get ownership of the specified item
unlock - open the lock of the specified object
disable - hide the specified object
enable - show an object that was hidden using the disable cheat
markfordelete - delete the selected object or character. Attention! With the help of this code, you can remove not only some kind of chest, but also invisible objects that can be selected with the mouse and which are necessary for the normal functioning of the game. Be careful when using this command. The objects you create are deleted immediately, while others - after saving and loading the game. There is no reverse command. It is not recommended to use this command, as you can delete some wall, floor or whole building. It is recommended to use the disable command to remove items, as it only hides the item and does not delete the item.
Taking control of an NPC
With the help of the following cheats, you can get control over any monster or character. Do everything strictly in the specified sequence. switch to "third person view" [f] (it won't work otherwise); we approach the required character or monster; open the console, click on it with the mouse and enter the following code;
and close the console.
To return to the normal game and take control of your main character, enter in the console: TC and player.TC
Notes: After gaining control over the NPC, you can only move with it and cannot attack. If you press attack, then your main character will attack, and not the one under your control. How to get the NPC to attack is unknown. If you find a solution to this problem, write in the comments.
Satellites
In Skyrim, almost any character can be made your partner, companion. To do this, do the following:
Approach the required character;
Open the console and click on it (highlight);
Enter setrelationshiprank player 3
Enter addfac 0005C84D 1
After that, this character will have a dialogue: “Follow me. I need your help."
Strengthening skills
All of the codes below enhance this or that skill by (base value * N%). That is, if your base weapon damage is 15 and you entered 200 as the value, then the initial damage will be (15 + 15 * 2) = 45. To disable the modifier, enter 0 as the value. The exact same formula is used to calculate the duration of spells.
Example: player.setav DestructionPowerMod 100 - increase the damage from all spells of the school of destruction by 100%
OneHandedPowerMod - one-handed weapon
TwoHandedPowerMod - two-handed weapon
MarksmanPowerMod - bows
BlockPowerMod - shield
SmithingPowerMod - blacksmithing
HeavyArmorPowerMod - heavy armor
LightArmorPowerMod - light armor
PickPocketPowerMod - pickpocketing
LockpickingPowerMod - Hack
SneakPowerMod - stealth
AlchemyPowerMod - alchemy
SpeechcraftPowerMod - Speech
AlterationPowerMod - change
ConjurationPowerMod - witchcraft
DestructionPowerMod - destruction
IllusionPowerMod - illusion
RestorationPowerMod - recovery
EnchantingPowerMod - enchanting
Note. Changes to these modifiers are displayed in the descriptions of spells and weapons.
Remove squares when entering cheat codes
We go into the folder with the game and find the following file:
Skyrim \ Data \ Interface \ fontconfig.txt. Replace the following line:
map "$ ConsoleFont" = "Arial" Normal
map "$ ConsoleFont" = "FuturaTCYLigCon" Normal
Note. If after that the fontconfig.txt file does not want to be saved or offers to save a copy of this file, then do the following: in the properties of this file, see if the "Read only" checkbox is ticked; if it is, remove it, change the file, save it and put this checkbox back.
Installing English in the console
Go to C: \ Users \<имя_пользователя>\ Documents \ My Games \ Skyrim and open the Skyrim.ini file. After the lines:
SLanguage = RUSSIAN
add (not replace) the following line
sConsole = ENGLISH
Now in the console you will have English instead of Russian.
Note. If after adding this line the language in Skyrim consoles remained the same or you cannot find the Skyrim.ini file (start folder or not) then remove the sConsole = ENGLISH line (if added) and set the default English language in the operating system.
Leveling all skills
With the help of these cheat codes for Skyrim, you can quickly pump all the skills and get all the perks. For this we need the following cheats:
advskill N X - increase the skill N by X experience points. The main team for pumping all skills and perks
player.setav N X - set X skill level N. This cheat does not add "ability points", but is necessary when your skill level reaches 100
player.setlevel N - set the character level N (1-255). Can be used to lower the character level after using the advskill cheat
List of all skill names for advskill and player.setav
Usage example:
advskill Destruction 100 - increase "Destruction" by 100 experience (not levels)
player.setav Block 50 - set 50 skill level "Block"
Alchemy - alchemy
Alteration - change
Conjuration - witchcraft
Destruction - destruction
Enchanting - enchanting
Illusion - illusion
Restoration - restoration
Marksman - shooting
Block - block
HeavyArmor - heavy armor
LightArmor - light armor
Lockpicking - hack
Onehanded - one-handed weapon
Twohanded - two-handed weapon
Pickpocket - pickpocketing
Smithing - blacksmithing
Sneak - stealth
Speechcraft - eloquence
To pump all the perks of all skills, do the following:
Using the advskill cheat (description above), we raise any skill to level 100
Then we apply the code player.setav [skill name] 0 (without brackets) - set the level of the specified skill to 0
Repeat points 1 and 2 until you have pumped all the perks.
If after that you still do not understand how to add "ability points" for pumping perks, then enter this several times (in turn):
advskill Destruction 999999
player.setav Destruction 0
After these manipulations, you will receive the required amount of "ability points" and can spend them on pumping all the perks available in Skyrim.
To change the amount of magic, lives and stamina, use the following cheats:
player.setav Health X - set max. number of lives in X units
player.setav Magicka X - set max. amount of magic in X units
player.setav Stamina X - set max. stock quantity in X units
Armor sets (sets)
To get the required set of armor, enter cheat codes in the following form:
player.additem [armor_code] [amount] (without brackets)
Example: player.additem 00013938 1 - get 1 glass boots
Dwemer Armor Set:
0001394D - armor
0001394E - gloves
0001394C - boots
0001394F - helmet
00013950 - shield
Daedric Armor Set
0001396B - armor
0001396A - boots
000D7A8C - Boots of Suppression of Fire - + 50% Fire Resistance
000D7A8B - Boots of Silence - Silent Movement
000D7A8A - mammoth boots - +50 units. lightning capacity
0001396D - helmet
0001396C - gloves
0001396E - shield
000D7AF9 - grounding shield - + 70% resistance to electricity
000D7AF6 - heat shield - + 70% cold resistance
0010DFA3 - Shield of Negation - + 22% Magic Resistance
Glass armor set
00013938 - boots
00013939 - armor
0001393A - gloves
0001393B - helmet
0001393C - shield
Imperial Armor Set
000136D5 - armor
000136D6 - boots
000136D4 - bracers
00013EDC - helmet
000135BA - shield
Elven Armor Set
000896A3 - armor
0001391A - boots
0001391C - gloves
0001392A - gilded armor
0001391D - helmet
0001391E - shield
Leather Armor Set
0003619E - armor
00013920 - boots
00013921 - bracers
00013922 - helmet
Dragonplate Armor Set
00013965 - boots
00013966 - armor
00013967 - gloves
00013969 - helmet
00013968 - shield
Dragon Scale Set
0001393D - boots
0001393E - armor
0001393F - gloves
00013940 - helmet
00013941 - shield
Ebony Armor Set
00013960 - boots
00013961 - armor
00013962 - gloves
00013963 - helmet
00013964 - shield
Orcish Armor Set
00013956 - boots
00013957 - armor
00013958 - gloves
00013959 - helmet
00013946 - shield
Rogue Armor Set
000D8D50 - armor
000D8D4E - boots
000D8D55 - bracers
000D8D52 - helmet (horns)
Nightingale Armor Set
000FCC0F - armor
000FCC11 - gloves
000FCC0D - boots
000FCC12 - hood (helmet)
Blade Armor Set
0004F912 - shield
0004B28F - helmet
0004B288 - boots
0004B28D - gloves
0004B28B - armor
Wolf Armor Set
000CAE15 - armor
000CEE7C - boots
000CEE7E - gloves
0004C3D0 - helmet
Stormcloak Officer Armor
0008697E - armor
00086981 - boots
00086983 - gloves
00086985 - helmet
Ancient Nordic Armor
00018388 - armor
00056A9D - boots
00056A9E - helmet
00056B17 - gloves
Thieves Guild Armor
000D3AC4 - gloves
000D3ACE - hood
000D3ACC - armor
000D3AC2 - boots
Thieves Guild Master Armor
000E35D7 - armor
000E35D9 - hood (helmet)
000E35D8 - gloves
000E35D6 - boots
Unique armor with bonuses
0007C932 - "Robe of the Archmage" (armor) - + 100% to the speed of recovery of magic; all spells consume 15% less magic
000F9904 - "Scientist's Circlet" (helmet) - All spells consume less magic
000FC5BF - "Bloodthirst Tarch" (shield) - Shield strike deals 3 damage. damage over 5 sec
000E41D8 - "Shield of Ysgramor" - + 20% magic resistance; +20 dmg. health
000295F3 - "Ingol's Helmet" - + 30% cold resistance
Accessories with bonuses
000С8911 - "Amulet of Akatosh" - + 25% to the speed of recovery of magic
0002D773 - "Amulet of Goldur" - +30 units. magic, health and stamina
00100E65 - "Necklace of Immunity and Disease" - 100% Immunity to Disease
000C891B - "Mara's Amulet" - Recovery spells consume 10% less magic. Essential for a wedding.
Masks (helmets) with bonuses
00061CB9 - "Krosis" - + 20% to hacking, archery and alchemy skills
00061C8B - "Morokey" - + 100% to the speed of recovery of magic
00061CA5 - "Nakrin" - spells of the school of destruction and restoration spend 20% less mana; +50 mana
00061CC9 - "Vokun" - spells of the school of illusion, change and witchcraft spend 20% less mana
00061CC2 - "Otar" - resistance to fire, electricity and cold increases
00061CC0 - "Ragoth" - +70 units of the reserve of forces
00061CAB - "Wolsung" - 20% discount on all goods; breathing underwater; +70 carrying capacity
00061CC1 - "Hevnorak" - immunity to diseases and poisons
00061CCA - "Wooden Mask"
00061CD6 - "Konarik" - At low health, it has a chance to heal the wearer and damage nearby enemies
Weapon Sets
To get the required weapon, enter cheat codes in the following form: player.additem [weapon_code] [amount] (without brackets).
Example: player.additem 000139A8 1 - get 1 glass bow
Glass weapon:
000139A3 - one-handed ax
000139A4 - two-handed ax
000139A9 - one-handed sword
000139A7 - two-handed sword
000139A8 - mace
000139AA - war hammer (two-handed)
000139A5 - bow
000139A6 - dagger
Daedric Weapons
000139B4 - ax
0001DDFB - Inferno ax - +30 units. fire damage; sets fire to target
0001DFCB - ax of thunderstorms - +30 units. electricity damage; takes 15 units. of magic
000139B5 - bow
0001DFEF - Petrification Bow - Chance to paralyze target for 6 sec
0001DFE6 - Inferno bow - +30 units. fire damage; sets fire to target
0001DFE9 - winter bow - +30 units. cold damage; takes 30 units. reserve of strength
0001DFF2 - Lightning Bow - +30 units. electricity damage; takes 15 units. of magic
0001DFFC - Sacred Bow - Undead level 40 and below flee for 30 seconds
000139B6 - dagger
000139B7 - two-handed sword
000139B8 - mace
000139B9 - sword
000139B3 - battle ax
000139BA - war hammer
Imperial weapons
000135B8 - sword
00013841 - bow
Dwemer weapons
00013994 - poleaxe
00013995 - bow
00013996 - dagger
00013997 - two-handed sword
00013998 - mace
00013999 - sword
00013993 - battle ax
0001399A - war hammer
Elven weapons
0001399C - battle ax
0001399E - dagger
0001399F - great sword
000139A0 - mace
000139A1 - sword
0001399D - bow
000139A2 - war hammer
Ebony weapon
000139B1 - sword
000139AD - bow
000139B2 - war hammer
000139B0 - mace
000139AC - battle ax
000139AB - ax
000139AF - two-handed sword
000139AE - dagger
Orcish weapon
0001398B - battle ax
0001398C - ax
0001398D - bow
0001398E - dagger
0001398F - two-handed sword
00013990 - mace
00013991 - sword
00013992 - war hammer
Rogue Weapons
000СС829 - ax
000CADE9 - sword
000CEE9B - bow
000АЕ087 - heather geis (5 units of additional damage to the nords)
Nightingale weapon
000F6527 - blade
000F652C - bow
Weapon of Blades
0003AEB9 - sword
Ancient Nordic weapons
0002C66F - sword
000236A5 - two-handed sword
0001C864 - hammer
0002C672 - ax
Dragon weapon
One-handed
XX 014fcb - Dragonbone Dagger
XX 014fce - Dragonbone Sword
XX 014fcf - Dragonbone Battleaxe
XX 014fcd - Dragonbone Mace
Two-handed
XX 014fcc - Dragonbone Two-Handed Sword
XX 014fc3 - Dragonbone Ax
XX 014fd0 - Dragonbone Warhammer
XX
0176f1 - Dragonbone Bow
Unique weapon with bonuses
000F1AC1 - "Dragon Scourge" - +40 units. damage to dragons and +10 pts. electricity damage against everyone
000F5D2D - "Pale Blade" - +25 units. cold damage; subtract 50 stamina from the target; weaker creatures and humans flee for 30 seconds
000956B5 - "Wootrad" - Especially deadly against elves
000B3DFA - "Eye of Crayon" - Fire blast deals 40 damage. damage in a radius of 4.5 m. and sets the target on fire
000A4DCE - "Bloody thorn" - Fills a soul stone if the enemy dies within 3 seconds
00053379 - "Fierce" - +15 units. cold damage; takes 15 units. enemy forces
000F8317 - "Cooler" - +30 units. cold damage; chance to paralyze target for 2 sec
0001C4E6 - "Ax of Sorrow" - Takes away 20 units. enemy forces
00035369 - "Staff of Magnus" - Absorbs 20 units. magic per second, if the enemy has no magic - absorbs her health
0010076D - "Staff of Hevnorak" - Within 30 sec. deals 50 damage. lightning damage per second. Applies to surface
000AB704 - "Staff of Kholdir" - Soothes weak opponents for 60 seconds. or captures their souls if they die
000E5F43 - "Staff of Yurik Goldurson" - deals 25 damage. damage and takes 50 pts. of magic
00094A2B - "Ghost Blade" - +3 units. extra damage ignoring armor
000AB703 - "Curse of the Red Eagle" - Sets fire to undead level 13 and below, and makes them flee for 30 seconds
0009FD50 - "Rage of the Red Eagle" - +5 units. fire damage and sets the target on fire
000B994E - "Valdar's Lucky Dagger" - + 25% critical strike chance
0006A093 - "Staff of Tandil" (staff) - Creatures and people of level 12 and below do not fight for 60 seconds
Notes:
Additional damage from weapons was indicated for a character of the first level without pumped skills. All descriptions and names were taken from the game. "Staff of Yurik Goldurson" - that is what it is called in the game, and not "Yurik". This may be a localization error. Only the latest (most powerful) versions of the weapon were added.
Non-craftable armor
Example: player.additem 000D8D50 1 - get 1 Rogue Armor
Light armor
Rogue Armor
000D8D50 - Outcast Armor
000D8D4E - Boots of the Outcast
000D8D55 - Gloves of the Outcast
000D8D52 - Outcast Headpiece
Armor Penitus Oculatus
000D3EA0 - Armor Penitus Oculatus
000D3EAA - Penitus Oculatus Helmet
000D3EAB - Bracers Penitus Oculatus
000D3EA7 - Boots Penitus Oculatus
Linvey's Armor
00108544 - Linvey's Armor
00108546 - Linvey's Hood
00108545 - Linvey's Gloves
00108543 - Linvy's Boots
Fur armor
0010594B - Fur Armor (Pt. 1)
0010594D - Fur Armor (Pt. 2)
0010594F - Fur Armor (Pt. 3)
0006F393 - Fur Armor (Pt. 4)
0006F398 - Fur boots
000A6D7F - Fur boots
0006F39B - Fur Bracers
000A6D7D - Fur gloves
0006F39E - Fur Helmet
Stormcloak Officer Armor
0008697E - Stormcloak Officer Armor
00086983 - Stormcloak Officer's Bracers
00086981 - Stormcloak Officer's Boots
00086985 - Stormcloak Officer Helmet
Thieves Guild Armor
000D3AC3 - Thieves Guild Armor
000D3AC4 - Thieves Guild Gloves
000D3AC5 - Thieves Guild Hood
000D3AC2 - Thieves Guild Boots
(Improved Armor: Improved Thieves Guild Armor - only one piece of armor can be exchanged after the Scoundrel's Whim quest)
000D3ACC - Thieves Guild Armor
000D3ACD - Thieves Guild Gloves
000D3ACE - Thieves Guild Hood
000D3ACB - Thieves Guild Boots
Guild Master Armor
000E35D7 - Guild Master Armor
000E35D9 - Guild Master's Hood
000E35D8 - Guild Master Gloves
000E35D6 - Guild Master Boots
Nightingale armor
Each piece of armor has several options with a different ID
000FCC0C -
0005DB85 - Nightingale Boots
000FCC0D -
0005DB86 -
000FCC0E - Nightingale Armor
000FCC0F -
0005DB87 -
000FCC10 - Nightingale Gloves
000FCC11 -
0005DB88 -
000FCC13 - Nightingale Hood
000FCC12 -
Tsuna's Armor
000C0165 - Tsuna's Armor
000C0166 - Tsuna's Boots
Dark Brotherhood Armor
000D2844 - Armor of Shadows
000D2845 - Boots of Shadows
000D2843 - Gloves of Shadows
000D2842 - Hood of Shadows
0005ABC4 - Masked Hood of Shadows
Ancient Armor of the Dark Brotherhood
000E1F15 - Ancient Shadow Armor
000E1F14 - Ancient Boots of Shadows
000E1F16 - Ancient Gloves of Shadows
000E1F17 - Ancient Hood of Shadows
Heavy armor
Wolf armor
000CAE15 - Wolf Armor
000CEE7C - Wolf Boots
000CEE7E - Wolf Gloves
0004C3D0 - Wolf Helmet
Falmer Armor
000B83CB - Falmer Armor
000B83CD - Falmer Boots
000B83CF - Falmer Gloves
0004C3CB - Falmer Helmet
0005C06C - Falmer Shield
Armor of the Blades
0004B28B - Blade Armor
0004B288 - Boots of Blades
0004B28D - Gloves of Blades
0004B28F - Helmet of Blades
0004F912 - Shield of Blades
Artifacts
000295F3 - Ingol's Helmet
000F9904 - Scientist's Diadem
0002AC61 - Savior's Skin
Non-craftable weapon
To get the required item, the IDs of which are below, you must use the cheat code in the following form: player.additem [amount] (without brackets)
Example: player.additem 0009F25D 1 - Get 1 Celestial Steel Dagger
Blades of the Domain
A player receives such blades when he becomes a tan in one or another possession. All indicators of such blades vary depending on the level of the player, namely: material (10 options), type (7 options for each material) and enchantment (8 more options). Thus, the player can get one blade from a huge number of different options, which each will have its own ID.
Heavenly weapon
0009F25D - Celestial Steel Dagger
0009F25C - Heavenly Steel Sword
0009F260 - Celestial Steel Battle Ax
Weapon of Blades
0003AEB9 - Sword of Blades
000F1AC1 - Dragon Scourge
Rogue weapons
000CADE9 - Sword of the Outcasts
000CEE9B - Bow of the Outcasts
Weapon from Volundrud
0008ADFB - Ceremonial Ax
0008ADFC - Ceremonial Sword
0008FFDE - Okin
0008FFDF - Edouge
Ancient and Good Ancient Nordic Weapons
0002C66F - Ancient Nordic Sword
0002C672 - Ancient Nordic Battle Ax
0005BF14 - Good Ancient Nordic Sword
0005BF15 - Fine Ancient Nordic Battle Ax
Nightingale weapon
0007A917 --- | Nightingale Blade
000F6524 --- | Nightingale Blade
000F6525 --- | Nightingale Blade
000F6526 --- | Nightingale Blade
000F6527 --- | Nightingale Blade
0007E5C3 --- | Nightingale Bow
000F6529 --- | Nightingale Bow
000F652A --- | Nightingale Bow
000F652B --- | Nightingale Bow
000F652C --- | Nightingale Bow
Other
00029B91 - Greatstaff of Soothing
00046E0B - Gatnor's Magic Staff
000B3DFA - Crayon's Eye
000E57F0 --- | Spider Control Rod
000C19FF --- | Spider Control Rod
Luke
0003B562 - Longbow
0006B9AD - Dravin's Bow
000AB705 - Bow of the Hunt
000C0186 - Frocky Bow
000F82FC - Bow Beach Magician
00013985 - Hunting bow
One-handed weapon
000F5D2D - Pale Blade
00013983 - Balgruf's Battle Ax
000AE087 - Heather Geis
00079B1D - Sacrificial Blade
000426C8 - Sharpening
000ECD54 - Alesandra's dagger (I know what is written with two s, there was just a bug, so I cut it)
00043E1E - Dagger Borvir
0001C1FE - Dagger of the Dragon Priest
000ECD53 - Rundi's Dagger
000C1989 - Bolar Blade
0009CCDC --- | Blade of Sorrow
000964C9 --- | Blade of Sorrow
000D0758 - Cavosein Fang
0001C492 - Wren
000A4DCE - Bloodthorn
0003B0B7 --- | Lunar Steel Sword
0003B0BA --- | Lunar Steel Sword
0003B0BD --- | Lunar Steel Sword
00053379 - Fierce
0009F25E - Sword of Vilkas
000AB85D - Sword of Queen Freydis
00068976 - Hyalti Sword
000F71DD - Sword-Slayer
You can get the sword only by completing the "Deadly Dangerous Field" quest, and only on condition that both brothers survived. - Cooler
0001F25A - Knife
0001F25B - Fork
Two-handed weapon
0006AF63 - Troll Beach
0002ACD2 - Volendrung
000956B5 - Wootrad
000223FB - Forester's friend
000461DA --- | Giant's club
000C334F --- | Giant's club
Other of other
000461DA --- | Serrated Pickaxe
000C334F --- | Serrated Pickaxe
001019D4 --- | Serrated Pickaxe
000E3C16 - Pickaxe
0002F2F4 - Cleaver
List of small arms
To get the required item, the IDs of which are below, you must use the cheat code in the following form: player.additem [amount] (without brackets)
Example: player.additem 0001398D 1 - Get 1 Orc Bow
Crafted weapons
Luke
0001398D - Orcish Bow
00068C57 - Nordic Hero Bow
00013995 - Dwemer Bow
0001399D - Elven Bow
XX 026232 - Nordic Bow (Dragonborn)
000139A5 - Glass bow
000139AD - Ebony Bow
XX 026231 - Dragonborn Bow
000139B5 - Daedric Bow
XX 0176F1 - Dragonborn Bone Bow
Crossbows
XX 000801 - Crossbow (Dawnguard)
XX 00B647 - Dwemer Crossbow (Dawnguard)
Special weapon
Luke
0003B562 - Longbow
00013985 - Hunting bow
000302CA - Ancient Nordic Bow
00013841 - Imperial Bow
00038340 - Falmer Bow
000CEE9B - Bow of the Outcasts
0005D179 - Flexible Ancient Nordic Bow
000F82FC - Bow Beach Magician
00083167 - Flexible Falmer Bow
Unique weapon
Luke
000C0186 - Frocky Bow
0006B9AD - Dravin's Bow
000CC392 - Bow of Angi
000A5DEF - Goldur's Black Bow
000AB705 - Bow of the Hunt
XX 00CFB6 - Marshmallow (Dawnguard)
00017059 - Death of Firiniel
XX 02C01A - Dwemer Black Bow of Fate (Dragonborn)
XX 018ED5 - Dragonborn Glass Bow
Artifacts
Luke
0007E5C3 - Nightingale Bow
XX 000800 - Auriel's Bow (Dawnguard)
Ammunition
Arrows
000CAB52 - Training Arrow
000E738A - Rusty arrow
00038341 - Falmer Arrow
000CEE9E - Arrow of the Outcasts
0001397D - Iron arrow
00034182 - Ancient Nordic Arrow
0001397F - Steel boom
XX 017720 - Riekling's Spear (Dragonborn)
000139BB - Orcish Arrow
000139BC - Dwemer Arrow
XX 02623B - Nordic Arrow (Dragonborn)
000139BD - Elven Arrow
XX 0098A1 - Sun Elven Arrow (Dawnguard)
XX 0098A0 - Blood Curse Elven Arrow (Dawnguard)
000139BE - Glass arrow
0007B932 - Arrow of the Dwemer Orb
000139BF - Ebony Arrow
XX 026239 - Ironhrim Arrow (Dragonborn)
0010b0A7 - Summoned Arrow
000EAFDF - Hero's Nordic Arrow
000139C0 - Daedric Arrow
XX 0176F4 - Dragonbone Arrow (Dawnguard)
Bolts
XX 00590C - Test bolt (Dawnguard)
XX 000BB3 - Steel Bolt (Dawnguard)
XX 00D099 - Dwemer Bolt (Dawnguard)
List of two-handed weapons
To get the required item, the IDs of which are below, you must use the cheat code in the following form: player.additem [amount] (without brackets)
Example: player.additem 0001359D 1 - get 1 Iron two-handed sword
Crafted weapons
Swords
0001359D - Iron two-handed sword
00013987 - Steel two-handed sword
0001398F - Orcish two-handed sword
00013997 - Dwemer two-handed sword
0001399F - Elven two-handed sword
XX 01CDAF - Nordic Two-Handed Sword (Dragonborn)
000139A7 - Glass two-handed sword
000139AF - Ebony Two-Handed Sword
XX 01CDB6 - Ironhrim Greatsword (Dragonborn)
000139B7 - Daedric Greatsword
XX 014FCC - Dragon Bone Two-Handed Sword (Dawnguard)
Axes
00013980 - Iron Ax
00013984 - Steel ax
0001398C - Orcish Ax
00013994 - Dwemer Ax
0001399C - Elven Ax
XX 01CDAD - Nordic Ax (Dragonborn)
000139A4 - Glass poleaxe
000139AC - Ebony Ax
XX 01CDB4 - Irongrim Ax (Dragonborn)
000139B4 - Daedric Ax
XX 014FC3 - Dragon Bone Ax (Dawnguard)
Hammers
00013981 - Iron War Hammer
0001398A - Steel War Hammer
00013992 - Orcish War Hammer
0001399A - Dwemer War Hammer
000139A2 - Elven War Hammer
XX 01CDB3 - Nordic Warhammer (Dragonborn)
000139AA - Glass War Hammer
000139B2 - Ebony War Hammer
XX 01CDBA - Irongrim War Hammer (Dragonborn)
000139BA - Daedric War Hammer
XX 014FD0 - Dragon Bone War Hammer (Dawnguard)
Special weapon
Swords
000236A5 - Ancient Nordic two-handed sword
0005BF13 - Good Ancient Nordic Two-Handed Sword
0009F25E - Heavenly steel two-handed sword
0010C6FB - Silver two-handed sword
Axes
0001CB64 - Ancient Nordic Ax
0005BF12 - Good Ancient Nordic Ax
0009F25F - Celestial Steel Ax
0005BF12 - Ax-Bloodsucker
Hammers
XX 00DD55 - Dawnguard Warhammer
Unique weapon
Swords
XX 026B0B - Stormfang (Dragonborn)
XX 01AEA4 - Bloodskal Blade (Dragonborn)
Axes
000223FB - Forester's friend
000BE25E - Executioner's Ax
Hammers
000D2AFE - Curse of the Aegis
0006AF63 - Troll Beach
XX 01A578 - Baton of the Protector (Dragonborn)
000C334F - Giant's club
Quest weapon
Swords
000946FC - Balgruf's Two-Handed Sword
Hammers
00022265 - Shagrol's War Hammer
Artifacts
Swords
0004A38F - Ebony Blade
Axes
0001C4E6 - Ax of Sorrow
000956B5 - Wootrad
Hammers
XX 011BAD - Dawnguard Runic Hammer
0002ACD2 - Volendrung
Daedric Artifacts
The id of the daedric artifacts that are below must be used in the cheat code as follows: player.additem [number] (without brackets)
Example: player.additem 000240D2 1 - get 1 dagger "Razor of Mehrunes"
Weapon
000240D2 - "Razor of Mehrunes" (dagger) - Chance to kill the enemy when dealing damage
000233E3 - "Mace of Molag Bal" (mace) - Takes away 25 units. reserve of strength and magic. Fills a Soul Gem if the enemy dies within 3 seconds
0004E4EE - "Radiance of Dawn" (sword) - +10 units. damage. When killing undead there is a chance of a fire explosion that drives away or destroys nearby undead
000EA29C - "Ebony Blade" (two-handed sword) - The target does not perceive a weapon attack as an attack
0001C4E6 - "Ax of Sorrow" (two-handed ax) - Takes away 20 units. enemy forces
0002ACD2 - "Volendrang" (two-handed hammer) - Takes away 50 units. reserve of strength
0002AC6F - "Wabbajack" (staff) - Random effect on each use
0001CB36 - "Rose of Sanguine" (staff) - Summons Dremora for 60 seconds
00035066 - "Skull of Corruption" (staff) - +20 units. damage. Dreams collected from sleeping people increase damage to 50
Armor
0002AC61 - "Savior's Skin" (light armor) - + 50% resistance to poison and + 15% magic
00052794 - "Ebony Mail" (heavy armor) - you move more quietly, and opponents who come too close take 5 points of poison damage per second
000D2846 - "Mask of Clavicus Vile" (heavy helmet) +10 to eloquence. Magic recovery speed + 5%. Favorable prices + 20%
00045F96 - "Spellbreaker" (shield) - After blocking, absorbs up to 50 units. spell damage
Other
0002C37B - "Namira's Ring" - +50 units. reserve of strength. By devouring corpses, you increase your health and recovery rate
0002AC60 - "Ring of Hircine" - Additional transformation for revolves
0001A332 - "Oghma Infinum" (book) - After reading, you can get +5 to the following skills (only 1 of 3 lines is randomly selected):
Blacksmithing, Blocking, Shooting, One-handed Weapon, Two-handed Weapons, Heavy Armor, Hack, Light Armor, Stealth, Pickpocketing, Speech, Alchemy, Illusion, Witchcraft, Destruction, Recovery, Enchant, Alteration
00063B27 - "Star of Azura" - Infinite Soul Gem
00063B29 - "Black Star" - Stone of Souls
0003A070 - "Skeleton Key" - Infinite Lockpick
Screams of dragons
With the help of the psb cheat code "we get all the spells, dragon cries and talents" or we add only the necessary cries with the help of the cheat:
player.teachword - learn shout (list of all shout IDs below) Example: player.teachword 20e17 - learn the first word of the fire breath shout
To learn the 3rd word of the dragon's cry, you first need to learn 1 and 2, it will not work otherwise. To study the "Ice Form" level 3, you must enter the following:
player.teachword 602A3 - first word
player.teachword 602A4 - second
player.teachword 602A5 - third
Dragon shouts ID for player.teachword code (without brackets) first word / second / third - shout name (use only 1 of 3):
46B89 / 46B8A / 46B8B - Call of the Dragon
13E22 / 13E23 / 13E24 - Ruthless Force
602A3 / 602A4 / 602A5 - Ice Form
6029A / 6029B / 6029C - Lightning Call
20E17 / 20E18 / 20E19 - Fire Breath
48ACA / 48ACB / 48ACC - Time dilation
2F7BB / 2F7BC / 2F7BD - Rapid dash
60291/60292/60293 - Friendship with the Beasts
3291D / 3291E / 3291F - Elemental Rage
32917/32918/32919 - Ethereal
5D16C / 5D16D / 5D16E - Frosty breath
5FB95 / 5FB96 / 5FB97 - Disarmament
3CD31 / 3DC32 / 3CD33 - Clear sky
51960/51961/51962 - Call of Valor
44251/44252/44253 - Dragon Slayer
60297/60298/60299 - Death sentence
60294/60295/60296 - Whisper of aura
6029D / 6029E / 6029F - World of kin
3291A / 3291B / 3291C - Fright
To use dragon Shouts, you first need to activate them with the help of Dragon Souls. That is, kill the dragon or add the required amount using a cheat:
player.modav dragonsouls N - get N souls of dragons. This cheat sets the total number of absorbed dragon souls, and does not add N pieces.
To activate dragon shouts, press - Magic - Shouts - select the required shout that you want to activate - press [r] - Ok. Now you can use this shout.
player.setav shoutrecoverymult 0 - dragon shouts have no cooldown, no cooldown for reuse. If you entered this code after using a shout, you will need to wait until it recovers, after which you can use this shout all the time without waiting for it to be restored.
In order to get things from the game, you need to enter into the console: player.additem N
Mass Paralysis - 00021876
Curse of the Undead - 000218f2
Fire Arrow - 00096598
Ice Thorn - 00096599
Lightning - 0009659a
Candle Light - 0009659b
Oak Flesh - 0009659c
Revive Zombies - 0009659e
Pet Call - 0009659f
Courage - 000965a0
Fury - 000965a1
Magic Light - 000965a2
Flesh Stone - 000965a3
Reviving Corpse - 000965a4
Summon Fire Atronarch - 000965a5
Soul Capture - 000965a7
Fire Rune - 000965a8
Frost Rune - 000965a9
Thunder Rune - 000965aa
Muting Steps - 000965ab
Calm - 000965ad
Fear - 000965ae
Fast Heal - 000965af
Scare Undead - 000965b0
J`zargo's Fire Cloak - 000967e3
Life Detection001019ae - 001019ae
Shalidor's Works: Destruction - 001076e7
Shalidor's Works: Illusion - 001076e8
Shalidor's Works: Change - 001076e9
Shalidor's Works: Restoration - 001076ea
Shalidor's Works: Witchcraft - 001076eb
Shalidor's Works: Magic - 001076ec
Iron Flesh - 000a449b
Water Breathing - 000a449c
Paralysis - 000a449d
Ebony Flesh - 000a449e
Banishing Daedra - 000a449f
Summon Ice Atronach - 000a44a0
Summon Thunder Atronach - 000a44a1
Ghost - 000a44a3
Daedric Order - 000a44a4
Dire Zombie - 000a44a5
Expulsion Daedra - 000a44a6
Dead Thrall - 000a44a7
Fire Thrall - 000a44a8
Ice Thrall - 000a44a9
Thunderstorm Thrall - 000a44aa
Fire Cloak - 000a44ab
Frost Cloak - 000a44ac
Cloak of Lightning - 000a44ad
Fireball - 000a44ae
Ice Storm - 000a44af
Chain Lightning - 000a44b0
Firestorm - 000a44b1
Buran - 000a44b2
Encouragement - 000a44b5
Rabies - 000a44b6
Invisibility - 000a44b7
Appeasement - 000a44b9
Route - 000a44ba
Katavasia - 000a44bb
Harmony - 000a44bc
Hysteria - 000a44bd
Call to Arms - 000a44be
Scare Minor Undead - 000a44bf
Treat Near - 000a44c1
Repulsion of Lesser Undead - 000a44c2
Circle of Protection - 000a44c3
Higher Treatment - 000a44c4
Repulsion of Undead - 000a44c5
Scaring Elder Undead - 000a44c6
Fury - 000a44c7
Random Scroll - 000a44c8
Random Scroll - 000a44c9
Wound Healing - 000b64b3
Protective Circle - 000e0cd5
Dragon Hide - 000e0cd6
Spider scrolls
To get the required item, the IDs of which are below, you must use the cheat code in the following form: player.additem [amount] (without brackets)
Example: player.additem XX 019534 10 - Get 10 Explosive Fire Spiders
Description:
Spider Scrolls (a conventional name for a group of items introduced in addition The Elder Scrolls V: Dragonborn.) Are magical items that can be crafted using the infill chamber, a device located in the White Ridge Barrow in Solstheim. The name of the items received does not contain the word "scroll", but they are placed in this particular category of inventory. Spider Scrolls can be equipped in each hand.
A creature of this category looks like a spider, which Dovahkiin holds in his hand before throwing. The creation and final use of spiders does not require the cost of magic, however, each individual spider scroll (like an ordinary scroll or volume of spells) is a one-time use and disappears after the creature is put into operation.
Fire spiders
XX 019534 - Explosive Fire Spider (Throw a spider that explodes when an enemy approaches, dealing fire damage.) + Recipe: Ruby, damaged belly of an albino spider
XX 01952C - Hidden Fire Spider (Throw a spider that attacks all approaching enemies with fire.) + Recipe: Ruby, Salt, Belly of an Albino Spider
XX 014480 - Jumping Fire Spider (Throw a spider that attacks the nearest enemy and explodes, dealing fire damage.) + Recipe: Ruby, belly of an albino spider
Ice spiders
XX 0206D3 - Explosive Ice Spider (Throw a spider that explodes when an enemy approaches, dealing cold damage.) + Recipe: Sapphire, damaged belly of an albino spider
XX 0206D9 - Hidden Ice Spider (Throw a spider that attacks with cold all approaching enemies.) + Recipe: Sapphire, Salt, Belly of an Albino Spider
XX 0206DB - Jumping Ice Spider (Throw a spider that attacks the nearest enemy and explodes, dealing cold damage.) + Recipe: Sapphire, Albino Spider Belly
Thunder Spiders
XX 02095F - Explosive Thunder Spider (Throw a spider that explodes when an enemy approaches, dealing shock damage.) + Recipe: Amethyst, Damaged Belly of an Albino Spider
XX 020960 - Hidden Thunder Spider (Throw a spider that attacks all approaching enemies with lightning) + Recipe: Amethyst, Salt, Albino Spider Belly
XX 020961 - Leaping Thunder Spider (Throw a spider that attacks the nearest enemy and explodes, dealing shock damage.) + Recipe: Amethyst, Albino Spider Belly
Poisonous spiders
XX 01707B - Explosive Poisonous Spider (Throwing a spider that explodes when an enemy approaches, dealing poison damage.) + Recipe: Emerald, damaged belly of an albino spider
XX 01CAB0 - Hidden Poisonous Spider (Throw a spider that attacks with poison all approaching enemies.) + Recipe: Emerald, Salt, Belly of an Albino Spider
XX 01445E - Leaping Poisonous (Throwing a spider that itself attacks the nearest enemy and explodes, dealing poison damage.) + Recipe: emerald, belly of an albino spider
Other spiders
XX 016E1C - Controlling spider (Creatures and people under the influence of the spider fight on the side of the hero for 30 seconds.) + Recipe: any soul gem, belly of an albino spider (Note: One spider is created in one run. Any soul gem is suitable, except the Stars of Azura since they cannot be parsed.)
XX 02749D - Butter Spider (Summons a spider that secretes a pool of flammable oil.) + Recipe: Dwemer Oil, Albino Spider Belly (Note: One spider is created in one run.)
XX 027490 - Glowing Spider (Spider accompanying the hero and attacking enemies.) + Recipe: glowing mushroom, belly of an albino spider (Note: Was not included in the game.)
XX 0274A5 - Pack Spider (Summons a spider, no more than one at a time, that can carry things.) + Recipe: bone meal, belly of an albino spider (Note: Was not included in the game.)
Note:
At the same time, up to 6 spiders can exist in the applied form. Occupying separate slots, spiders can coexist with the summoned creature - or two, if Dovahkiin has the ability of the Witchcraft skill - Twin Souls.
Allied spiders fighting on a par with Dovahkiin are summoned indefinitely. Unlike the basic units, the exploding spider exists until the moment of the explosion, and the activated controlling spider thrown at the enemy lasts for 30 seconds.
Spiders follow the hero when changing locations, including fast travel.
If you inflict damage on at least one of the spiders, then they all become hostile and attack.
Explosive Spider Species can be knocked back by shouting "Ruthless Force".
Located south of Bloodskal Mound, all container eggs containing the belly of an albino spider are regenerated, but only once.
When using a Flawless Gem, 6 spiders are created, not 3 (from the others, 2 and 1, respectively).
The glowing and pack spiders can be obtained in the developer room, which can be accessed using console command coc qasmoke.
Spell books. Part 1
What ( XX
Spells of Change
Candle Light - 0009e2a7
Oak Flesh - 0009e2a8
Magic Light - 000a26e2
Stone Flesh - 000a26e3
Life Detection - 000a26e7
Iron Flesh - 000a26e4
Telekinesis - 000a26e5
Transmutation - 00109112
Water Breathing - 000a26e6
Death Detection - 000a26ea
Ebony Flesh - 000a26e9
Paralysis - 000a26e8
Dragon Hide - 000d2b4e
Mass Paralysis - 000dd646
Equilibrium - 000f4997
Spells of Conjuration
Summoned Sword - 0009e2a9
Pet Call - 0009e2ab
Revive Zombies - 0009e2aa
Summoned Ax - 000a26ed
Bone Man Challenge - XX 0045b0
Summon Fire Atronach - 000a26ec
Fire Pet - 000b45f7
Reanimation of a corpse - 000a26eb
Capturing Souls - 0009cd54
Banishing Daedra - 000a26ee
Summoned Bow - 000a26f1
Frost Atronach Summon - 000a26ef
The misty man's call - XX 0045b1
Ghost - 000a26f2
Daedra Order - 000a26f6
Lord Dremora's Challenge - 0010fd60
Summon Thunderous Atronach - 000a26f0
Calling a furious man - XX 0045b2
Horrible Zombie - 000a26f7
Expulsion Daedra - 000a26f8
Fire Thrall - 000a26fa
Dead Thrall - 000a26f9
Ice Thrall - 000a26fb
Thunder Thrall - 000a26fc
Ghost Arrow - 000b3165
Spell books. Part 2
In order to get these items, you must enter in the console: player.additem
What ( XX?) 00e8d6 in ID? Look in the sections, where I explain what it is and what you need to do to get this or that thing.
Destruction Spells
Flame - 0009cd51
Frostbite - 0009cd52
Sparks - 0009cd53
Fire Rune - 000a2700
Fire Arrow - 000a26fd
Frost Rune - 000a2701
Ice Spike - 000a26fe
Lightning - 000a26ff
Thunder Rune - 000a2702
Chain Lightning - 000a2708
Fireball - 000a2706
Fire Cloak - 000a2703
Frost Cloak - 000a2704
Ice Storm - 000a2707
Lightning Cloak - 000a2705
Ice Lance - 0010f7f3
Incineration - 0010f7f4
Lightning Discharge - 0010f7f5
Wall of Flame - 000a2709
Cold Wall - 000a270a
Storm Wall - 000a270b
Blizzard - 000a270d
Firestorm - 000a270c
Lightning Storm - 000a270e
Illusion Spells
Clairvoyance - 000ff7d1
Courage - 0009e2ad
Fury - 0009e2ac
Calm - 000a2711
Fear - 000a2712
Muting footsteps - 000a270f
Rabies - 000a2714
Encouragement - 000a2713
Invisibility - 000a2715
Appeasement - 000a2717
Getaway - 000a2718
Hysteria - 000a271c
Call to Arms - 000a271b
Harmony - 000a271a
Katavasia - 000a2719
Restoration Spells
Treatment - 0009e2af
Small Amulet - 0009e2ae
Fast Heal - 000a271d
Healing Hands - 000a271e
Necromantic Healing - XX 00e8d5
Stable Charm - 000a2720
The fire of the sun - XX 003f51
Scare Lesser Undead - 000a271f
Healing from wounds - 0010f64d
Great Amulet - 000a2722
Treatment of neighbors - 000a2727
Healing the undead - XX 00e8d6
Knock Back Lesser Undead - 000a2725
Aura of Stendarr - XX 003f4e
Scare Undead - 000a2721
Vampire Scourge XX 003f4d
Circle of Protection - 000a2728
Higher Heal - 000dd643
Knock Back Undead - 000a2726
Scaring Elder Undead - 000a2729
Curse of the Undead - 000dd647
Protective Circle - 000fde7b
Ingredients, Soul Gems, Potions, Arrows
To get the required item, the IDs of which are below, you must use the cheat code in the following form: player.additem [amount] (without brackets)
Example: player.additem 00039BE5 10 - get 10 full health recovery potions
Potions
00039BE5 - fully restores health
00039BE7 - fully restores magic
00039CF3 - fully restores the reserve of strength
00073F34 - "Deadly Poison" - 65 units. poison damage
00039D12 - "Enchanter's Elixir"
00039967 - "Blacksmith's Elixir"
Soul stones
0002E4F4 - large (empty)
0002E4FB - Large (Large)
0002E4FC - great (empty)
0002E4FF - Great (Great)
0002E500 - black (empty)
0002E504 - black (Great)
00063B27 - Star of Azura (empty)
00063B29 - Black Star of Azura (empty)
Arrows
00038341 - Falmer
00034182 - Ancient Nordic
000236DD - dart (can only be obtained after passing the main storyline)
00020F02 - rusty iron
00020DDF - iron
000139C0 - Daedric
000139BF - ebony
000139BE - glass
000139BD - elven
000139BC - Dwemer
000139BB - Orcish
0001397F - steel
XX0176f4 - dragon
Ingots
0005ACE5 - steel
0005ACE4 - iron
0005ACE3 - silver
0005AD93 - carund
0005AD99 - Orichalcum
0005AD9D - ebony
0005AD9E - gold
0005ADA0 - mercury
000DB8A2 - Dwemer metal
0005ADA1 - refined malachite
0005AD9F - Refined Moonstone
Skins
0003ad52 - Bear Skin
0003ad53 - Cave Bear Skin
0003ad54 - Polar Bear Skin
0003ad6d - Sabretooth Skin
0003ad6e - Snow Sabretooth Skin
0003ad74 - Wolf Skin
0003ad75 - Snow Wolf Skin
0003ad8e - Goat Skin
0003ad8f - Cow Skin
0003ad90 - Deer Skin
0003ad93 - Horse Skin
000d4b35 - Fox Skin
000d4be7 - Snow Fox Skin
000fe6a9 - Werewolf Skin
Gems
00063B46 - amethyst
00063B47 - diamond
00063B45 - garnet
00063B43 - emerald
00063B42 - ruby
00063B44 - sapphire
0006851E - flawless amethyst
0006851F - flawless diamond
00068521 - Flawless Garnet
00068520 - flawless emerald
00068522 - Flawless Ruby
00068523 - flawless sapphire
Other
0003AD5B - Daedra Heart
0003ADA3 - dragon scales
0003ADA4 - dragon bones
000E7ED0 - hawk feathers
0003AD60 - Salt of the void
Ingredients Pt. 1
To get the required item, the IDs of which are below, you must use the cheat code in the following form: player.additem [amount] (without brackets)
Example: player.additem 00106E1B 10 - get 10 Abesino perches
Abesino perch- 00106E1B (Weakness to Cold, Skill Up: Stealth, Weakness to Poison, Skill Up: Recovery)
Scarlet Root Nirn- 000B701A (Damage Health, Damage Stamina, Invisibility, Magic Resistance)
Belyanka- 0004DA22 (Weakness to Cold, Fortify Skill: Heavy Armor, Magicka Regeneration, Magicka Desolate)
Demonic mushroom- 0004DA23 (Damage Health, Lingering Damage Health, Paralysis, Health Regeneration)
Fighting fish- 00106E1A (Damage Health, Increase Skill: Change, Slow Down, Increase Carry Weight)
Swamp pod- 0007E8B7 (Shock Resistance, Lingering Magic Damage, Paralysis, Health Regen)
Big horns- 0006BC0A (Restore stamina, Increase stamina, Slow down, Damage stamina regeneration)
Bearded moss- 00057F91 (Damage Magic, Fortify Health, Damage Regenerate Magic, Fortify Skill: One-Handed Weapon)
Heather heart- 0003AD61 (Restore Magic, Fortify Skill: Block, Paralyze, Fortify Magic)
Thistle branch- 000134AA (Resist Cold, Drain Stamina, Resist Poison, Fortify Skill: Heavy Armor)
Jazby grapes- 0006AC4A (Weakness Magic, Fortify Magic, Regenerate Magic, Drain Health)
Giant lichen- 0007E8C1 (Weakness to Electricity, Drain Health, Weakness to Poison, Restore Magicka)
Saber-toothed eye- 0006BC07 (Stamina Regeneration, Health Drain, Magic Damage, Health Regeneration)
Namira's Rot- 0004DA24 (Magic Damage, Increase Skill: Hack, Fear, Health Regeneration)
Blue mountain flower- 00077E1C (Restore health, Increase skill: sorcery, Increase health, Damage magic regeneration)
Dwemer Oil- 000F11C0 (Weakness to Magic, Fortify Skill: Illusion, Regenerate Magic, Regenerate Magic)
Roasted Malice Leather- 00052695 (Restore stamina, Heal diseases, Resist poisons, Restore health)
Pearl- 000854FE (Restore Stamina, Increase Skill: Block, Restore Magic, Resist Electricity)
Spriggan sap- 00063B5F (Damage Regeneration Magic, Fortify Skill: Enchant, Fortify Skill: Blacksmithing, Fortify Skill: Change)
Troll fat- 0003AD72 (Resist Poison, Increase Skill: Two-Handed Weapon, Frenzy, Damage Health)
Ice Wraith Teeth- 0003AD6A (Vulnerability to Cold, Fortify Skill: Heavy Armor, Invisibility, Vulnerability to Fire)
Killer Fish Caviar- 0007E8C5 (Resist Poison, Fortify Skill: Pickpocketing, Lingering Health Damage, Increased Stamina)
Nirn Root- 00059B86 (Damage Health, Damage Stamina, Invisibility, Magic Resistance)
Red mountain flower- 00077E1D (Magicka Restore, Magicka Desolate, Magicka Up, Health Damage)
Mud Crab Claw- 0006BC00 (Restore Stamina, Heal Diseases, Resist Poison, Resist Fire)
Saber tooth- 0006BC04 (Restore Stamina, Fortify Skill: Heavy Armor, Fortify Skill: Blacksmithing, Weakness to Poison)
Hawk beak- 000E7EBC (Stamina Restoration, Cold Resistance, Carry Weight Increase, Electricity Resistance)
Witch's claw- 0006B689 (Magic Resist, Lingering Magic Damage, Fortify Skill: Enchant, Fortify Trading Art)
Bone flour- 00034CDD (Damage Stamina, Fire Resistance, Fortify Skill: Affliction, Waste Stamina)
Bloody crown- 0004DA20 (Weakness to Fire, Fortify Skill: Block, Weakness to Poison, Resistance to Magic)
Moon moth wing- 000727DF (Magic Damage, Fortify Skill: Light Armor, Health Regeneration, Invisibility)
Monarch wing- 000727E0 (Restore Health, Increase the Art of Trading, Lingering Damage to Stamina, Damage Magic)
Blue butterfly wing- 000727DE (Damage stamina, Fortify skill: spellcasting, Damage regeneration magic, Fortify skill: enchant)
Egg- 00023D77 (Magic Resistance, Damage Magic Regeneration, Water Breathing, Lingering Stamina Damage)
Lavender- 00045C28 (Resist Magic, Increase Stamina, Desolate Magic, Fortify Skill: Affliction)
Purple mountain flower- 00077E1E (Restore Stamina, Fortify Skill: Stealth, Lingering Magic Damage, Cold Resistance)
Moon sugar- 000D8E3F (Weakness to Fire, Cold Resistance, Magic Regeneration, Magic Regeneration)
Dire mushroom- 0004DA25 (Stamina Damage, Frenzy, Health Regeneration, Fortify Skill: Blacksmithing)
Little pearl- 00085500 (Restore Stamina, Fortify Skill: One-Handed Weapon, Fortify Skill: Recovery, Resist Cold)
Small horns- 0006BC0B (Weakness to Poison, Fortify Skill: Recovery, Lingering Damage to Stamina, Damage Health)
Bear claws- 0006BC02 (Restore Stamina, Increase Health, Increase Skill: One-Handed Weapon, Damage Magic Regeneration)
Honeycomb- 000B08C5 (Restore Stamina, Fortify Skill: Block, Fortify Skill: Light Armor, Waste Stamina)
Mora tapinella- 000EC870 (Magicka Regeneration, Lingering Health Damage, Stamina Regeneration, Skill Upgrade: Illusion)
Frosty Miriam- 00034D32 (Resist Cold, Fortify Skill: Stealth, Desolate Magic, Damage Stamina Regeneration)
Frosty salt- 0003AD5F (Weakness to Fire, Cold Resistance, Magicka Recovery, Fortify Skill: Sorcery)
Sea acorn- 0007EDF5 (Magic Damage, Water Breathing, Health Regeneration, Skill Up: Pickpocketing)
Fly agaric- 0004DA00 (Fire Resistance, Fortify Skill: Two-Handed Weapon, Frenzy, Stamina Regeneration)
Fire salt- 0003AD5E (Weakness to Cold, Fire Resistance, Magic Regeneration, Magic Regeneration)
Ingredients Pt. 2
To get the required item, the IDs of which are below, you must use the cheat code in the following form: player.additem [amount] (without brackets)
Example: player.additem 000BB956 10 - get 10 Orange dragonflies
Orange dragonfly- 000BB956 (Stamina Restoration, Magic Waste, Skill Up: Pickpocketing, Lingering Health Damage)
Giant's finger- 0003AD64 (Damage stamina, Increased health, Increased carry weight, Damage regeneration of stamina)
Nightshade- 0002F44C (Damage health, Damage magic regeneration, Lingering damage to stamina, Skill increase: destruction)
Spider egg- 0009151B (Damage to stamina, Damage to magic regeneration, Skill increase: hacking, Archer skill increase)
Shroud of haze- 0006BC0E (Restore Stamina, Increase Skill: Destruction, Increase Carry Weight, Magic Resistance)
The feathers of the sorcerer- 0003AD66 (Magic Damage, Fortify Skill: Affliction, Frenzy, Weakness to Electricity)
Hawk feathers- 000E7ED0 (Heal Diseases, Fortify Skill: Light Armor, Fortify Skill: One-Handed Weapon, Fortify Skill: Stealth)
Creeping vine- 000B2183 (Restore magic, Damage regeneration of stamina, Increased carry weight, Weakness to magic)
Ashes of a vampire- 0003AD76 (Invisibility, Magic Regeneration, Health Regeneration, Healing Diseases)
Cotton grass- 0003F7F8 (Resist Magic, Fortify Magic, Fortify Skill: Block, Fortify Trading Art)
Bee- 000A9195 (Regeneration of stamina, Waste of stamina, Regeneration of stamina, Weakness to electricity)
Bee nest- 000A9191 (Resist Poison, Fortify Skill: Light Armor, Fortify Skill: Stealth, Fortify Skill: Destruction)
Wheat- 0004B0BA (Health Regeneration, Health Increase, Stamina Regeneration Damage, Lingering Magic Damage)
Glowing dust- 0003AD73 (Magic Damage, Damage Magic Regeneration, Skill Up: Destruction, Resistance to Electricity)
Glowing mushroom- 0007EE01 (Resist Electricity, Upgrade Skill: Destruction, Upgrade Skill: Blacksmithing, Upgrade Health)
Daedra Heart- 0003AD5B (Health Regeneration, Damage Regeneration Stamina, Magic Damage, Fear)
Silver perch- 00106E1C (Stamina Regeneration, Stamina Regeneration Damage, Health Drain, Cold Resistance)
Blue dragonfly- 000E4F0C (Resist Shock, Fortify Skill: Pickpocketing, Restore Health, Fear)
Cyrodiil Shoveltail- 00106E19 (Damage Stamina, Fortify Skill: Recovery, Fear, Drain Health)
Snow berries- 0001B3BD (Resist Fire, Fortify Skill: Enchant, Resist Cold, Resist Shock)
Canine root- 0006ABCB (Damage Stamina, Fortify Skill: One-Handed Weapon, Fortify Archery Art, Paralysis)
Salt- 00034CDF (Weakness to Magic, Fortify Skill: Recovery, Slow, Magic Regeneration)
The salt of the void- 0003AD60 (Shock Weakness, Magic Resistance, Health Damage, Magic Up)
Taproot- 0003AD71 (Weakness to Magic, Fortify Skill: Illusion, Regenerate Magic, Regenerate Magic)
Crushed mammoth tusk- 0006BC10 (Restore Stamina, Fortify Skill: Stealth, Weakness to Fire, Fear)
Firefly Thorax- 0004DA73 (Restore Stamina, Lingering Magic Damage, Weakness to Magic, Increased Stamina)
Herbal pod- 00083E64 (Resist Poison, Desolate Magic, Fortify Skill: Alteration, Restore Magicka)
Falmer's ear- 0003AD5D (Damage health, Frenzy, Resistance to poisons, Increase skill: hacking)
Malevolent tail- 0003AD6F (Damage Regeneration Stamina, Drain Health, Damage Health, Increase Skill: Light Armor)
Histcarp- 00106E18 (Restoration of stamina, Fortify magic, Damage of regeneration of stamina, Water breath)
Human heart- 000B18CD (Damage health, Damage magic, Damage regeneration magic, Frenzy)
Human meat- 001016B3 (Damage Health, Paralysis, Magicka Recovery, Skill Up: Stealth)
Garlic- 00034D22 (Resist Poison, Increase Stamina, Regenerate Magic, Regenerate Health)
Flakes- 0006F950 (Weakness to magic, Fortify skill: illusion, Regenerate stamina, Increase carry weight)
Killer fish scales- 0003AD70 (Cold Resistance, Lingering Health Damage, Fortify Skill: Heavy Armor, Fortify Skill: Block)
Ectoplasm- 0003AD63 (Restore Magic, Fortify Skill: Destruction, Fortify Magic, Damage Health)
Elven ear- 00034D31 (Restore Magic, Fortify Archer Art, Weakness to Cold, Resist Fire)
Juniper berries- 0005076E (Weakness to Fire, Fortify Archer Art, Health Regeneration, Damage Stamina Regeneration)
Poison bell- 000516C8 (Damage Health, Drain Stamina, Slow, Vulnerable to Poison)
Dragon tongue- 000889A2 (Resist Fire, Fortify Trading Art, Fortify Skill: Illusion, Fortify Skill: Two-Handed Weapon)
Corus egg- 0003AD56 (Weakness to Poison, Increased Stamina, Magic Damage, Invisibility)
Origma egg- 0007E8C8 (Health Regeneration, Skill Up: One-Handed Weapon, Stamina Damage, Weakness to Magic)
Pine Thrush Egg- 00023D6F (Restoration of stamina, Increase of skill: hacking, Weakness to poison, Resistance to electricity)
Dawnguard
Yellow mountain flower - XX 002A78 (Resist Poison, Increase Health, Increase Skill: Recovery, Damage Regeneration of Stamina)
Ancestor moth wing - XX 0059BA (Damage Stamina, Fortify Skill: Sorcery, Damage Regeneration Magic, Fortify Skill: Enchant)
Glowing flower - XX 00B097 (Magic Resist, Fear, Health Regeneration, Paralysis)
Tendril of corus the hunter - XX 0183B7 (Damage Stamina, Fortify Skill: Affliction, Damage Regeneration Magic, Fortify Skill: Enchant)
Poison flower - XX 0185FB (Damage to Health, Fear, Increased Carrying Weight, Slowdown)
Hearthfire
Salmon caviar - XX 003545 (Water Breathing, Fortify Magic, Regenerate Magic, Restore Stamina)
Hawk egg - XX 00F1CC (Magic Resistance, Water Breathing, Magic Regeneration Damage, Lingering Stamina Damage)
Dragonborn
Wrecker - XX 017E97 (Drain Health, Drain Stamina, Drain Magic, Lingering Damage Health)
Burnt Spriggan Wood - XX 01CD6E (Weakness to Fire, Fortify Skill: Alteration, Damage Magic Regeneration, Slow)
Jelly netcha - XX 01CD72 (Paralysis, Increased Carrying Weight, Restoration of Stamina, Fear)
Ash Hopper Jelly - XX 01CD71 (Health Regeneration, Skill Up: Light Armor, Shock Resistance, Cold Vulnerability)
Imperial umbrella moss - XX 01FF75 (Damage Health, Fortify Magicka, Regenerate Health, Fortify Skill: Two-Handed Weapon)
Boar fang - XX 01CD6F (Increase Stamina, Increase Health, Increase Skill: Block, Frenzy)
Tram root - XX 017008 (Weakness to Electricity, Increased Carry Weight, Magic Damage, Slow)
Ashes of Spawn - XX 01CD6D (Desolate Stamina, Fire Resist, Fortify Skill: Enchant, Desolate Magic)
Ash creeping vine - XX 01CD74 (Stamina Damage, Invisibility, Fire Resistance, Skill Up: Destruction)
Felsadian Tern Feathers - XX 03CD8E (Restore Health, Fortify Skill: Light Armor, Heal Diseases, Resist Magic)
Ash grass pod - XX 016E26 (Fire Resistance, Weakness to Electricity, Skill Up: Hack, Skill Up: Stealth)
To get the required item, the IDs of which are below, you must use the cheat code in the following form: player.additem [amount] (without brackets)
Example: player.additem 00065C9A 10 - Get 10 Goat Ham
Raw
Goat ham- 00065C9A
horsemeat- 00065C9C (Restores 2 health points)
Crab Legs (Hearthfire) - XX 003540
Chicken breast- 000F2011 (Restores 2 health points)
Salmon- 00065C9F (Restores 2 health points)
Boar Meat (Dragonborn) - XX 03BD14 (Restores 2 health points)
Ash Hopper Meat (Dragonborn) - XX 03BD15 (Restores 2 health points)
Oyster meat- 000EBA03 (Restores 1 health point)
Horker meat- 00065C9B (Restores 1 health point)
Ash Hopper Leg (Dragonborn) - XX
03D125 (Restores 2 health points)
Venison- 000669A2 (Restores 2 health points)
Fresh meat- 0010211A
Sobachatina- 000EDB2E (Restores 2 health points)
Raw beef- 00065C99 (Restores 2 health points)
Raw rabbit leg- 00065C9E (Restores 2 health points)
Pheasant breast- 00065C9D (Restores 2 health points)
Mammoth trunk- 000669A4 (Restores 5 health points)
Vegetables and fruits
Green apple- 00064B2F (Restores 2 health points)
Cabbage- 00064B3F (Restores 1 health point)
Potato- 00064B41 (Restores 1 health point)
Red Apple- 00064B2E (Restores 2 health points)
Leek- 000669A5 (Restores 1 health point)
Carrot- 00064B40 (Restores 1 health point)
Ash Yam (Dragonborn) - XX
0206E7 (Restores 1 health point)
A tomato- 00064B42 (Restores 1 health point)
Pumpkin- 0010D666 (Restores 1 health point)
Bakery
Braided roll (Hearthfire) - XX
0009DB (Restores 2 health, Increases carry weight by 5 for 30 seconds.)
Grape Crostata (Hearthfire) - XX
00353A (Restores 10 health points, Magicka is increased by 4 points for 60 seconds.)
homemade food- 000CD614 (Restores 25 health for 600 seconds, Restores 25 stamina for 600 seconds, Restores 25 points for 600 seconds.)
Potato Bread (Hearthfire) - XX
003537 (Restores 3 health points)
Juniper Crostat (Hearthfire) - XX
003539 (Restores 4 units of health, Restores 2 units of health per second, lasts 60 seconds.)
Custard cake- 00064B30
Sweet roll- 00064B3D (Restores 5 health points)
Chicken Puff (Hearthfire) - XX
0117FF (Restores 15 health, Restores 1 health per second, lasts 120 seconds.)
Lavender Puff (Hearthfire) - XX
011801 (Restores 5 health points, Magicka is increased by 10 pts. For 60 seconds, Gives 10% magic resistance for 60 seconds.)
Puff with apples (Hearthfire) - XX
003533 (Restores 5 health, Arrows deal 5% more damage for 60 seconds.)
Snowberry Crostat (Hearthfire) - XX
00353B (Restores 10 health, Neutralizes 4% fire damage, lasts 60 seconds.)
Bread (v.1)- 00065C97 (Restores 2 health points)
Bread (v.2)- 00065C98 (Restores 2 health points)
Garlic bread (Hearthfire) - XX
0009DC (Restores 2 health points, Heals all diseases)
Apple pie- 00064B43 (Restores 10 health points)
Meat dishes
Horker steak- 0007224E (Restores 10 health points)
Boiled Boar Meat (Dragonborn) - XX
03CF72
Beef with spices- 000CADFB (Restores 5 health points)
Roasted horse meat- 000722B0 (Restores 10 health points)
Fried rabbit leg- 000722C2 (Restores 5 health points)
Fried chicken breast- 000E8947 (Restores 5 health points)
Fried killer fish- 00064B3C (Restores 5 health points)
Roasted Malevolent Meat- 000E8448 (Restores 2 health points)
Roasted goat ham- 0007224C (Restores 10 health points)
Salmon steak- 00064B3B (Restores 5 health points)
Salmon steak (Hearthfire) - XX
003541 (Restores 5 health points)
Deer chop- 000722BD (Restores 5 health points)
Boiled beef- 000721E8 (Restores 10 health points)
Mammoth steak- 000722BB (Restores 10 health points)
Stewed Crab Legs (Hearthfire) - XX
00353F (Restores 12 health points)
Roast pheasant- 000722C7 (Restores 5 health points)
Soups and stews
Beef stew- 000F4314 (Stamina increased by 25 pts. For 720 sec., Recovers 2 stamina per second, lasts 720 sec.)
Cabbage soup- 000EBA02 (Restores 10 health units, Restores 8 units of stamina)
Cabbage soup with potatoes- 000F431B
Potato Soup (Hearthfire) - XX
00353D (Restores 10 health units, Restores 10 units of stamina)
Vegetable soup- 000F431E (Restores 1 unit of health per second, lasts 720 sec., Restores 1 unit of stamina per second, lasts 720 sec.)
Cabbage and apple chowder- 000EBA01 (Restores 15 units of stamina, Restores 10 units of health)
Venison chowder- 000F431D (Restores 15 units of stamina, Restores 1 unit of health per second, lasts 720 sec., Restores 1 unit of stamina per second, lasts 720 sec.)
Horker chowder- 000F4315 (Restores 15 units of stamina, Restores 15 units of health, Restores 1 unit of health per second, lasts 720 sec.)
Horker Chowder with Sweet Potatoes (Dragonborn) - XX
03CD5B (Restores 16 units of health, Restores 12 units of stamina)
Clam Soup (Hearthfire) - XX
00353E (Restores 10 health units, Restores 10 units of stamina)
Tomato soup- 000F431C (Restores 10 health units, Restores 10 units of stamina)
Elsweyr fondue- 000F4320 (Magic regenerates 25% faster for 720 seconds, Magicka is increased by 100 for 720 seconds.)
To get the required item, the IDs of which are below, you must use the cheat code in the following form: player.additem [amount] (without brackets)
Example: player.additem 00064B33 10 - get 10 circles of goat cheese
Cheeses
Goat cheese
Chunk of Goat Cheese - 00064B31 (Restores 1 health point)
Pickled Goat Cheese Circle - 00064B35
Goat Cheese Circle - 00064B33 (Restores 15 health points)
Edar cheese
Chunk of Eidar Cheese - 00064B32 (Restores 1 health point)
Covered Edar Cheese Circle - 00064B36 (Restores 15 health points)
Circle of Eydar Cheese - 00064B34 (Restores 15 health points)
Other
Fried Leeks - 00064B3E (Restores 6 health points)
Jug of Milk (Hearthfire) - XX 003534 (Restores 2 health points)
Oil (Hearthfire) - XX 00353C (Restores 2 health points)
Sack of Flour (Hearthfire) - XX 003538 (Restores 1 health point)
Bowl of Mammoth Cheese - 000669A3 (Restores 10 health units, Restores 15 units of stamina)
Honey Nuts - 00064B38 (Restores 5 health points)
Baked Potatoes - 00064B3A (Restores 5 health points)
Bee Honey - 0010394D (Restores 2 health points)
Soul Pod (Dragonborn) - XX 014DC4 (Interrupts the Soul Draining effect in the Soul Cairn, Gives 10% Magic Resistance for 10 seconds.)
Toffee - 00064B39 (Restores 10 health units, Restores 5 units of stamina)
Beverages
Argonian Ale - 0009380D
Argonian Blood Wine (Hearthfire) - XX 003535 (40% Poison Resistance, lasts 50 sec., You can breathe underwater for 50 sec., Stamina regenerates 30% slower for 30 sec.)
Velvet Luck - 00065C37
White-Gold Tower - 00065C38 (Restores 25 units of stamina)
Wine (v.1) - 0003133C (Restores 15 units of stamina, Stamina regenerates 30% slower for 30 seconds.)
Wine (v.2) - 000C5348 (Restores 15 units of stamina, Stamina regenerates 30% slower for 30 seconds.)
Wine "Alto" (v.1) - 0003133B (Restores 15 units of stamina, Stamina regenerates 30% slower for 30 seconds.)
Wine "Alto" (v.2) - 000C5349 (Restores 15 units of stamina, Stamina regenerates 30% slower for 30 seconds.)
Brothers Surili Wine (Hearthfire) - XX 003536 (Restores 15 units of stamina, Stamina regenerates 30% slower for 30 seconds.)
Jessica's Wine - 000F257E (Restores 5 units of stamina)
Esbern's Potion - 000E6DF5 (Gives you the Dragon Bones and Scales ability)
Ash honey (Dragonborn) - XX 03572F (Restores 40 units of stamina, Stamina regenerates 50% slower for 30 seconds.)
(Recovers 25 units of stamina, Prices become 20% more profitable for 30 s., Stamina regenerates 30% slower for 30 s.)
Matzt (Dragonborn) - XX 0248CE (Recovers 10 units of stamina, Neutralizes 20% of cold damage, lasts 60 s., Reduces target's magicka regeneration by 25%, lasts 60 s.)
Honey with juniper berries - 00107A8A (Restores 20 units of stamina, Stamina regenerates 30% slower for 40 seconds.)
Honning's Honey - 000508CA (Restores 20 units of stamina, Stamina regenerates 25% slower for 20 seconds.)
Nordic Honey - 00034C5D (Restores 15 units of stamina, Stamina regenerates 30% slower for 30 seconds.)
Fire Breathing Honey - 000555E8 (Restores 20 units of stamina, Stamina regenerates 30% slower for 60 seconds.)
Fire Wine - 0001895F (Recovers 20 units of stamina, Stamina replenishes 30% slower for 45 s., Neutralizes 15% of cold damage, lasts 45 s.)
Spicy Wine - 00085368 (Recovers 25 Stamina, Stamina regenerates 30% slower for 50 seconds.)
Holy Water - 000A9661 (Restores 25 units of stamina)
Cyrodiil Brandy - 000B91D7 (Recovers 25 Stamina, Stamina replenishes 25% slower for 30 seconds.)
Rock Rider - 00065C39 (Restores 25 units of stamina)
Strauss M "Kai Rum - 000D055E (Restores 25 units of stamina)
Sujamma (Dragonborn) - XX 0207E6
Sujamma Sadri (Dragonborn) - XX 024E0B (Restores 25 units of stamina, Decreases the target's stamina regeneration by 30%, lasts 60 s.)
Coal Wine (Dragonborn) - XX 0320DF (Restores 25 units of stamina, Decreases the target's stamina regeneration by 60%, lasts 120 s.)
Flynn (Dragonborn) - XX 0207E5 (Restores 25 units of stamina, Decreases the target's stamina regeneration by 20%, lasts 120 s.)
Roughberry Honey - 0002C35A
Selected blackberry honey - 000F693F (Recovers 25 Stamina, Stamina replenishes 40% slower for 30 seconds.)
Shane - XX 0248CC (Restores 25 units of stamina, Decreases the target's stamina regeneration by 30%, lasts 60 s.)
EL - 00034C5E (Recovers 25 Stamina, Stamina replenishes 30% slower for 30 seconds.)
Materials for crafting items
To get the required item, the IDs of which are below, you must use the cheat code in the following form: player.additem [amount] (without brackets)
Example: player.additem 000DB5D2 10 - get 10 skin
Leather
000DB5D2 - Leather
000800E4 - Strips of leather
Ingots
0005ACE5 - Steel Ingot
0005ACE4 - Iron Ingot
0005ACE3 - Silver Ingot
0005AD93 - Corundum Ingot
0005AD99 - Orichalcum Ingot
0005AD9D - Ebony Ingot
0005AD9E - Gold Bar
0005ADA0 - Mercury Ore Ingot
000DB8A2 - Dwemer Metal Ingot
0005ADA1 - Refined Malachite
0005AD9F - Refined Moonstone
Dragon Scale and Bone
0003ADA3 - Dragon Scale
0003ADA4 - Dragon Bone
Ores
00071CF3 - Iron Ore
00071CDB - Corundum ore
00071CDC - Ebony Ore
00071CDE - Gold Ore
00071CE1 - Malachite Ore
00071CE0 - Moon Ore
00071CDD - Orichalcum Ore
00071CE2 - Mercury Ore
00071CDF - Silver Ore
XX 02B06B - Stalgrim
Gems
Gems are found when mining various ores, in game containers, as well as on the bodies of some dead creatures. Can sometimes be purchased from merchants. As the level rises, they begin to occur more often, however, the probability of finding an expensive stone (for example, flawless diamond) still remains fairly low. The Thieves' Luck effect also contributes to a more frequent finding of valuable stones. They can be used in blacksmithing in jewelry making or sold. Some gems are needed to complete quests.
V The elder Scrolls V: Dragonborn appears new opportunity uses for gems - they are now needed for making Spider Scrolls. Since the scrolls are disposable, there is a reason not to sell stones, but to save them.
00063B46 - Amethyst
00063B47 - Diamond
00063B45 - Garnet
00063B43 - Emerald
00063B42 - Ruby
00063B44 - Sapphire
0006851E - Flawless Amethyst
0006851F - Flawless Diamond
00068521 - Flawless Garnet
00068520 - Flawless Emerald
00068522 - Flawless Ruby
00068523 - Flawless Sapphire
Skins
0003AD52 - Bear Skin
0003AD53 - Cave Bear Skin
0003AD54 - Polar Bear Skin
0003AD6D - Sabretooth Skin
0003AD6E - Snow Saber Tooth Skin
0003AD74 - Wolf Hide
0003AD75 - Snow Wolf Skin
0003AD8E - Goat skin
0003AD8F - Cowskin
0003AD90 - Deer skin
000D284D - Deer skin
000CF89E - Deer skin
0003AD93 - Horse skin
000D4B35 - Fox Skin
000D4BE7 - Snow Fox Skin
XX 011999 - Dawnguard Skin
XX 01199A - Dawnguard Skin
Hearthfire
Crafted items
XX 003035 - Iron fittings
XX 003011 - Door hinge
XX 00300F - Nails
XX 003012 - Lock
XX 005A69 - Glass
XX 003043 - Clay
XX 00306C - Quarry stone
XX 00303F - Goat horns
XX 005A68 - Straw
Other
XX 011CF7 - Bonehawk Claw
XX 002994 - Bone Hawk Feathers
XX 002993 - Bone Hawk Skull
0003AD57 - Chitin corus
XX 0195AA - Carapace beetle chitin
XX 01CD7C - Netch Skin (Dragonborn)
00034CDD - Bone meal
0003AD5B - Daedra Heart
0006F993 - Log
Potions Pt. 1
To get the required item, the IDs of which are below, you must use the cheat code in the following form: player.additem [amount] (without brackets)
Example: player.additem 000F84AE 10 - get 10 fugitive potions
Runaway Potions
000F84AE - Fugitive Potion
000F84AF - Fugitive Potion
000F84B0 - Runaway Potion
000F84B1 - Elixir of the Fugitive
000F84B2 - Great Elixir of the Fugitive
000F84B3 - Superior Fugitive Elixir
Berserker potions
0003EB2B - Berserker Potion
00039974 - Berserker Potion
00039980 - Berserker Potion
00039AA6 - Berserker Elixir
Potions of Swift Speech
000D6948 - Potion of Lively Speech
000D6949 - Potion of lively speech
000D697F - Potion of lively speech
000D6980 - Elixir of Lively Speech
Cracker potions
00039930 - Cracker's Potion
00039945 - Cracker's Potion
00039946 - Cracker's Potion
00039948 - Cracker Elixir
Warrior Potions
0003EB2A - Warrior's Potion
00039954 - Warrior's Potion
00039955 - Warrior's Potion
00039956 - Warrior Elixir
Thief's potions
000F84A7 - Thief's Potion
000F84A8 - Thief's Potion
000F84A9 - Thief's Potion
000F84AA - Elixir of a Thief
000F84AB - Great Thief Elixir
000F84AC - Superior Thief Elixir
Procurement Potion
000F84C1 - Loot Potion
000F84C2 - Prospect's Potion
000F84C3 - Potion of the Obtainer
000F84C4 - Elixir of the Observer
000F84C5 - Great Elixir of the Observer
000F84C6 - Superior Elixir of the Observer
Badass Potions
000F84B5 - Bully Potion
000F84B6 - Tease Potion
000F84B7 - Potion of a bully
000F84B8 - Bully Elixir
000F84B9 - Great elixir of a bully
000F84BA - Superior Badass Elixir
Potions arrow
000F84BB - Archer's Potion
000F84BC - Archer's Potion
000F84BD - Shooter's potion
000F84BE - Archer Elixir
000F84BF - Archer's Great Elixir
000F84C0 - Superior Elixir of the Archer
Skirmisher Potions
0003EB30 - Skirmisher's Potion
000398FD - Skirmisher's Potion
00039903 - Skirmisher's Potion
00039904 - Skirmisher Elixir
Potions Pt. 2
To get the required item, the IDs of which are below, you must use the cheat code in the following form: player.additem [amount] (without brackets)
Example: player.additem 00039CFB 10 - Get 10 Enchanter Potions
Enchanter's potions
00039CFB - Enchanting Potion
00039D02 - Enchanter's Potion
00039D0A - Enchanter's Potion
00039D12 - Enchanter's Elixir
Defender Potions
0003EB32 - Defender Potion
0003989B - Defender's Potion
000398AB - Defender's Potion
000398AC - Elixir of the Protector
Potions of Change
0003EB36 - Potion of Alteration
0003988E - Potion of Change
00039899 - Potion change
0003989A - Elixir of Change
Illusion potions
0003EB39 - Potion of Illusion
0003994E - Potion of Illusion
00039950 - Potion of Illusion
00039951 - Elixir of Illusion
Sorcerer's potions
0003EB37 - Sorcerer's Potion
000398AD - Sorcerer's Potion
000398EC - Sorcerer's Potion
000398ED - Elixir of the Sorcerer
Blacksmith potions
0003EB2E - Blacksmith's Potion
0003995D - Blacksmith's Potion
00039962 - Blacksmith's Potion
00039967 - Blacksmith Elixir
Merchant's Potions
0003EB35 - Merchant's Potion
00039970 - Merchant's Potion
00039971 - Merchant's potion
00039973 - Merchant Elixir
Light Feet Potions
0003EB33 - Light Legs Potion
0003EB0E - Light Feet Potion
00039969 - Lung Legs Potion
0003996F - Lung Legs Elixir
Healer's potions
0003EB3A - Healing Potion
0003995A - Healer's Potion
0003995B - Healer's Potion
0003995C - Elixir of the Healer
Accuracy Potions
0003EB2C - Potion of Accuracy
00039949 - Potion of Accuracy
0003994B - Potion of Accuracy
0003994E - Elixir of Accuracy
Potions of Destruction
0003EB38 - Potion of Destruction
000398EE - Potion of Destruction
000398F1 - Potion of destruction
000398F3 - Elixir of Destruction
Pickpocket Potions
0003EB31 - Pickpocket Potion
00039957 - Pickpocket Potion
00039959 - Pickpocket's potion
00039958 - Pickpocket Elixir
Knight's potions
0003EB2F - Knight's Potion
000398F4 - Knight's Potion
000398F5 - Knight's Potion
000398F6 - Knight's Elixir
Potions Pt. 3
To get the required item, the IDs of which are below, you must use the cheat code in the following form: player.additem [amount] (without brackets)
Some IDs have signs XX, what is it and how to get this item, see the section "What is XX in ID Items"
Example: player.additem 0003EB11 10 - get 10 vitality potions
Vigor potions
0003EB11 - Vitality Potion
00039B0C - Drink of energy
0003EB14 - Vigor Potion
000FFA02 - Elixir of Cheerfulness
Water Breathing Potions
0003AC2E - Water Breath Potion
0003AC2F - Water Breathing Potion
0003AC30 - Water Breathing Potion
0003AC31 - Elixir of Water Breathing
Invisibility potions
0003EB3E - Potion of Brief Invisibility
0003EB40 - Potion of Invisibility
0003EB3F - Medium Invisibility Potion
0003EB41 - Potion of Long Invisibility
Supplemental Magic Potions
0003EAF7 - Potion of Additional Magic
0003EAFA - Additive Magic Potion
0003EAFB - Drink of Complementary Magic
0003EAFC - Potion of Additional Magic
000FF9FD - Elixir of Additional Magic
Stamina potions
0003EAE5 - Minor Stamina Potion
0003EAE1 - Stamina Potion
0003EAE7 - Strong Potion reserve of strength
00039CF3 - Strong Stamina Potion
0003EAE6 - Best Potion reserve of strength
00039CF3 - Perfect Stamina Potion
Improved stamina potions
0003EAFD - Improved Stamina Potion
0003EB00 - Enhanced Stamina Potion
0003EAFE - Drink of improved stamina
0003EAFF - Potion of improved stamina
000FFA01 - Elixir of Enhanced Stamina
Skuma
XX01391D - Redwater skooma
00057A7A - Skuma
00057A7B - Skuma Kordir
0003F4BD - Double distillation skooma
000DC172 - Balmor blue
Unique potions
0005F6DF - Vermina Apathy
000AED90 - Sleepy Tree Sap
XX018EF3 - Blood Potion
0005566A - Horse Stamina Potion
XX0390E0 - Water Walking Potion
000E6DF5 - Esbern's Potion
0005661F - Unknown Potion
000E2D3D - Curse of the Ice Ghost
000A9661 - Holy water
000B91D7 - Cyrodiil Brandy
000663E1 - Phantom Potion
000D055E - Strauss M "Kaiskiy rum
00076F17 - Falmer Blood Elixir
00058CFB - Lotus extract
XX015A1E - Soul Pod Extract
000F9642 - Essence of Ice Wraith
Poisons
00065A6F - Weak poison
00073F35 - Poison
00073F36 - Strong poison
00073F37 - Pernicious poison
00073F38 - Deadly poison
Potion Pt. 4
To get the required item, the IDs of which are below, you must use the cheat code in the following form: player.additem [amount] (without brackets)
Example: player.additem 00065A70 10 - get 10 Poisons of anti-magic
Poisons of anti-magic
00065A70 - Poison of antimagic
00073F3D - Lingering Poison of Anti-Magic
00073F3E - Prolonged Poison of Antimagic
00073F3F - Prolonged Poison of Antimagic
00073F40 - Perpetual Poison of Antimagic
Poisons of decay
00065A71 - Poison of decay
00073F45 - Lingering Poison of Decline
00073F46 - Prolonged Poison of Decline
00073F47 - Prolonged Poison of Decline
00073F48 - Perpetual Poison of Decline
Rabies poisons
00065A69 - Weak Rabies Poison
00073F5A - Rabies Poison
00073F5B - Potent Rabies Poison
00073F5C - Virulent Rabies Venom
00073F5D - Deadly Rabies Poison
Paralysis poisons
00065A6A - Weak Poison of Paralysis
00074A38 - Paralysis poison
00074A39 - Potent Paralysis Poison
00074A3A - Virulent paralysis poison
00074A3B - Deadly Paralysis Poison
Fear Poisons
00065A68 - Weak Venom of Fear
00073F5E - Poison of Fear
00073F5F - Strong Poison of Fear
00073F60 - Virulent Venom of Fear
00073F61 - Deadly Venom of Fear
Poisons of decay
00065A66 - Weak Poison of Decay
00073F41 - Poison of Decline
00073F42 - Strong Poison of Decay
00073F43 - Virulent Poison of Decay
00073F44 - Deadly Poison of Decay
Potions Pt. 5
To get the required item, the IDs of which are below, you must use the cheat code in the following form: player.additem [amount] (without brackets)
Example: player.additem 0003EAF2 10 - Get 10 Health Potions
Health potions
0003EAF2 - Health Potion
0003EAF4 - Potion of Health
0003EAF6 - Health Drink
0003EAF5 - Potion of Health
000FF9FC - Elixir of health
Other
000AE723 - Potion of Healing Disease
000E41B8 - Frostbite poison
00065A64 - Antidote
Healing potions
0003EADD - Weak Healing Potion
0003EADE - Potion of Healing
0003EADF - Greater Healing Potion
0003EAE3 - Strong Healing Potion
00039BE4 - Ultimate Healing Potion
00039BE5 - Perfect Healing Potion
Potions of magic
0003EAE0 - Minor Magic Potion
0003EAE1 - Potion of Magic
0003EAE2 - Greater Magic Potion
0003EAE4 - Strong Magic Potion
00039BE6 - Ultimate Potion of Magic
00039BE7 - Perfect Magic Potion
Magic Resist Potions
00039E52 - Potion of Magic Resistance
00039E53 - Potion of Magic Resistance
00039E54 - Potion of Magic Resistance
00039E55 - Elixir of Magic Resistance
Magic Rejection Potions
00065A6E - Weak Aversion to Magic
00073F56 - Aversion to Magic
00073F57 - Strong aversion to magic
00073F58 - Corrosive Aversion to Magic
00073F59 - Deadly Rejection of Magic
Anti-magic poisons
00065A65 - Weak Poison of Antimagic
00073F39 - Poison of anti-magic
00073F3A - Potent anti-magic poison
00073F3B - Noxious Poison of Antimagic
00073F3C - Deadly anti-magic poison
Poisons of Non-Replenishment
00073F90 - Weak Poison of Non-Replenishment
00073F91 - Poison of Non-replenishment
00073F92 - Potent Poison of Non-Replenishment
00073F93 - Noxious Poison of Non-Replenishment
00073F94 - Deadly Poison of Non-replenishment
Potions of magical powers
0003EB0D - Potion of Magical Powers
0003EB0E - Potion of Magical Powers
0003EB0F - Drink of magical powers
0003EB10 - Potion of magical powers
000FFA00 - Elixir of Magical Powers
Power potions
0003EB02 - Potion of Strength
0003EB05 - Potion of Strength
0003EB03 - Drink of Power
0003EB04 - Potion of Strength
000FF9FE - Elixir of Strength
Potions Pt. 6
To get the required item, the IDs of which are below, you must use the cheat code in the following form: player.additem [amount] (without brackets)
Example: player.additem 00039B4A 10 - Get 10 Fire Resistance Potions
Fire Resistance Potions
00039B4A - Fire Resistance Potion
0003EAE9 - Potion of Fire Resistance
00039B4B - Potion of fire resistance
0003EAEF - Elixir of Fire Resistance
Cold Resistance Potions
00039B8A - Potion of resistance to cold
0003EAED - Potion of Cold Resistance
00039BDF - Potion of resistance to cold
0003EAF0 - Elixir of Cold Resistance
Shock Resistance Potions
00039BE1 - Potion of Electricity Resistance
0003EAEE - Potion of Electricity Resistance
00039BE3 - Potion of resistance to electricity
0003EAF1 - Elixir of Resistance to Electricity
Regeneration potions
0003EB09 - Regeneration Potion
0003EB0A - Potion of Regeneration
0003EB0B - Drink of regeneration
0003EB0C - Potion of Regeneration
000FF9FF - Elixir of Regeneration
Frost aversion potions
00065A6C - Weak frost aversion
00073F4D - Frost aversion
00073F4E - Strong frost aversion
00073F4F - Pernicious Frost Aversion
00073F50 - Deadly Frost Aversion
Potions of fire aversion
00065A6B - Weak fire aversion
00073F49 - Aversion to Fire
00073F4A - Strong aversion to fire
00073F4B - Pernicious Fire Aversion
00073F4C - Deadly Fire Aversion
Potions of Dislike of Electricity
00073F52 - Weak aversion to electricity
00065A6D - Rejection of electricity
00073F53 - Strong aversion to electricity
00073F54 - Detrimental Aversion to Electricity
00073F55 - Deadly Rejection of Electricity
Fatigue Poisons
00073F8B - Weak Poison of Fatigue
00073F8C - Poison of Fatigue
00073F8D - Poisonous Fatigue Poison
00073F8E - Noxious Fatigue Poison
Poisons
0003A5A4 - Weak Poison
00073F31 - Poison
00073F32 - Strong Poison
00073F33 - Virulent poison
00073F34 - Deadly Poison
Building materials
In the Hearthfire add-on in construction, you need materials.
To add straw 10 pcs. you must enter:
player.additem 03005a68 10
where 03005a68 10 - 03 because Hearthfire is the third in the download queue in the launcher. If the cheat code does not work, enter the first numbers 04. Or 02, or 01 instead of XX (if the add-on is loaded 4th, 2nd or first).
Found / purchased materials
Glass - XX 005a69
Sawed log - XX 00300e
Straw - XX 005a68
Leather Strips - 000800E4
Crafted items
Door hinge - XX 003011
Iron parts - XX 003035
Lock - XX 003012
Nails - XX 00300f
Livestock
Wolf Hide - 0003ad74
Bear Skin - 0003ad52
Deer Skin - 0003ad90
Sabretooth Hide - 0003ad6d
Snow Sabertooth Hide - 0003ad6e
Goat Skin - 0003ad8e
Killer Fish Scale - 0003AD70
Mud Crab Claw - 0006BC00
Horker's Fang - 0003AD68
Saber Tooth Fang - 0006BC04
Large Horns - 0006BC0A
Goat horns - XX 00303F
Stones and ores
Refined Moonstone - 0005AD9F
Mercury Ore Ingot - 0005ADA0
Iron Ingot - 0005ACE4
Corundum Bar - 0005AD93
Quarry stone - XX 00306c
Clay - XX 003043
Great Stone of Souls - 0002E4FC, 0002E4FF
Miscellaneous
Baby doll - XX 00c1de
Wooden sword - XX 004d91
Amulet of Akatosh - 000C8911
Julianos Amulet - 000c8917
Amulet of Dibella - 000C8915
Zenitar's Amulet - 000878BB
Amulet of Kynareth - 000C8919
Amulet of Stendarr - 000CC844
Amulet of Talos - 000CC846
Arkay's Amulet - 000CC848
Amulet of Mary - 000c891b
Treasure chests
Each of the chests contains all the items of its class. For example, a staff chest contains ALL staves, and an ingredient chest contains ALL ingredients. To get these treasure chests use the following cheat codes for Skyrim: player.placeatme (no brackets)
Example: player.placeatme 000C2CDE - get a chest with all staves
000C2CDF - Enchanted Weapon
000C2CD7 - enchanted armor, jewelry, clothes for mage and robber
000C2CE0 - standard weapon
000C2CD6 - standard armor
000C2CDE - staves
000C2CD8 - armor and jewelry, clothes for mage and robber
0010D9FF - Skill Books
000C2CD9 - Spellbooks
000C2D3B - regular books
000C2CD4 - arrows
000C2CDA - ingredients
000C2CDB - keys
000C2CE1 - Spell Scrolls
000C2CE2 - potions, elixirs and tinctures
Notes: After opening some chests (with enchanted weapons and armor) Skyrim freezes for 30-60 seconds. (depending on the power of your CPU). Wait a while and everything will be fine. If, after opening a chest with an enchanted weapon / armor, instead of any one item, press [r] (take all), then the duration of the suspension will be reduced several times. Chests contain all the things of their class - there are a lot of things. Each chest contains only 1 copy of each item. If you want to make a lot of such items (ingredients), find out its item ID (read how to do it below) and create the required number of these things using the player.additem ID number cheat
Dragon Priest Masks
To get the required item, the IDs of which are below, you must use the cheat code in the following form: player.additem [amount] (without brackets)
Some IDs have signs XX what it is and how to get this item, see the section "What is XX in ID items"
Example: player.additem 00061CCA 1 - Get 1 Wooden Mask
List of masks:
Wooden Mask - 00061CCA
Wolsung - 00061CAB
Morokei - 00061C8B
Waucoon - 00061CC9
Krosis - 00061CB9
Otar - 00061CC2
Hevnorak - 00061CС1
Ragot - 00061CC0
Nakrin - 00061CA5
Konarik - 00061CD6
In Dragonborn:
Mirak - This mask belongs to the character of the same name, a former dragon priest. You can get it only after completing the quest "At the top of the Apocrypha" by taking Mirak from the body.
Zakrisosh - XX 024037
Dukan - XX 0240FF
Azidal - XX 0240FE
Passing quests
To complete quests in Skyrim, we need the following cheat codes:
showquesttargets - Shows the ID of the active quest
getstage (without brackets) - shows the stage of the specified quest (the received number is not% complete)
setstage [stage] (no brackets) - set the stage of execution
movetoqt (no brackets) - teleport to key point(last unfinished stage) of the specified task
sqs (without brackets) - show a list of all stages of the active quest (they are different for each quest). Used in the setstage cheat
resetquest (without brackets) - reset all stages of the quest, after which you can go through it again. In order for this quest to be removed from the "Quest Log", you must save and load the game
player.completequest (without brackets) - complete the quest. It is not recommended to use this command, as you will not be able to get the next quest if it is a quest chain. Use only if you want to complete the quest without the possibility of further passing.
Quest items
Skeleton Key - 0003A070
Gem Flask - 00044E67
Precious Cup - 00044E6C
Precious Jug - 00044E6E
Gem Pendant - 00023DF8
Precious Candlestick - 00044E6A
Golden Ship Model - 00044E8B
Golden Urn - 00044E63
Mercer's Plans - 00037CE9
Crown of Barenziah - 0009DFF5
Items that can be sold to Delvin:
Bust of the Gray Fox - 00019954
Honning Honey Decanter - 00019952
Falmer's Left Eye - 0001994F
Bee Figurine - 00019958
Dwemer Puzzle - 0005598C
Nautical chart Eastern Empire Company - 00060CC2
Ship model - 0006F266
Dragon claws:
Diamond Claw - 000AB375
Iron Claw - 0008CDFA
Golden Claw - 00039647
Emerald Dragon Claw - 000ED417
Coral Dragon Claw - 000B634C
Bone Dragon Claw - 000AB7BB
Sapphire Dragon Claw - 000663D7
Glass Claw - 0007C260
Ruby Dragon Claw - 0004B56C
Ebony Claw - 0005AF48
Ingredients:
Jazby Grape - 0006AC4A
Frying Root - 0001BCBC
Berit's Ashes - 000705B7
Scarlet Root Nirn - 000B701A
Heather Heart - 0003AD61
Nirn Root - 00059B86
Fire Salt - 0003AD5E
Nightshade - 0002F44C
Crushed Mammoth Tusk - 0006BC10
Poison Bell - 000516C8
Non-melting snow - 0002С25С
Food:
Argonian Ale - 0009380D
Jessica's Wine - 000F257E
Colovian Brandy - 00036D53
Fire Wine Crate - 0003EC95
Stone of Barenziah
Player.moveto
You cannot get the stone using RefID, but you can move to where it should be using the console command player.moveto
1) RefID 2) Place where to look 3) Detailed description of the place
0007FB5D Ansilvund Northeast of Shore Stone, Burial Halls zone, on a table between sarcophagi.
0007F908 College of Winterhold Lies on a shelf in the Archmage's chambers. The chambers become available after the quest "In the Depths of Saarthal".
0007F95D Dragon's Reach In one of the rooms of the Jarl's quarters. Lies on the bedside table.
0007F956 Hall of the Dead Whiterun Catacombs Zone. On one of the burial boxes at the end of the hall.
0007F923 Jorrvaskr Residential Area. Kodlak's chambers Whitemane.
0007F965 Shattered Shield Clan House The house is located in Windhelm.
0007F962 Royal Palace in Windhelm Top floor. Wunfert the Unliving Room. Associated quest "Blood in the Snow".
0007FB54 Smoking Cave Next to the corpse of a necromancer. Prior to patch 1.4, this stone was in the Thalmor embassy.
0007FB4A Ingvild Throne Room, the room behind Arondil's throne.
Associated quest "Games with the Dead" (Thieves Guild).
0007FB58 Fellglow Keep In the room with the alchemy lab and the pentagram of souls. Related quest "Library Books" (College of Winterhold).
0007F909 Dwemer Museum The museum is located in the Understone Fortress in Markarth. The stone lies behind a golden lattice door, on the table. Related quest "Difficult Answers" (Thieves Guild).
0007F925 Treasury in Markarth In Tonar's bedroom, on the curbstone to the right of the bed. Associated quest "Conspiracy of the Outcasts".
0007FB64 Rannveig Abode On a table in a cage room.
0007FB65 Stone Stream Cave Next to the alchemy laboratory.
0007FB63 Hob's Cave To the left of the alchemy lab.
0007F927 Picky Sload On the table next to the captain's chest. Associated quest "Picky Sload" (Thieves Guild).
0007FB51 Divided Gorge Northwest of Falkreath. The stone lies on the table in front of the Wall of Words.
0007FB55 Mistvale Fortress in Riften Jarl's quarters. The stone lies on the curbstone to the left of the bed.
0007FB56 Black Heather Residence Not far from Riften. The stone is on the top floor, on the bedside table in the room. Associated quest "Gave your word - keep".
0007F926 Blue Palace in Solitude In the Jarl's quarters.
0007FB3A High Spire Manor Located in Solitude. One of the purchased houses for the main character. Stone in the room by the bed.
The Elder Scrolls V: Skyrim (no add-ons or custom mods) has XX equal to 00. The most common DLC numbers are:
DLC The Elder Scrolls V: Dawnguard - 02
DLC The Elder Scrolls V: Hearthfire - 03
DLC The Elder Scrolls V: Dragonborn - 04
Cheating, in particular the use of skill codes on Skyrim, is often criticized. At the same time, it is not considered shameful to turn gaming flaws to your advantage. Few players have never attacked the unrequited Ralof or Hadvor on their way from Helgen.
Probably, only a few did not take free shooting lessons from the trusting Fendal, and Talos himself ordered to practice fighting skills on Shadow Mane.
Quickly pumping a character using codes is, in principle, no different from the listed actions. This way of developing skills will take less time and save the keyboard and mouse from premature wear.
Skill boosting codes for Skyrim
The "player.setav" cheat is used to increase the real value of the skill, to which the base value is added, multiplied by the percentage specified by the player. Introduction formula:
player.setav [X] [Y]
Instead of "X", the English name of the skill is put, and "Y" means the number of percent by which the skill will increase. For example, you can increase the skill of using a two-handed weapon like this:
player.setav TwoHandedPowerMod 50
Shooting (MarksmanPowerMod), blocking (BlockPowerMod) and one-handed weapons (OneHandedPowerMod) are pumped in the same way.
All skill enhancement codes:
- OneHandedPowerMod - one-handed weapon
- TwoHandedPowerMod - two-handed weapon
- MarksmanPowerMod - bows
- BlockPowerMod - shield
- SmithingPowerMod - blacksmithing
- HeavyArmorPowerMod - heavy armor
- LightArmorPowerMod - light armor
- PickPocketPowerMod - pickpocketing
- LockpickingPowerMod - Hack
- SneakPowerMod - stealth
- AlchemyPowerMod - alchemy
- SpeechcraftPowerMod - Speech
- AlterationPowerMod - change
- ConjurationPowerMod - witchcraft
- DestructionPowerMod - destruction
- IllusionPowerMod - illusion
- RestorationPowerMod - recovery
- EnchantingPowerMod - enchanting
Skyrim codes for skill points
Using some cheats, you can quickly develop the skills of Dovahkiin and open all the necessary perks.
advskill [X] [Y] - increases skill X by Y experience points. This is the main code used to level up the character.
An example of use for Enchanting:
advskill Enchanting 100 - Adds 100 points to Enchanting (but not levels).
player.setav [X] [Y] - sets Y level to skill X. Does not affect experience points.
Example use for Illusion:
player.setav Illusion 50 - Dragonborn gets level 50 Illusion.
Instructions for full pumping:
To develop all the skills on Skyrim, the codes for the levels and experience will have to be applied sequentially.
1. Raise the skill with the advskill command.
2. Reset the level with the player.setav command.
3. Spend the gained experience points to purchase all the necessary perks.
4. Repeat steps for other skills.
Example for light armor:
advskill LightArmor 999999
player.setav LightArmor 0
All codes for pumping skills:
- Alchemy - alchemy
- Alteration - change
- Conjuration - witchcraft
- Destruction - destruction
- Enchanting - enchanting
- Illusion - illusion
- Restoration - restoration
- Marksman - shooting
- Block - block
- HeavyArmor - heavy armor
- LightArmor - light armor
- Lockpicking - hack
- Onehanded - one-handed weapon
- Twohanded - two-handed weapon
- Pickpocket - pickpocketing
- Smithing - blacksmithing
- Sneak - stealth
- Speechcraft - eloquence
Instructions for fast pumping:
Of course, entering a lot of commands, albeit of the same type, is tedious. The necessary cheats will need to be kept at hand, printed, rewritten, and even memorized. It is much easier to create or download a ready-made file containing required codes for Skyrim skill points.
Procedure:
Download archive;
Extract two text files to the root of the game;
Launch Skyrim;
Having opened the console, sequentially enter "bat allskills" and "bat allperks".
The first cheat will increase all skills to the maximum, the second will open the perks available in the game.
Adjustment of character characteristics:
The player.setav command can additionally be used to increase / decrease the amount of mana, health and powers of Dovahkiin. Use the parameters Health, Magicka and Stamina instead of the names of the skills, plus a number indicating the maximum value of a particular stat.
An example of use for magic:
player.setav Magicka 500
Additionally:
Using skill point codes on Skyrim will inevitably level up your character. Thus, the advantages gained will turn out to be meaningless - after all, opponents will also become stronger. To lower the Dovahkiin's level, use the simple code "player.setlevel X", where X means, in fact, the number of the required level.
As you know, skills are an important element of the Skyrim game, because every time a player increases a skill level, he gets a new level of his hero. Usually it is not so easy to get a new level, but our recommendations can help you to carry out pumping of the protagonist, spending much less time.
First, decide which character you ultimately want to see. By increasing the level of higher skills, you will receive more points, which will constantly increase the level of the same skills.
The most convenient method for choosing skills is to decide what kind of hero you want to make. For example, mages use spells in battles, they often develop the skills of Destruction, Restoration, Change, Charm, Illusion and Conjuration.
Thieves, on the other hand, feel better when attacking suddenly, therefore it is beneficial for them to pump the skills of Stealth, Pickpocketing, Speech, Hacking, Light Armor and Alchemy.
Warriors fight using brute force, hence the skills of Block, Heavy Armor, Shooting, One-handed weapons, Two-handed weapons and Blacksmithing will be useful to them.
To increase the level of skills, it is worth using them more often. With a simple elimination of enemies, you will not gain experience, while the use of skills provides the necessary increase in the level of the hero.
The essence is simple - here is the Hacking skill, for example - in order to pump it, you need to break locks accordingly more often. To pump Alchemy, create potions as often as possible. To improve the skills of battles (the same skills of One-handed weapons, Two-handed weapons, Shooting and Destruction), the player will have to engage in battle with opponents, using the correct weapons and spells against them.
As other skills are pumped, the player gets the opportunity to increase the level of his hero, but it is important to pay special attention to the basic skills, then the level will rise faster.
An important element in the development of the protagonist is the Guardian Stone, it needs to be consistent with the chosen style of play. You will find such stones in the southwest of Riverwood, but there are others.
They are scattered over the most different parts of the game world and provide bonuses that make it possible to increase the level of skills significantly faster, which, as you already understood, leads to a faster increase in the level of your hero.
The stone must be chosen wisely - for example, for thieves it is the Stone of the Thief, for the magicians - the Stone of the Mage, for the warriors - the Stone of the Warrior, respectively. And so on.
The level of secondary skills will also not be superfluous to pump. Some of them may easily not be the main ones, but at the same time they can be effective for increasing the level of your hero.
As examples, you can cite the warriors who have pumped the Charm skill - get at your disposal the magical damage caused by your weapon.
Or you can remember magicians who, having pumped the Alchemy skill, become able to make potions to restore their mana.
But thieves sometimes will not be superfluous to pump the skill of one-handed weapons so that their sudden attacks inflict noticeably more damage on the enemy.
Among other things, some NPCs can teach you something - and many of them will do it for free. Aim to level up as soon as possible - try to get an extra five skill points for each level.
It is also useful to talk to as many characters as possible, very often this is useful in one way or another. And many of them give skill points if you complete the tasks assigned to them.
It is most advisable to increase the skills of professions in big cities. This will give you more value given the ability to sell what you do.
The main parameter of the character, showing his experience and strength. The level grows by increasing various skills (to get a new level - you need to go to the skills menu). For increasing the level, one point of abilities (perks) is given and the opportunity to increase health, magic or stamina by 10 units. Increasing the stamina also increases the maximum carrying capacity by 5.
In Skyrim, there is no direct relationship, for example, 10 skill increases = 1 level, and although the exact formula has not yet been found, the relationship is as follows:
- The higher the level of the skill, the more it adds to the scale of level growth with increasing this skill.
- The higher the level, the more increases in various skills are required.
For example, having a 70th level, an increase in underdeveloped skills will ate-ate move the level progress bar, while an increase in highly developed skills (for example, from 99 to 100) will significantly increase the progress of level growth.
Maximum level
Level restrictions are not embedded in the physics of the game (perhaps this was done in view of future additions, and possibly to avoid bugs).
But, having pumped all skills to 100, you will only get 81 level (and 80 ability points, respectively).
Is it possible, having level 81, to collect large fines for crimes, then go to jail, lower skills, and then pump them again, and raise the level - it is not known (but in the near future I will definitely try and write).
In any case, with various trainers and cheats, the level 100, 150 and 200 is taken easily.
Health
The amount of health determines how much damage a character can suffer before dying. When health is at its maximum, it is not displayed on the screen. And only in the case when it is not equal to 100% - it is displayed at the bottom of the screen with a red stripe.
You can increase your health:
- By enchanting (items: armor, shield, amulet, ring);
- With a potion for 60 seconds (Ingredients: Bearded Moss, Blue Mountain Blossom, Bear Claws, Giant's Finger, Wheat, Glowing Mushroom);
- With the help of Arkay's Blessing, + 25 units for 8 hours (gives the Shrine of Arkay);
Health regeneration
If health is below the maximum value, it regenerates in real time.
Out of combat, health regenerates at 3% per second of the maximum value.
During the battle, 0.49%.
You can increase health regeneration with a potion for 60 seconds (ingredients: namira rot, moon moth wing, sea acorn, vampire dust, garlic, juniper berries).
There are no health regeneration enchanting properties.
Disable health regeneration
This is done using the console command (key "~"): player.modav healrate -0.7 *
Magic
Magic is spent on using spells, and its amount determines how long you can use spells in battle, without additional replenishment. The starting 100 units of magic are very lacking, especially for those who have chosen the path of magic, but at high levels of the game, its amount is easily replaced by enchanted items, giving a total of 100% reduction in the consumption of magic of a particular school (i.e., spells will be 0 magic each).
When the amount of magic is at its maximum, it is not displayed on the screen. When magic is less than the maximum value, its amount is displayed in a blue scale at the bottom left of the screen.
You can increase magic:
- When you get a new level by 10 units;
- By enchanting
- With a potion for 60 seconds (ingredients: heather heart, jazby grapes, red mountain flower, cotton grass, void salts, histcarp, ectoplasm);
- With the help of the guardian stone Atronach (+50 to magic, 50% absorption of spells, restoration of magic is slowed down by 50%);
- With the Blessing of Julianos, + 25 points for 8 hours (gives the shrine of Julianos);
Regeneration of magic
If the magic is below the maximum value, it regenerates in real time.
Out of combat, magic regenerates 3% per second, from the maximum value.
During the battle, 0.99%.
You can increase the regeneration of magic:
- With a potion for 60 seconds (Ingredients: Jazby Grape, Dwemer Oil, Moon Sugar, Fire Salts, Salt, Taproot, Garlic);
- By enchanting (items: helmet, armor, ring);
Also, all magical robes have the ability to increase the regeneration of magic.
Disable magic regeneration.
It is done using the console command ("~" key): player.modav magickarate -100 *
Power reserve
The reserve of forces is an important tactical resource, which is spent on running (moving with Alt held down) and on power attacks. Increasing the reserve of strength with increasing level also increases the maximum carried weight by 5. But enchanting items for a bonus to endurance does not increase the carried weight.
When the reserve of forces is full, it is not displayed on the screen. Otherwise, the power reserve is displayed by a green bar, at the bottom right of the screen.
You can increase the reserve of strength:
- When you get a new level by 10 units;
- With a potion for 60 seconds (Ingredients: Large Horns, Killer Fish Caviar, Lavender, Firefly Thorax, Garlic, Corus Egg);
- By enchanting (items: armor, boots, amulet, ring);
- With the help of the Blessing of Kynareth, + 25 units for 8 hours (gives the sanctuary of Kynareth);
Regeneration of stamina
If the power reserve is below the maximum value, it regenerates in real time.
Outside of combat, the reserve of forces is regenerated at 5% per second of its maximum value.
During the battle, 1.75%.
You can increase the regeneration of the reserve of strength:
- With the help of a potion for 60 seconds (ingredients: tapinella pestilence, fly agaric, bee, scales);
- By enchanting (items: gloves, boots, amulet);
The weight
Weight determines how much cargo your character can carry without penalties. The base value is 300. In case of exceeding the tolerated weight, you will not be able to run and make fast movements on the map.
A funny trick: if, having a load of 295/300, you can “hold in your hands” (point at an object and hold “E”), for example, an ax with a weight of 20, you can move freely without a penalty. And if you take it into your inventory, then there will be an overweight with corresponding penalties.
You can increase weight:
- When you get a new level (by increasing the reserve of strength, you will also receive +5 to the maximum carried weight);
- With a potion for 60 seconds (ingredients: fighting fish, hawk beak, giant's finger, shroud of haze, creeping vine, scales);
- By enchanting (items: boots);
Important: enchanting items with a bonus to stamina does not add to the carry weight.
Solving overweight problems
Almost all players are faced with the problem of overweight, when it seems that there is nothing superfluous, but still the weight is extremely lacking. Most go straight ahead - they are pumping the reserve of strength, but this path is not the best - nevertheless, pumping health or magic is more useful. So how do you get out of the situation with an advantage?
- At first, the Horse Stone will help, which gives an increase of +100 to the weight;
- Give heavy items to allies and partners;
- Buy a house, and put unnecessary items in it (ingredients, potions - which at first glance do not weigh anything, in total they can give a significant load);
- If you are wearing heavy armor, learn the "Stubborn training" ability (requires 70 skill), and the equipped armor will not weigh anything;
- If you are wearing light armor, learn the ability “Second skin” (requires 50 skill), and the light armor equipped will not weigh anything;
- Learn the ability "Patch Pockets" in the pickpockets tree (not expensively pumped from teachers), which will give a permanent +100 weight gain.
As a result, without investing a single point in the reserve of strength, you can have 400 transferred weight, and the armor you wear will not weigh anything.
Armor class
Armor class is the sum of the "Armor" indicators of all the armor that you are wearing. The armor class reduces the physical damage taken by the character.
- By wearing light armor, you get a lower armor class, but you can move freely, run, and hide better.
- Having put on heavy armor, you will receive a higher class of armor, but also a penalty to the speed of running, attack (penalties can be removed by learning the "Stubborn training" ability in the heavy armor branch). Heavy armor makes more noise during movement, which makes it harder to hide in them.
You can upgrade your armor class:
- Wearing higher quality armor;
- By improving the armor on the anvil (read more: blacksmithing);
- With a potion for 60 seconds (ingredients for light armor: moon moth wing, honeycomb, hawk feathers, bee's nest, malevolent tail; ingredients for heavy armor: whitefish, thistle branch, ice ghost teeth, saber tooth, killer fish scales);
- By enchanting (items: armor, gloves, amulet, ring);
- With the help of abilities (light armor: "Dexterity in defense" - 5 levels of 20% increase in armor and "Full set" giving a 25% increase when wearing a full set of light armor; heavy armor: "Juggernaut" - 5 levels of 20% increase and "Full set" giving a 25% increase when wearing a full set of heavy armor).
Damage
The damage parameter affects how much damage you inflict on the enemy with a weapon strike. The higher the value, the more damage you do. But the damage is not equal to the damage dealt. At the moment, we do not know the formulas by which the final damage to the enemy is calculated.
The minimum damage is for daggers, and the maximum is for two-handed hammers.
Damage is divided into 3 types:
- One-handed weapon damage
- Two-handed weapon damage
- Shooting Damage
Damage of one type or another is influenced by various properties, skills and abilities. Let's consider them in more detail.
The damage of one-handed weapons can be increased:
- By increasing the skill one-handed weapon;
- Due to the ability "Strong hand" (5 levels, the sum of which gives a 100% increase in damage);
- By enchanting
- With a potion for 60 seconds (ingredients: bearded moss, small pearl, bear claws, hawk feathers, dog root, origma egg);
The damage of two-handed weapons can be increased:
- By increasing the skill two-handed weapon;
- Due to the ability "Barbarian" (5 levels, the sum of which gives a 100% increase in damage);
- By enchanting (items: gloves, boots, amulet, ring);
- Using a potion for 60 seconds (ingredients: troll fat, fly agaric, dragon tongue);
Shooting damage can be increased:
For now, the game only has bows, but there will probably be new types of ranged weapons in the future.
- By increasing the skill of shooting;
- Due to the ability "Excessive tension" (5 levels, the sum of which gives a 100% increase in damage);
- By enchanting (items: helmet, gloves, amulet, ring);
- With a potion for 60 seconds (Ingredients: Spider Egg, Dog Root, Elven Ear, Juniper Berries).
P.S.
* Commands for disabling health and magic regeneration work correctly only at the first level. When used at other levels, the regeneration, although slowing down, may remain.
Spell damage and elemental resistances will be discussed separately.
If you have something to add to the page, or you know any formulas on the topic - write in the comments.
The Elder Scrolls V: Skyrim is the fifth installment in the epic RPG saga The Elder Scrolls. The new game features an expansive, detailed fantasy world that you can explore at your leisure. As in the rest of the games in the series, Skyrim allows you to choose your options for the passage of the game. You can be a warrior, magician, thief, or all three at the same time; you can be kind, evil, or neither; ignore the main quests and just go about random treasure collection. All these features (as well as many others) have become available due to the fact that Skyrim contains such unlimited possibilities, which only can be in a computer game.
When a game developer (Bethesda Game Studios) claims that game content takes literally hundreds of hours, that's no exaggeration. The length of the gameplay depends on how curious and adventurous you feel. In terms of graphics, the world and its inhabitants look even more realistic and alive than ever before. The completeness of the picture is complemented by a wonderful musical accompaniment, written by the same composer who wrote the music for Morrowind and Oblivion. This makes an already outstanding game even richer.
The purpose of this guide is to enable you to better understand and put into practice all of the configuration options available in Skyrim, as well as familiarize yourself with special advanced settings to enhance your gaming experience.
- Processor: 2 GHz dual core CPU (Quad Core CPU)
- RAM: 2GB (4GB) RAM
- Hard Drive: At least 6GB of free space
- Video card: DirectX 9 compatible (GeForce GTX 550 Ti or GeForce GTX 260 or higher)
- Sound Card: DirectX Compatible
- Internet connection: required to access Steam
- Operating system: Windows XP, Vista or Windows 7
In this guide, you will find complete descriptions for all the settings found in the various game options menu. To compare the influence of a certain setting on the quality of the game picture, we have provided this material with game screenshots that clearly illustrate the action "before" and "after" the application of a certain effect. For each setting, detailed information is provided about the effects and possibilities that it achieves. Also keep in mind that the level of influence of a particular option specifically on your system depends on the configuration of the latter, as well as on other game settings and general system settings. Here we have tried to provide as much information as possible so that you can make an informed choice (which settings to enable and which not) that provides the optimal balance of image quality and performance.
General system optimization
Before proceeding to the settings inside the game, make sure how correctly you have installed Windows itself and the drivers. Because because of incorrect settings operating system and drivers have a lot of performance issues. In particular, slowdown, freezing or complete "throwing" from the game can be caused precisely by the internal settings of Windows and some old or misconfigured drivers. Use our dedicated guide to setting up your PC specifically for gaming, or at least make sure your graphics drivers are updated to the latest version available.
performance measurement
To assess the success of any innovation, you will need something that can objectively measure gaming performance in FPS (Frames Per Second). The most in a simple way to make such measurements is to use the FRAPS utility. Download, install and run this program even before launching the game itself. You will see a yellow FPS counter in the corner of your screen. Keep an eye on its readings throughout the game, especially during graphics-intensive scenes: massive battles over large areas, especially around cities. If, at the same time, your FPS level drops more than twice or to the level of single-digit numbers (0-9), then this is a sure sign that you need to adjust some settings so that the minimum FPS level does not fall below 25. Then you will be provided constant support of the optimal level of frame rate.
Remember that in Skyrim, vertical sync (VSync) is enabled by default and cannot be disabled via in-game settings. This means that your frame rate will be limited by the refresh rate level of the screen, which is usually 60 FPS. Mouse lags are also possible. Some of the ways to deal with the default preset vertical sync will be covered in the Advanced Settings section of this guide.
General Settings
Before diving into the various graphics settings that have the most significant impact on performance and image quality, let's take a look at the other settings. To get into the game settings, you need to launch Skyrim, load a saved one, or start new game... After that press the ESC key and select the "Settings" menu item.
Graphics options will be covered later, but for now let's take a closer look at gameplay, display and audio settings.
Gameplay
Invert Y: if there is a cross in front of this option, then when moving the mouse forward, your character will look down, and moving the mouse backward will make him raise his head and look up. If this option is not checked, then the character reacts to the movement of the mouse in a forward order: forward - up and back - down.
Look Sensitivity: This slider determines the level of sensitivity of the mouse: the higher the level of the slider, the more sensitive the mouse becomes to your movements. But remember: if the mouse "lags" even after you set this indicator to the maximum, you need to check the frame rate. If its value is constantly at the level of 20-25 FPS, then you need to adjust the settings so as to improve the FPS level. Only then will the mouse's response return to normal. In the Advanced Settings section of this guide, we'll go over some advanced settings to help mitigate mouse lag.
Vibration: if you have a gamepad capable of transmitting vibration and you are using it in Skyrim, then check this option to enable vibration transmission during the game. Otherwise, leave the window blank.
360 Controller: This option must be enabled if you play Skyrim with an Xbox 360 joystick. If the aforementioned joystick is connected to your computer, but you do not want to use it to play Skyrim, make sure this option is disabled and / or disconnect controller, otherwise it could cause hardware conflicts.
Difficulty: There are five difficulty levels in the game. They are named Novice (beginner), Apprentice (apprentice), Adept (expert), Expert (expert), and Master (master) in order from simplest to most difficult. The higher the difficulty level, the more difficult it is to go through the battles: in order to kill the enemy, he will need to inflict more damage. However, unlike Oblivion, the level of enemies in the Skyrim game world will not automatically "pull up" to match your current level. Often battles will take place with both frankly weak and very strong enemy units. Moreover, the difficulty level can be changed at any time and the changes will take effect immediately.
Show Floating Markers: In your Journal you can define, by pressing Enter or clicking the left mouse button on the names of the respective quests, which ones to make active. A small mark will appear above each active quest in the journal. In turn, on the compass at the top of the screen, such a quest will be highlighted with an arrow. If this option is active, then a smaller version of such an arrow will also float above the corresponding character (object, terrain) from the quest when he is nearby. Deactivating this option removes floating marks, but does not affect the display of other quest marks.
Save on Rest: If selected, whenever you sleep (Sleep), an autosave (state at the point in time before falling asleep) will be created.
Save on Wait: the same as the previous one. An autosave will be created every time until the "Wait" option is selected.
Save on Travel: similar to the previous one. The game will automatically save all the time you use the Fast Travel option. Save moment: before starting a journey to a new place.
Save on Character Menu: If this option is active, then it can be used to determine the amount of time (in minutes) that must elapse before creating an autosave after you enter the Character Menu (by default - the TAB key).
Created using one of the four options above, Auto Save files are different from Quick Save files and other manually created “saves” and are not overwritten. However, the total number of simultaneously existing Auto Save files is limited to three, so more recent "auto saves" will replace the previously created ones. Four different auto-save options are designed to make it easy to create auto-saves on a regular basis. So that in case you forget to save manually or using a quick save, you have at least one more or less fresh and good point to resume the game. If you frequently use Quick Save or Manual Save, then you do not need to activate these four options.
Display
Brightness: This slider adjusts the overall brightness of the game. Install it according to your preference. The position of the slider in the middle corresponds to the default brightness level.
HUD Opacity: allows you to set the transparency for the main elements of the Heads Up Display (HUD): the scale of the compass, crosshair, health levels, magic and stamina (stamina). The further to the left you move the slider, the more transparent these elements become, until they become completely invisible at the leftmost point of the slider. If the constant presence of the HUD seems intrusive or distracting to you, then you can reduce the transparency level of its elements, leaving them visible, but less expressive.
Actor Fade, Item Fade, Object Fade, Grass Fade, Light Fade, Specularity Fade: All of these metrics have an impact on performance and image quality and will be discussed in the relevant sections of this guide.
Crosshair: if you check this box, a round "front sight" of the sight will appear in the center of the game screen. If you uncheck the box, the sight will disappear. However, even if you turn off the scope display, an eye symbol will still be displayed in the middle of the screen while sneaking, indicating the level of “reveal”.
Dialogue Subtitles: When this option is selected, subtitles are displayed for the spoken responses of the characters with whom you are entering a dialogue. However, anything they say besides the direct conversation with you will not be displayed using subtitles.
General Subtitles: This option determines whether the words spoken by the characters of the game outside of dialogues with you will be shown in the form of subtitles.
The difference between the last two settings can be illustrated with the following example: if you walk past the characters in the game and they mumble something indistinct, or when you fight them, their words will be shown as subtitles when the 'General Subtitles' option is enabled. ... If you are talking with a specific character and the dialog interface is open, then all the answers of the interlocutor will be duplicated with subtitles only when ‘Dialogue Subtitles’ is selected. If both options are active, then the text will repeat all spoken words.
Sound (Audio)
Master: This is the master control for the overall volume of all sounds in the game.
Effects, Footsteps, Voice & Music: These sliders adjust the volume level of the corresponding game elements.
Many aspects of the gameplay, interface and audio can be customized later (during the gameplay). This will be discussed in more detail in the Advanced Settings section of this manual. Now it's time to look at the various graphics related settings.
Video Settings
Full range graphic settings is available in the Options menu, which can be invoked whenever you launch a game from the Steam game server. In this section, we'll take a closer look at each of the graphics settings and see how they affect performance and picture quality.

We start the performance graph for each of the settings from the "basic level", where for all options high detail preset is selected, and VSync is disabled (how to disable it - in the "Advanced Settings" ). From this baseline, we varied specific settings to measure the effect they had on performance and image quality.
The parameters of the system on which we tested the game:
- GeForce GTX 560 1GB
- Intel Core i7 940
- 3GB RAM
- Win7 64-bit
- NVIDIA 285.79 Beta Drivers
- Resolution & Antialiasing
This chapter covers some of the common video settings found in the main Options window, accessible after Skyrim Launcher is launched.
Graphics Adapter: Shows your graphics card (GPU) here. Check that it is correctly defined. If not, see the General System Optimization section of this manual. You can also read the beginning of the Advanced Settings section to learn how to reset all settings to their default values.
Aspect Ratio: This option determines the ratio of the height to width of your monitor and affects which of the options are available to you in the Resolution setting. To avoid image distortion, choose the aspect ratio that matches your monitor. Most modern displays are 16: 9 or 16:10, older models are 4: 3. The correct aspect ratio should be set automatically, but if you are not sure, then do a simple test: make sure that the round objects in the game (for example, shields) look really round. If such objects are flattened or stretched (have the shape of an ellipse), then the proportions are set incorrectly.
Resolution: This defines the resolution of the game image, expressed in the number of pixels horizontally and vertically (for example, 1920 × 1080 pixels). The number of resolution options is limited by the following parameters: the capabilities of your video card and monitor; is there a check mark next to ‘Show all resolutions’; the 'Aspect Ratio' settings discussed above. The higher the resolution level you select, the more detailed the image will be on the monitor screen. Do not forget that too high a resolution can provoke and increase the load on the system (in particular on the video card), as a result of which the overall level of gaming performance will decrease. For a clearer image on LCD-monitors, you need to select the highest possible resolution level (the so-called "native" resolution of the monitor). In the same case, when you choose a resolution lower than the maximum possible, put a tick next to the ‘Windowed Mode’ box, the value of which will be discussed further in the text.
The graph shows the changes in the FPS value depending on the changes in the resolution settings:

The graph shows that the FPS value is inversely proportional to the resolution level: the better the image, the lower the performance. But in our game, FPS is not decreasing on such a large scale as in others. The thing is that in Skyrim the load level of the central processing unit (CPU) is forcibly limited. This means that if your processor is a little weak, but you have a powerful video card, then changing the resolution will not have any noticeable effect on the overall system performance.
Windowed Mode: if you want to launch Skyrim in a separate window on the Desktop (so that the game does not occupy the entire screen, hiding other applications and Windows elements), then check this item. Running the game in this mode is the best solution if you need to reduce the resolution of the game screen to improve performance while maintaining the clarity of the image. However, this can cause problems with memory allocation in the system, so if you observe some kind of instability, then it is better to return to full screen mode.
Antialiasing: Antialiasing (AA) method is available for use in Skyrim in four variations: Off, 2 Samples, 4 Samples, and 8 Samples. This corresponds to 0, 2, 4 and 8 times Multi-Sample Anti-Aliasing (MSAA). The higher the level of anti-aliasing, the less jagged the outlines of various objects in the game world will be. But the higher the potential level of FPS loss.


In the pictures above, notice the roof of the building and the wooden fence just behind playable character... When anti-aliasing is not applied, the outlines of these objects have a pronounced "jagged" effect. When the AA level is set to “2 Samples,” the roughness is already largely smoothed out. At 4 Samples, the lines are almost perfectly straight. All the charm from the choice of the "8 Samples" level with the naked eye is quite difficult to evaluate, at least in these static screenshots.
Regardless of the level of anti-aliasing we choose, some aspects of the game will still appear somewhat uneven, especially foliage. This can be corrected by using the FXAA filter (more on this later in the text), or by forcing Transparency Antialiasing, which is discussed in detail in the Video Driver Settings section of this manual.
The level of performance impact of changing this parameter is shown below:

Anti-aliasing can have a significant impact on FPS, but much depends on the resolution you choose. As you can see in the graph, using 8x MSAA overall has a significant impact on performance, resulting in only a marginal improvement in image quality. By and large, if you want to use anti-aliasing, then the most optimal options are two or four times MSAA. But if you need to increase your FPS, then MSAA is the first thing to disable. FXAA can also be considered as an alternative way to smooth images, but we'll talk about it later. Note also that 8x MSAA caused artifacts at 2560 × 1600, so we did not measure performance with this combination of parameters.
Anisotropic Filtering
Anisotropic Filtering: Anisotropic Filtering (AF) is a texture enhancement technique designed to improve image clarity on surfaces that are angled to the viewer. Similar textures are visible in the pictures below when looking at the road that opens in front of us. Here, anisotropic filtering is turned off at first, and then its magnification is increased from two to sixteen times. The higher the AF ratio used, the clearer and more distinguishable the road surface becomes, moving away into perspective.


In these game screenshots, you can see how the picture quality changes when a certain AF level is applied. This effect is most noticeable on the main path of wood blocks and on the parallel road of stone: with increasing AF, they become clearer. Already with an anisotropic filtering factor of 2, the overall improvement in detail looks significant, and when using 4x AF, the clarity of textures at medium distances is noticeably higher than before applying the filter. With a factor of 8, the most distant surfaces become clearer, and 12 and 16 make only subtle improvements in comparison with the previous level.
If you want to improve the quality of textures even more using anisotropic filtering, then this indicator can be forcibly activated through the control panel of the video card. In this case, the image quality will be much sharper compared to applying AF directly through the game's graphics settings interface. This issue will be discussed in more detail in the "Video driver settings" section of this manual.
Performance versus changes in AF scores is shown below:
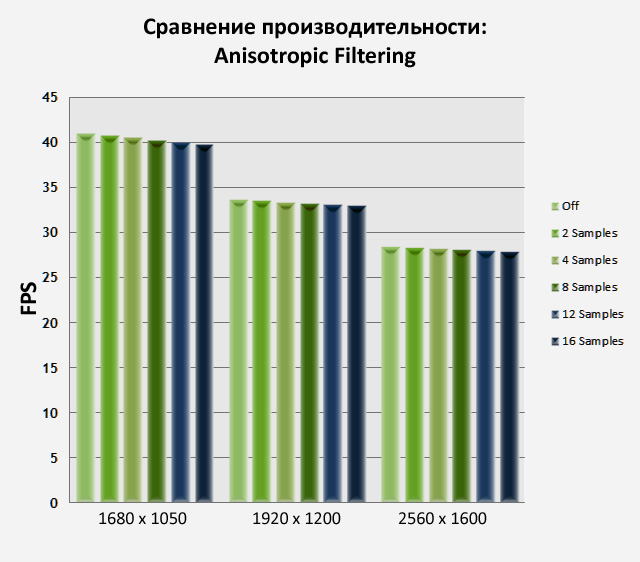
Anisotropic filtering has very little effect on the performance of modern graphics cards. Basically, level 8 AF is the optimal choice, while level 16 AF should be chosen for those who want the best image clarity with little loss in performance. If you have an outdated video card or you have to literally "rip out" every FPS unit with your teeth, then 2 AF is quite enough to feel a noticeable improvement in the quality of textures compared to the complete absence of such a filter.
Detail Presets
Detail: In the game, you have four main auto-settings for the graphics quality level: Low, Medium, High and Ultra. Each preset affects a wide range of settings, as well as the effects of Antialiasing and Anisotropic filters. In general, such a composition has a significant effect of improving performance and image quality. Nevertheless, do not forget that all the installations were made for you and are supplied as a ready-made kit. Therefore, using presets is not the option when you need to customize the graphics in Skyrim exactly for yourself with pinpoint accuracy.


The figures above show the differences between the capabilities of each of the presets:
- at a low level (Low) the image looks generally acceptable, but the details of the game world are frankly sparse. The textures are very blurry even though the Texture Quality is set to "Medium", which is not the lowest possible value. Grasses and foliage are almost invisible, objects seem unusual for the game world, the shadows are very short: therefore, everything that is already behind the character does not cast shadows at all. In the water, except for the sky, nothing else is reflected. Also, Antialiasing and Texture Filtering are not applied, which appears in jagged edges and blurring distant images.
- at Medium, Texture Quality is set to the highest. However, this does not significantly affect the level of clarity of the overall picture due to the parallel activated FXAA and 4x Multisample Antialiasing. The latter filters are used to reduce the jaggedness of the textures. Increasing shadows, trees and other details in the distance add more depth to the overall picture. The water already reflects not only the sky, but also the main elements of the terrain, which looks more realistic.
- at the High level, subjects look significantly clearer because FXAA, 8X Multisample Antialiasing and 8X Anisotropic are active at the same time. Together, these filters improve picture quality while minimizing blur. Grass and leaves look much more believable, as do nearby objects. Sheds, tree stumps, stones and a bridge stand out for their realism on the right, and the surface of the ground (both near and far) acquires sharper contours. The shadow from the character is much clearer (because its resolution has been increased), the rest of the shadows have increased to normal length. Water already reflects everything, not just the sky.
- at the Ultra level, noticeable differences are visible on distant objects. Most of the objects on the right began to cast shadows, the number of trees on the top of the mountain increased, and the mountains themselves became more detailed. The surface of the water has undergone minor changes, becoming more similar to the color tones of the sky. By increasing the Anisotropic filtering level to 16, distant textures are also noticeably clearer.
The dependence of the performance level on changes in the detail settings is shown below:

The graph shows how significantly performance can change depending on different detail settings. The transition from Medium to High turns out to be very significant at low resolutions, reducing the frame rate by almost half. But in any case, the set of settings for each of the presets is far from ideal. We advise you to start with the detail setting that works best for your system (without overloading it), and then tweak each filter individually for the optimal balance of performance and gaming picture quality.
In the next section, we begin a detailed look at all of the graphical settings that are available by clicking the Advanced button in the Skyrim Options window.
Texture & Radial Blur Quality
Texture Quality: Textures (in general) are images that cover the surfaces of all objects in the game world, giving their appearance an effect of depth and detail. This setting adjusts the level of detail for textures and has options for Low, Medium, and High. As they change from low to high, the visual depth and detail of the structures increases, improving the overall perception of the picture.


In the screenshots above, you can see how the use of one degree or another of this effect affects the image quality. At the Low level, surfaces and objects are very poorly detailed. This is done primarily to ensure that the game runs even on the weakest system configurations. On Medium, the overall picture already looks much more detailed: the leaves become more distinguishable, the bark on the trees is more realistic, and the road is structured and deep. The rocky hill, seen in the distance to the right, also acquires pronounced detail. When using High, the difference with the previous level is also quite noticeable: the bark and leaves become even clearer, the road becomes clearer, and the rocks (regardless of distance) are "overgrown" with new details.
Try to use anisotropic filtering (AF, discussed earlier in the tutorial) in order to improve the clarity of the textures. Also keep in mind that FXAA settings (discussed later) tend to blur the overall picture slightly and can therefore reduce the clarity and clarity of textures. Therefore, if very crisp textures are important to you, FXAA should not be used.
The effect of this metric on the performance level is shown below:

As you can see from the graph, this setting has a very moderate impact on the FPS level. However, the graph cannot show that if your video card has a small amount of RAM (Video RAM; VRAM), then you may experience slight "slowdown" or periodic "lags" when using the High level. The minimum level we recommend is Medium, as on Low the details are still too blurry to be enjoyable.
Radial Blur Quality: This setting adjusts the visibility of the Blur effect, which is most often seen when you want to simulate disorientation and pain if you miss hits in battle. It's called "Radial" because the shake and blur appear to radiate outward in circles from the center of the screen. There are three options (levels) available for this effect: Low, Medium, and High. As practice shows, there is no significant difference between these three levels.


Comparative shots of screenshots were intended to demonstrate the difference in applying each of the levels of this setting, but seeing it is quite problematic due to the fact that this is a dynamic effect in itself. And despite the fact that in the screenshots the Medium and High levels look more "shaky" than the Low, but during a dynamic gameplay the overall degree of "jitter" for each level looks about the same. With this setting, you won't be able to turn off the effect completely (if you don't like it). For more information on how to do this, see the "Advanced Settings" section of this guide.
The performance dependence of changing this setting is shown below:

The graph confirms that changing the Radial Blur Quality parameter does not have a noticeable effect on game performance (mainly due to the fact that changing the levels of the parameter itself does not greatly affect the visual image).
Number of decals and details of shadows (Shadow Detail & Decal Quantity)
Shadow Detail: This parameter determines the overall resolution of most shadows cast by players, objects and buildings in Skyrim, as well as the length of those shadows. There are four levels available: Low, Medium, High and Ultra.


In the pictures above, you can see that at the Low level, the hero and the tree near him cast fuzzy shadows due to the choice of their low resolution in order to maintain game performance. At the Medium level, the contours of the shadows become more visible. When using High, they get even more detailed outlines, although some blurring still remains. Additional shading becomes noticeable at medium distances. At the Ultra level, there is a subtle improvement in the appearance of the shadows, and they also appear on rocks and a canopy located in the distance.
Due to the specific nature of the game shadows, their quality will differ markedly depending on the distance and light source. For example, a shadow cast by an indoor subject from a nearby fire will have smooth edges and appear more detailed. And the shadows from objects that are farther from the fire will remain "square". By the way, we noticed a small game "glitch" (not only in this game moment) and can be seen in the pictures above: after the shadow detail level changes from High to Ultra, additional leaves appear on the far-away trees.
There are several ways to add and customize shadows using the set of commands described in the Advanced Settings section. You can also add beauty to the game atmosphere by rendering the shadows even deeper using the preset Ambient Occlusion. To learn more about this, see the section "Video driver settings".
How the game performance changes depending on the change in the shadow detail setting can be seen in this figure:

The graph demonstrates the significant effect of shadow detail level on FPS. This is not surprising since shadows are widely used throughout the game world. In practice, the effect of this parameter on FPS can be even more significant in some game episodes, so use it sparingly so as not to hurt performance and get rid of lags in some specific episodes. For example, simply switching from Ultra to High can dramatically increase FPS without any loss in image quality.
Decal Quantity: This parameter determines the number of decals that can be seen at the same time. As a rule, decals are small images that are additionally applied to characters, objects and the surrounding area. These can be bits of dirt, blood, or charred marks. The options are None, Medium, High, and Ultra. However, it seems that in Skyrim this option does not affect blood splatter in any way, because even with the option turned off, your weapons, enemies and the screen (on the back side) still remain bloodied in order during the battle.


The main differences when varying the different levels of this setting were seen in the appearance of a large number of black charred spots on the ground after using destructive spells. They are not present when the Decal Quantity parameter is not enabled at all; at the Medium level, there are already a lot of them; switching to High and Ultra levels does not noticeably increase the number of decals that appear on the screen at the same time. Despite the fact that in practice it is rather difficult to count the number of decals that appear in most scenes, the theoretical values for the maximum number of these additional images are as follows: None - 0, Medium - 100, High - 250 and Ultra - 1000.
The performance dependence on changing this parameter is presented below:

The graph shows that this setting has very little effect on the performance of the game, although it can slightly "load" the system in massive battles, when spells are used and many decals are generated (like blood, soot, etc.). Since in most cases high levels of adjustment do not drastically change the look, we recommend setting this to Medium for an optimal balance of performance and picture quality.
FXAA and reflections in water (FXAA & Water)
FXAA: NVIDIA's FXAA (Fast Approximate Anti-Aliasing) filter is a jagged edge alignment technique that has proven to be very powerful and moderately effective. There are four options to choose from: Off, Low, Medium, and High. FXAA can be used in place of or in conjunction with the standard game Antialiasing filter discussed earlier in this tutorial.


The screenshots above show the basic combinations of the various anti-aliasing filters available in Skyrim. In the first pair of images, the standard Antialiasing was not used at all, only the FXAA effect is visible. When this filter is turned on, the total number of jagged lines becomes much less, such as the outline of the top of a bridge in the distance, bushes and trees, the outline of a horse and rider on it. However, this filter also blurs the overall picture a little, making it a little hazy and reducing the definition of textures, as seen in the example of the wooden planks of the bridge in the foreground. In the third image, FXAA is already off, and 8x standard anti-aliasing (8xAA) is turned on instead. When comparing the third image with the first and the second (where only FXAA was used), it can be seen that the 8x AA level eliminates the "jagging" on most objects without blurring them like FXAA. The overall picture itself looks much clearer, but it is worth noting that 8x AA does not smooth foliage. And the last one is the image where FXAA and 8x AA are included together. It looks extremely smooth. Be that as it may, the overall picture is still not as blurred as with the effect of only FXAA, and the fog is more noticeable.
The performance impact of changing the metrics of this filter is shown below:

FXAA remains true to its reputation as a moderately efficient filter, with minimal impact on FPS at various resolutions. This makes it an indispensable assistant for those players who are looking for a sparing resource and a fairly effective line smoothing tool instead of the more intensive and resource-consuming Antialiasing filter option available in the game menu. On the other hand, if the blurriness from FXAA worries you, but you still want to achieve anti-aliasing of the foliage, you can activate Transparency Antialiasing, which we will discuss in more detail in the section "Video Driver Settings".
Water: There are four options for the reflection that appears on the surface of the water: Reflect Land, Reflect Trees, Reflect Objects, and Reflect Sky. If desired, you can turn off all reflections by unchecking the corresponding boxes (Reflect None), or vice versa, enable them all together (Reflect All). Depending on the selected reflection option, the color and realism of the water in the game will change.


The screenshots above compare the main options for water reflections. Note the water around nearby ruins and water far enough away. When all reflections are off, the water looks fairly flat, pale blue in color. When Reflect Land is on, the general contours of the landscape are visible in the water. By activating Reflect Trees, you can clearly see the reflections of trees in the water. In the screenshot with Reflect Objects enabled, you can see that rocks and more detailed elements are already visible in the water earth surface... Reflect Sky affects the appearance of the water surface, giving it realistic highlights and changing color. When all these options are selected together, in comparison with the Reflect None screenshot, the Reflect All image clearly shows the depth and realism of the picture achieved thanks to the various reflected elements.
The dependence of performance on changing the parameters of the reflection options is shown below:

This graph shows that when the reflection options are enabled individually, they do not have any measurable effect on gaming performance. However, when they are all turned on together, there will be a small jump in frame rates. Considering how noticeably these options can improve the realism and depth of bodies reflected in the water, it is generally advisable to leave them on. At least not if you are not fighting for every FPS unit during the presence of large water surfaces in the game scenes.
Objects and characters in sight (Object & Actor Fade)
There are a number of settings on the View Distance tab of the Advanced Options window. They determine the distance between you and an object (character, object), necessary for this object (character, object) to come into your field of vision (or disappear from it). It is important that the effect of getting / disappearing from the field of view, obtained with various combinations of the options described below, directly depends on whether you are approaching a specific object (character, object) or moving away from it. For example, if you approach a rock with the lowest Object Fade level set, then this rock will appear instantly in front of your eyes, just a few steps away. But when you move away from her, you will need to overcome twice the distance in order for her to disappear from view again.
Object Fade: This slider determines the distance at which secondary game objects, such as fences, stones, paths, and others, become visible. When this setting is at the minimum level, some objects in the distance will not be visible and will only appear in the field of view when you start getting closer to them. The distance at which they begin to appear is determined by the position of the slider: the more to the left it is, the closer you will need to be to the object in order for it to appear in front of your eyes.


The images above show the effects of the slider in the Minimum, 1, Medium, 8, and Maximum, 15 positions. Moving from Minimum to Medium, a number of additional objects become visible, including some new rocks in the middle of the screen, a path to the left in the distance, as well as many dry branches, rocks and small boulders throughout the landscape. At the Maximum level, the main changes concern the increase in detail of small bushes and stone protrusions, respectively, in the far left and far to the right of the center of the screen.
The effect of this setting on game performance is shown below:

The graph shows that as the Object Fade level increases, FPS starts to decrease, but this is not the main thing. The main reason why this setting should not be underestimated too much (preferably leaving it at Medium - 7 or 8) is so that you do not miss interesting objects and objects standing nearby during your wanderings around the game world.
Actor Fade: This slider adjusts the distance at which characters and creatures can be seen. Similar to Object Fade: the lower you move the slider, the closer you need to be in order for these creatures to become visible to you.


The screenshots show the slider positions corresponding to the levels "minimum" (Minimum, 2), "average" (Medium, 8) and "maximum" (Maximum, 15). There are four different people and a chicken in the situation. At the minimum level of Actor Fade, none of this is visible. On average, an elderly woman and a chicken in the middle of the screen are already visible, while the other three people are still not visible. When switching to maximum at the end of the path, two adults and a small boy are now visible, although they are quite difficult to distinguish.
The dependence of performance on changes in this indicator can be seen below:
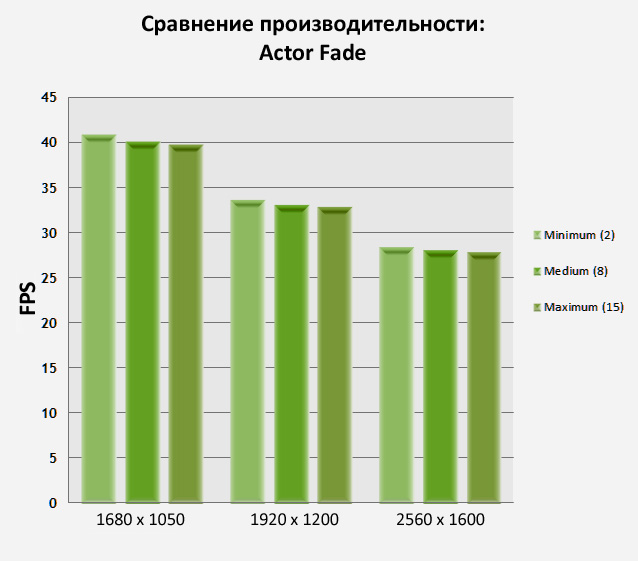
The graph shows a slight drop in FPS with increasing Actor Fade metrics. The battles and interaction of the main character with other characters is one of the key ideas of Skyrim, so we strongly recommend not to underestimate this indicator, unless there is an urgent need to "pull" FPS. Alternatively, using the Minimum level will cause you to literally collide head-ons with other characters or creatures that suddenly appear right in front of your nose.
Grass & Specularity Fade
Grass Fade: This slider controls the amount of grass and small shrubs that appear in the respective game locations (forest, meadow, etc.). The lower the level of this parameter is set, the less vegetation is visible on the surface of the earth.


The images clearly show the difference between the three positions of the slider: "minimum" (Minimum, 0), "average" (Medium, 3) and "maximum" (Maximum, 7). At the Minimum level, the ground in front of us is everywhere without grass. Rare spots of grass are visible only in the immediate foreground, and several lonely fern bushes are visible in the distance. When using the medium level, the amount of small vegetation increases markedly: grass and small grassy bushes cover almost the entire road, up to about the middle of the field of view. At the Maximum level, the entire field (even at a fairly large distance) is densely covered with grass. But still, in the farthest corners, small "bald" pieces can be seen.
The performance dependence on the settings of this parameter is discussed below:

The graph shows that the Grass Fade parameter has an impact on game performance, but in many cases it is insignificant. And since grass is not the most important thing in the game (and sometimes it can even obscure some objects and territories), it will be appropriate to lower this parameter within reasonable limits if you need additional performance in outdoor scenes.
Specularity Fade: This slider is designed to adjust the brightness (glitter) level of many objects in the game world. However, in practice, its influence is almost in no way manifested.


The available levels for this setting range from the minimum (Minimum, 2) to the maximum (Maximum, 15). In additional settings, you can also select the "ultra" level, then the Maximum value will become 20. Be that as it may, and the screenshots above make it clear that there is absolutely no difference between the minimum (2) and maximum (20) effects of this setting. And this despite the fact that the room is full of shiny and shimmery surfaces. Barely visible changes are visible only in the thickness of the smoke rising from the torches.
How this setting affects game performance is shown below:

The graph confirms that "out of nothing and there will be nothing": since this setting does not produce visible visual effects, it almost does not affect performance in any way. This is a great reason to set it to a minimum in order to win an extra couple of FPS units without feeling this on the quality of the game picture.
The appearance of heat from fire and small objects (Light & Item Fade)
Light Fade: This slider adjusts the distance from which fire from various sources (bonfires, torches, etc.) becomes more clearly visible. In practice, this effect establishes the realism of the heat emanating from the fire and the rarefied air in its immediate vicinity. The effect is best seen indoors.


The images show different levels of this effect: Minimum (2), Medium (18) and Maximum (35). Upon closer examination, subtle changes are hardly distinguishable, and during the gameplay they are not visible at all. If you take a closer look at these pictures, you can see that the fire on the torch on the right has become more distinct, and in the brazier, in addition, the rarefied air rising up from the flame is clearly visible. The overall picture in the room becomes a little brighter.
The effect of this effect on game performance is depicted below:

The graph shows that the Light Fade effect has negligible impact on the performance level. Since this effect affects the game picture in about the same way, it can be safely minimized if it is necessary to increase the FPS level. As much as possible, it would be wise to turn it on when the action takes place in dark dungeons, in order to make them a little lighter.
Item Fade: This visual parameter sets the distance from which small objects (weapons, armor, potion bubbles, scrolls, etc.) fall into your field of view. The lower the level of the slider, the closer you need to be near the object so that it becomes visible to you.


In the game episode, captured in the pictures above, we see a large number of various objects, densely scattered along the entire length of the road, on the bridge and near a small shack standing in the distance. When the minimum level (Minimum, 1) is set, only nearby objects are visible: a few mushrooms, a book, a scroll and a couple of bottles of potion. At an average level (Medium, 8), absolutely all objects become visible, including barely distinguishable weapons, scrolls and shields in front of the barn. At the Maximum level, there are no cardinal changes with the previous image: all / p objects are just as clearly visible and just as poorly distinguishable. But the ambiguity of the outlines is rather due to their microscopic size at such a decent distance.
The performance dependence of the Item Fade parameter can be illustrated below:

The graph shows that this parameter leads to a noticeable, albeit insignificant, jump in the FPS level, especially at its higher levels. For gaming purposes, we strongly recommend that you do not lower the value of this parameter below the average level. If you set it to a minimum, then you will simply lose sight of very important and useful items while exploring the game world just because you will not notice them.
Object Detail
Distant Object Detail: This setting adjusts the level of detail for distant game objects. As a rule, these are hills and mountains: they surround almost any game landscape. The available levels are Low, Medium, High and Ultra. The lower the level you choose, the less detail will appear in the distance. It should be noted, though, that this setting influences more realism and game atmosphere than gameplay.


The screenshots above show the changes that each LOD change brings to the distant landscape. Pay special attention to the mountains in the distance. At Low they are mostly naked, angular and devoid of any vegetation. At the intermediate level, they are already beginning to gradually fill with content, taking on shadows, shape and detailed surface. At the High level, the main innovation is the trees at the foot of the mountains. When Ultra is selected, trees fill the entire mountain surface, making it more believable. An important point is that this setting does not affect human buildings in any way (as can be seen from the building on the far right).
How this setting affects gaming performance is shown below:

The obvious consequence of a cursory analysis of the graph is that as the level of this effect increases, performance decreases. This is especially noticeable when using the Ultra detail level. Since this setting has no effect on gameplay, you can easily drop it down to High or Medium to win extra performance in large open areas.
Object Detail Fade: The purpose of this effect is to provide additional options for adjusting the subtle details of objects in the game world. When enabled, non-essential details will be hidden to provide improved gaming performance. But if you like higher detail images, then you should uncheck the box next to this option.


At first, it is difficult to find any differences between the two images. If you look more closely, it becomes noticeable that ivy disappears on the mountain slope in the distance to the left and in the center when the effect is turned on. A small patch of moss and a stone in the far right also disappear. In other words, the effect does not make any tangible changes, changing only very minor details.
How this effect alters gaming performance can be seen below:

The graph illustrates a slight increase in FPS when this effect is enabled. It makes sense to use it if you need to score multiple FPS points. Especially considering that it has almost no effect on the game picture, removing objects, the loss of which is not immediately easy to notice.
Afterword
For those players who are used to spending time plunging into the exploration of numerous quests and secrets, Skyrim provides a world of almost endless game possibilities. Try to avoid the temptation to rush through the game, and have an unforgettable enjoyment of sharp and detailed gameplay.
In terms of general gaming performance, it is advisable to play in Skyrim with a good video card and processor in order to achieve a consistently high frame rate when using maximum settings. Sometimes the game can be limited by the level of load that it has on the central processor, so sometimes "braking" will be simply inevitable, especially on weak system configurations. On the other hand, such an enforced limitation on the use of CPU resources gives advantages to owners of powerful video cards: they can significantly increase the level of visual effects without any loss of FPS. However, certain new graphical settings that are available in Skyrim (primarily Shadow Detail settings are very resource intensive. Shadows, along with anti-aliasing, are the first two settings that should be limited to avoid overloading weak systems. The rest is mostly a matter of taste for each player.Of course, if you like to experiment, then the possibilities of advanced settings allow you to more accurately set the compromise line on which performance and quality of the game image are constantly balanced.
If, after reading this guide, you still have questions and difficulties with the game settings, need some gameplay tips, or just want to know more about the upcoming patches and new downloadable content (DLC) for Skyrim, you are welcome to the official Skyrim forum. ...